If you have ever caught your own face in the corner of a Zoom window and winced, you are not imagining things. Learning how to look better on video calls is not vanity — it is one of the fastest ways to feel less drained, present more confidently, and stop fixating on your self-view. The good news: most of the difference comes from a handful of cheap, repeatable adjustments to light, angle, and resolution. The rest comes from a single real-time tool that polishes whatever the hardware can't.
This guide walks through the fundamentals in the order that actually matters, then shows where a real-time filter fits in — and where the built-in platform options stop short.
1.Why how you look on camera actually matters
Before the tips, the case for caring. The research on video-call fatigue is surprisingly direct about appearance.
People who are unhappy with their on-camera appearance are more likely to experience Zoom fatigue, driven by the "self-focused attention" created by the self-view window. Roughly 13.8% of women versus 5.5% of men report feeling "very" to "extremely" fatigued after video calls. (Source: studyfinds.org)
That gap is not trivial — staring at your own face, all day, taxes you. The same body of work found that turning off self-view reduced cognitive load and fatigue (Scientific Reports, 2025).
57% of workers aged 25–34 report video-call exhaustion, and 49% say on-camera meetings are more tiring than audio-only calls. (Source: speakwiseapp.com)
So when you make yourself look better — and crucially, feel comfortable with how you look — you are also directly reducing the self-focused anxiety that makes calls exhausting. Looking better is a wellness lever, not just a cosmetic one.
2.Step 1: Fix your lighting first (it does the most)
If you change one thing, change your light. A webcam's tiny sensor amplifies everything bad about dim, mixed, or backlit rooms — noise, muddy skin tone, raccoon shadows under the eyes.
The rule from Stanford Medicine's own video-visit guidance is simple: put your main light source in front of you, not behind you.
Position lighting in front of your face rather than behind, and avoid sitting with a bright window at your back, which throws your face into silhouette. (Source: med.stanford.edu)
Practical setup:
- Face a window during the day. North-facing windows give the softest, most flattering light.
- At night, use a ring light or a lamp with a diffuser at roughly eye level, slightly to one side for gentle dimension.
- Kill the backlight. A bright window or lamp behind you forces the camera to expose for the background and underexpose you.
- Aim for soft, even light. Two medium sources beat one harsh spotlight.
The reason lighting comes first is sequencing: good front light reduces the need for heavy software smoothing later. As iPhone Life puts it, get the light right before you reach for any beautify slider.
Add front lighting before you increase smoothing — software smoothing applied to a poorly lit face looks plasticky, while smoothing on a well-lit face looks natural. (Source: iphonelife.com)
3.Step 2: Get the camera to eye level
Webcam height is the most common unforced error. A laptop sitting on a desk points its camera up your nose — the classic "looking down at you" angle that flattens chins and exaggerates foreheads.
Both Stanford and iPhone Life recommend the same fix:
Position the camera at or slightly above eye level. (Sources: med.stanford.edu, iphonelife.com)
How to get there:
- Raise the laptop on a stand, a stack of books, or a shelf until the lens hits your eyeline.
- If you use an external webcam, clip it to the top of your monitor, not below it.
- Sit far enough back that you're framed from mid-chest up, with a little headroom above your hair — not a cropped close-up of your forehead.
- Look at the lens when you speak, not your own thumbnail, to create the impression of eye contact.
4.Step 3: Use a real 1080p camera
Resolution is the quiet differentiator. Many built-in laptop webcams still ship at 720p, and that softness reads as "lower effort" even if the viewer can't name why.
Use a 1080p (or higher) webcam — the jump from a 720p built-in camera to a dedicated 1080p webcam is one of the most visible upgrades you can make. (Source: iphonelife.com)
A 1080p external webcam costs less than a dinner out and gives the processing pipeline more detail to work with. Higher resolution also means filters and background separation have cleaner edges to operate on. If a new camera isn't in the budget right now, prioritize Steps 1 and 2 — light and angle move the needle more than pixels alone.
Resolution also interacts with everything else in this guide. A sharper, cleaner image gives a beauty filter and background separation more accurate edges to work with, so smoothing lands where you want it and a blurred or replaced background doesn't chew into your hair or shoulders. In other words, the camera upgrade quietly makes every later step look better too.
5.Step 4: Choose a background that builds trust
Your background is not just clutter management — it shapes how competent and trustworthy you appear. A 2023 Durham University study tested how viewers rated faces against different video backgrounds.
Video backgrounds featuring plants or bookshelves were rated highest for trustworthiness and competence, while blurred and novelty backgrounds scored lower. (Source: scienceofpeople.com)
Translation: a tidy shelf or a real plant in frame beats a blank wall, and both beat a chaotic room. If your real background can't cooperate, a clean background blur or a tasteful replacement is the next best thing. The goal is "considered and calm," not "I'm broadcasting from a spaceship."
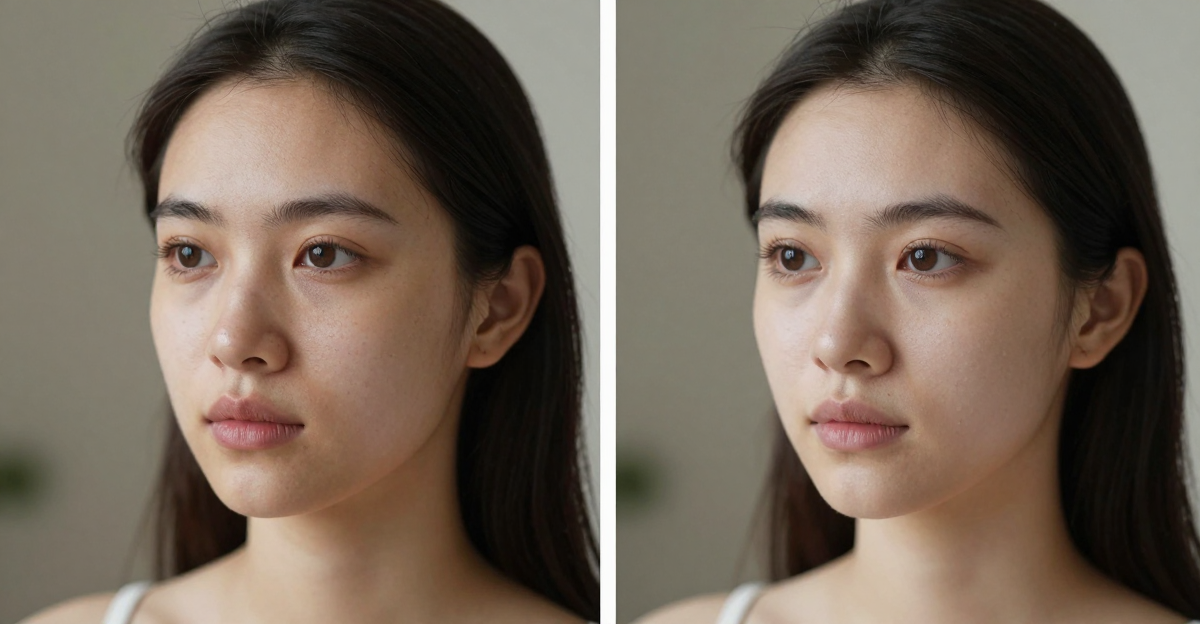
6.Step 5: Add a real-time filter — the right way
Once light, angle, resolution, and background are handled, a real-time beauty filter closes the gap between "fine" and "polished." This is where it's worth understanding what the platforms give you for free — and where they stop.
6.1What the built-in platform filters actually do
The built-ins are better than people assume, and it's worth being accurate:
| Platform | Built-in appearance tools | What's missing |
|---|---|---|
| Microsoft Teams | "Touch Up My Appearance" smoothing + a Maybelline Beauty app (powered by Modiface, ~12 looks, maps 70+ facial points) (pcworld.com, techcommunity.microsoft.com) | No hair recolour or face reshaping; only in Teams |
| Zoom | "Touch Up My Appearance" skin smoothing plus studio effects (eyebrows, lip colour, filters) (support.zoom.com) | Tied to Zoom; no reshaping |
| Google Meet | Background effects/blur and limited appearance touch-up | Minimal beauty control |
| Webex | Limited touch-up / lighting adjustment | No deep beauty or reshape tools |
| Whereby / Discord (web) | Background blur; Discord has no built-in beauty/skin filter | No skin smoothing or makeup |
So the platforms each solve a slice of the problem — inside their own app. The catch is consistency. Touch up your skin in Zoom, then jump to a Teams call, and you're starting from scratch with different controls and a different look.
It's also worth remembering the old workaround is gone. Snap Camera, the desktop app many people used for cross-platform filters, was discontinued on January 25, 2023 (Source: help.snapchat.com). It also required a separate desktop install plus a virtual camera — exactly the friction most people don't want.
6.2Where GlowCam fits
GlowCam by Imagera AI is a Chrome (Chromium) browser extension that applies real-time beautification to your webcam across Google Meet, Zoom web, Microsoft Teams, Cisco Webex, Whereby, and Discord web — one consistent look everywhere, instead of relearning each platform's menu.
The differentiator over every built-in is twofold: it's one cross-platform tool, and it does things the built-ins simply don't:
- Skin: smoothing, blemish and pimple cleanup, even tone, glow, warmth, brightness, fair/lighten, and under-eye brightening.
- Makeup: lipstick, blush, teeth whitening, and eye brightening that track your face as you move.
- Hair (PRO): recolour while keeping natural shine and individual strands.
- Reshape (PRO): subtle face slim, nose slim, jaw/chin V-line, lip plump, and eye enlarge.
- Background: blur, replace, brighten, custom colour, and presets — useful if your real shelf-with-plant isn't an option.
- Looks: Natural, Meeting, and Polished presets, plus the ability to save your own. A master on/off switch restores your raw feed instantly.
Crucially, it's 100% on-device, running on WebGL plus MediaPipe. Your webcam feed is never uploaded, transmitted, or stored, and it doesn't need a discrete GPU or heavy neural upscaling — it runs on ordinary laptops. You can read exactly how that works on the privacy page.
Honest note: Google Meet is the platform we've fully end-to-end tested. The other supported apps use the same on-device technique, but your mileage may vary slightly by platform.
If your main app is Zoom or Teams, you can compare directly: see the Zoom beauty filter walkthrough, or — if you miss the discontinued desktop tool — the Snap Camera alternative breakdown.
7.A 5-minute pre-call checklist
- Light in front, not behind — face a window or a lamp at eye level.
- Camera at eye level — raise the laptop; frame mid-chest up with headroom.
- Use 1080p if you have it; clean the lens.
- Background: plant or bookshelf if possible; otherwise a clean blur.
- Filter last: start with a Natural preset, dial smoothing only as far as it stays believable.
There's also a habit worth building once the gear is sorted: glance at your framing for two seconds before you join, not after the call has started. A quick check that the light is in front, the lens is at eye level, and you're framed mid-chest up takes less time than muting and unmuting, and it spares you the mid-meeting fidgeting that everyone on the call can see. Treat it like checking a mirror before walking out the door.
Do the first four and you've solved most of the problem with hardware and habits. The filter is the finishing touch — not a substitute for good light.
8.The honest trade-offs
A real-time filter is processing, and that has limits. Heavy smoothing on a badly lit face still looks artificial — which is exactly why lighting comes first in this guide. Reshaping should stay subtle; the goal is "well-rested," not "different person." And the master on/off toggle exists for a reason: there are calls (interviews, anything requiring documented identity) where the raw feed is the right call.
Used well, though, the combination is genuinely effective. Better light and angle remove the things that make you look tired; a tasteful filter evens out the rest; and a calm background earns trust before you say a word — all while reducing the self-focused fixation that the research links to call fatigue.
9.Try it on your next call
You've got the fundamentals. To add the real-time polish across whichever app your team uses, start a 7-day free trial of GlowCam — no credit card required (Skin, Makeup, and Background are all free during the trial). After that it's $19.99/month or pay-per-use credits, with Hair colour and Reshape on PRO.