AI Head Swap: How to Swap Heads in Photos is a practical Imagera workflow: start from a real source file, describe what should change, generate with credits shown up front, and review before you publish. This guide covers the steps, quality checks, and when to use related tools.
Swapping a head in a photo used to mean hours in Photoshop — manually masking hair strand by strand, matching skin tones, and re-building lighting from scratch. Today, AI handles all of that automatically. If you have two photos and two minutes, you can produce a clean, realistic head swap online without touching a single layer mask.
This guide explains exactly how to do it using Imagera's AI head swap tool, covers the difference between a head swap and a face swap, and gives you practical tips for getting natural-looking results — especially on photos where hair, angle, or lighting differ between the two shots.
Quick answer: To swap heads in a photo, upload a source and target image to Imagera's head swap tool and let the AI transplant the entire head — hair, ears, and forehead included — onto the new body in under a minute, with the credit cost shown before you confirm.
How does an AI head swap differ from a face swap in 2026?
A face swap replaces only the central face oval, leaving the original hair, ears, and hairline untouched. Imagera's 2026 head swap replaces the full head region, including hair and forehead, then auto-aligns pose and perspective to the target body. That full-head coverage is why photos shot at mismatched angles still blend cleanly with no manual masking.
Can I get a natural, high-resolution head swap online without editing skills?
Yes. Imagera accepts both JPG and PNG uploads and returns a single high-resolution file, so you skip the layer-masking that traditional Photoshop workflows required. The AI matches lighting and skin tone automatically, and results typically finish in about a minute. One photo in, one polished file out — no experience needed.
Head Swap vs. Face Swap: Why It Matters
A face swap replaces only the inner face and keeps the target photo's hair and ears; a head swap moves the whole head, hair included. When each one is the right call, and how to pick the photo whose hair you want, is covered in the guide to head swap with hair vs face swap.
Step-by-Step: How to Swap Heads in a Photo with Imagera
Step 1 — Prepare Your Two Photos
Before you upload, a quick check makes a real difference:
- Resolution: Higher resolution source images give the AI more detail to work with. Anything above 800 × 800 px produces good results; 1200 px or above is ideal.
- Head angle: Results are most natural when both heads face a similar direction (both roughly front-facing, or both in three-quarter profile). Large angle mismatches — one fully front-facing, one in pure profile — will require the AI to estimate perspective that is not visible in either image. If one head faces the wrong way, changing the head angle in a photo can turn it first.
- Lighting direction: If both photos were shot with light coming from the same side, the neck-to-head boundary will blend more cleanly. You can fix moderate mismatches after the swap using Imagera's image editor.
- Background clutter: Complex backgrounds right behind the head (busy foliage, other people) can sometimes confuse the segmentation step. Clean or soft-focus backgrounds work best.
You do not need to crop or mask anything manually — the tool handles segmentation automatically.
Step 2 — Open the Head Swap Tool
Go to the AI head swap tool. You will see two upload slots:
- Source image — the photo containing the head you want to move.
- Target image — the photo whose body you want to keep.
Both JPG and PNG files are accepted.
Step 3 — Upload and Run
Upload both images to their respective slots. The tool previews both photos side by side so you can confirm you have them in the correct positions before processing.
Check the credit cost shown on the run button — it reflects the exact number of credits that will be deducted before you commit. When you are ready, click the button to start the swap.
Processing typically takes under a minute. A progress indicator keeps you updated.
Step 4 — Review and Download
Once complete, the output image loads in the viewer. Inspect it at full size — zoom into the neck join, hairline edge, and ear area to evaluate the blend quality.
If the result looks good, download it directly. If you want to refine specific areas — touch up the neck join, adjust brightness on the incoming head, or clean up any edge fringing — Imagera's image editor is the natural next step and keeps everything in one place.
Full Head Swap with Hair: Getting It Right
Hair is the hardest edge in any head swap: fine strands and flyaways that reach past the original hairline overlap the target photo's background, so plain or blurred backgrounds and similar hair density help most. For choosing the hair photo and fixing a head that looks pasted on, see head swap with hair.
Common Head Swap Scenarios
Creative Photo Composites
Swapping a head is a core technique in composite photography — putting someone's face on a costume character, placing a portrait into a themed setting where a different body pose was captured, or correcting a group photo where one person blinked or looked away. For this use case, the priority is a clean edge blend and matching skin tone warmth.
Headshots with Better Expression
Professional headshots sometimes have one shot where the body posture is perfect but the expression is slightly off, and another where the expression is ideal but the pose is stiff. A head swap lets you combine the best of both frames from the same session. Pair this with Imagera's AI headshot tool if you want to generate a polished professional portrait from scratch as an alternative.
Costume and Character Work
Creators working on fan art, costume portfolios, or themed content regularly need to place their face — or a specific character's look — onto a different body or costume. Because the full head (including hair and accessories worn on the head) transfers as one unit, cosplay-style swaps are particularly clean.
Head Swap vs. Generating a New Image
For some use cases, it is worth asking whether you need a head swap at all, or whether generating a new image would serve you better.
| Situation | Better approach |
|---|---|
| You have two real photos and need to combine them | Head swap |
| You want a custom portrait from a text description | Image generator |
| You want a professional headshot in a specific setting | AI headshot tool |
| You need to edit text or labels on an existing photo | Edit text in image |
| You want to sharpen or enhance an existing head swap result | Smart detail enhancer |
The head swap tool works best when you have real, specific source material you want to combine. If you need more creative freedom or want to start from scratch, the generation tools give you more control over the final look.
Tips for the Most Natural-Looking Results
Match the light direction. Before uploading, look at where shadows fall on the face in your source image, and compare that to the body shot. Shadows falling from the left on the incoming head placed onto a body lit from the right will look inconsistent. If you cannot re-shoot, choose the source image whose lighting most closely matches the target.
Prefer similar skin tones. The AI blends the neck boundary, but if the incoming head's skin tone is noticeably cooler or warmer than the target body's exposed skin (neck, hands, arms), the join will draw attention. A post-swap color adjustment in Imagera's image editor can correct this quickly.
Keep both images at similar scales. Upload both photos at their original resolution rather than one at full size and one heavily compressed. Consistency in source quality helps the model make accurate decisions.
Check at full zoom before downloading. The neck/chin boundary and the hairline edge are the two spots most likely to show a seam. Zoom to 100 percent and examine both before deciding whether to download or try a different source image pair.
Related tools on Imagera
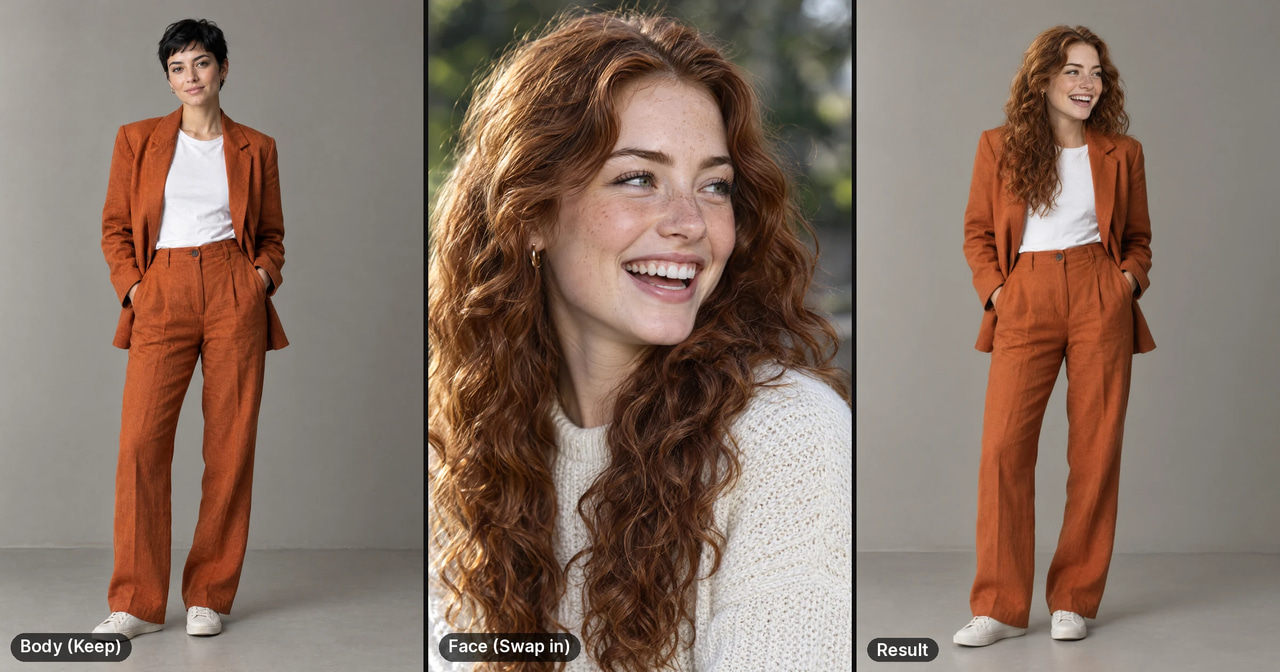
See it in action — real Imagera output
These are real, unedited results from Imagera Head Swap, the exact tool this guide covers.


Ready to Swap?
Head swapping used to require professional retouching skill and significant time. With AI handling the segmentation, alignment, and edge blending automatically, you get a clean, realistic result from Imagera's head swap tool in about a minute — no layer masks, no manual hair cutting, no color-matching by hand.
Open the tool, upload your two photos, and see the result for yourself.