You have a finished image — a product label, a banner, a screenshot, a social graphic — and one word is wrong. Maybe it is a typo. Maybe the product name changed. Maybe you want to localize a sign for a different market. Opening the original design file is not an option, and manually cloning pixels in Photoshop to cover old text before retyping is slow, error-prone work that rarely matches the original font perfectly.
AI image text editors solve this directly. You tell the tool which words to change and what they should say instead, and the model redraws the lettering in the style of the original — font weight, color, perspective and the surface behind it — so the new wording sits in the image instead of on top of it.
This guide walks through how to do that on two Imagera pages: the Photo Text Changer to edit text in image with the same font when only the wording should change, and change text in image when the words, color or font all need to move. It also covers tips for getting the closest font and style match, and answers the most common questions about editing text in images online.
Quick answer: To edit text in an image with AI, upload the photo to Imagera, describe the text change in plain language (for example, "change the sign to read OPEN"), and the AI redraws the lettering with matching font, color, and lighting. Proofread every character before you use the result.
How does AI edit text in an image without ruining the background?
Provide the original image and spell out the exact text you want, including punctuation and capitalization. Ask to preserve the surrounding layout, type style, lighting, and perspective. Imagera shows a credit quote before generation. Inspect every character and the rest of the image afterward, since a generative edit can change details outside the requested text.
Can AI edit text in an image and keep it sharp at 4K or 8K?
Not in one step. A text edit comes back at screen resolution, with a long edge of about 2,000 pixels at most, which is enough for screens and small prints. For a large print file, finish and proofread the text edit first, then run the result through the image upscaler to the size you need. Each step is charged in credits, and the cost is shown before you run it.
Why AI Text Editing in Images Is Different from Manual Methods
Traditional approaches to changing text in a photo involve two steps: erase the old text by painting over it with a clone stamp or content-aware fill, then retype the new text on a new layer and attempt to match the font manually. The problems compound quickly:
- The background under the text is rarely flat, so clone-stamping leaves visible patches
- Font matching is guesswork unless you have the exact font file
- Perspective distortion on signs, labels, or 3D surfaces is nearly impossible to replicate manually
- Curved text on badges, bottles, or logos requires additional warping steps
AI-powered text changers approach the problem differently. The model understands the text region as part of the image context — it knows what the background likely looked like before the text was placed there, and it can regenerate a realistic background while placing your new text with the same apparent rendering style. The result is a coherent image, not a visible patch-and-retype job.
How to Edit Text in an Image Using Imagera
Imagera's Edit Text in Image tool is built specifically for this task. Here is the full process, step by step.
Step 1 — Upload Your Image
Go to the Edit Text in Image tool and upload the image you want to edit. The tool accepts JPEG, PNG, and WebP files. If your source image is low resolution, consider running it through the Imagera Image Upscaler first — editing text in a higher-resolution image gives the AI more detail to work with and produces a cleaner result.
Step 2 — Point to the Text You Want Changed
You do not need to draw a selection. You point to the text in words: quote the exact characters that are there now, or say where they sit ("the large headline at the top", "the price on the bottom label"). For best results:
- Quote the old wording exactly, including capitals and punctuation
- If the image carries several blocks of type, change one block per pass
- If you only need one panel of a large layout, crop the image to that panel before you upload it
Step 3 — Enter Your New Text and Describe the Style
In the prompt or instruction field, write what you want the new text to say. You can also include style guidance — for example, "same bold white font on the red background" or "replace with [new name], keep the gold italic style." The more specific you are about matching the original, the more precisely the AI will follow the target rendering.
If you want to change the font style deliberately — for example, switching from a serif to a sans-serif, or making the text larger — describe that in the instruction too. The tool can handle intentional style changes as well as same-style replacements.
Step 4 — Run the Edit and Review
Click the generate button. The credit cost is shown on the button before you run it, so there are no surprises. The AI re-renders the image with your new wording in place of the old, following the style, scale and perspective of the original lettering.
Review the output at full size. Short, large lettering usually lands in one pass; if a letter drifts or the color is slightly off, run a second pass with a more specific instruction. Because the whole frame is redrawn, fine background detail can shift slightly, so compare it with the original too.
Step 5 — Download and Use
Download the result as PNG or JPG. The file format and the frame shape are both settings you can choose before you generate, so set the shape explicitly if the crop matters, and upscale the result if you need a large print file.
Tips for Matching Font, Color, and Perspective
Getting a precise match on the original text style depends on a few factors.
Be Explicit in Your Instruction
The AI uses your instruction as the primary guide for style. If you write only "change the text to [new word]," it will make a reasonable attempt to match the original. If you write "change to [new word], same font weight, same white color, same left-aligned position," the output will align more closely with your intent. Specificity costs nothing.
Work on the Highest-Resolution Version Available
Resolution matters for text editing because character edges and fine details like serif strokes and letter spacing are easier to replicate at higher pixel densities. If your image is compressed or small, run it through Imagera's image upscaler before editing the text, then downscale the final output if needed.
Handle Curved and Perspective Text Carefully
Text on bottles, badges, road signs, or product shots often has visible perspective distortion or follows a curve. For these cases, describe the surface in your instruction: "text on a curved label, follow the same arc." Strong curves and steep angles are where a second pass is most often needed.
Use the Full Edit Tool for Complex Backgrounds
If the text is embedded in a photograph with a complex background — a street scene, a product shot, a textured wall — and you need broader control over the surrounding area after the text change, the Imagera Edit Image tool lets you describe any other change to the picture as a separate edit. This is useful when a text edit reveals background inconsistencies that need additional cleanup.
Common Use Cases
Product Labels and Packaging Mockups
Brands and freelancers frequently need to swap product names, flavor variants, or volume specifications across a family of label images. Rather than re-rendering each SKU from the design file, editing the text directly in the image is faster when the underlying design is consistent.
Localizing Signs and Banners for Different Markets
A marketing team might have a hero image of a storefront banner in English and need versions in Spanish, French, or Portuguese for regional campaigns. Imagera's Photo Text Changer lets the text be swapped in each language while keeping the real-world photograph intact.
Fixing Typos in Finalized Creative
After a design is approved and exported, a typo surfaces. Going back to the source file is possible, but if the original design assets are archived or the designer is unavailable, editing the exported image directly is a practical fix — especially for internal documents, presentations, or assets that are not going to print.
Social Media and Thumbnail Variants
Content creators running A/B tests on YouTube thumbnails or ad creatives often need the same visual with different headline text. An AI text changer makes it straightforward to produce multiple text variants from a single base image without recreating the layout each time.
Replacing Placeholder Text in Generated Images
If you used Imagera's image generator to create a concept image and the AI placed placeholder or garbled text (common in AI-generated imagery), the text editor lets you replace that with legible, correctly spelled text in the same visual style.
Online and file-format questions
Can I edit text in an image online without installing software?
Yes. The tool runs in the browser, with nothing to install. Upload, edit, and download from any modern browser on desktop or mobile.
What does a text edit cost?
Imagera charges in credits. The cost of each edit is shown on the Generate button before you run it, and it depends on the engine and settings you pick. If you need to run many edits across a batch of images, check the pricing page for plan options that bring the per-credit cost down.
What file formats are supported?
The tool accepts JPEG, PNG, and WebP. The edited image downloads as PNG or JPG at screen resolution, with a long edge of about 2,000 pixels at most; set the frame shape before you generate if the crop matters. If you need a larger file after editing, the image upscaler handles that.
Does it work on screenshots and UI images?
Yes, though text on screenshots tends to be small and low-contrast. For best results, upscale the screenshot to at least 2× before editing the text, then scale back down. This gives the model enough resolution to render the characters cleanly.
Comparison: Approaches to Changing Text in an Image
| Method | Font matching | Background repair | Perspective handling | Time required |
|---|---|---|---|---|
| Imagera Edit Text in Image | AI-matched visually | Automatic (whole frame redrawn) | Followed by the model | About 2 minutes, plus proofreading |
| Photoshop clone + retype | Manual font hunt | Manual cloning | Manual warping | 15–45 minutes |
| Canva / design tool re-creation | Template fonts only | Not applicable | Not applicable | Requires source file |
| Screenshot + re-export from source | Exact match | Exact match | Exact match | Requires original project |
When you no longer have the source file or the design program, AI text editing is the most direct path.
Related tools on Imagera
- Photo Text Changer: edit text in image with the same font
- Change text in image: new words, font or color
- Imagera Identity Editor
- Imagera Image Editor
- Imagera Fast Edit
- Pricing
See it in action
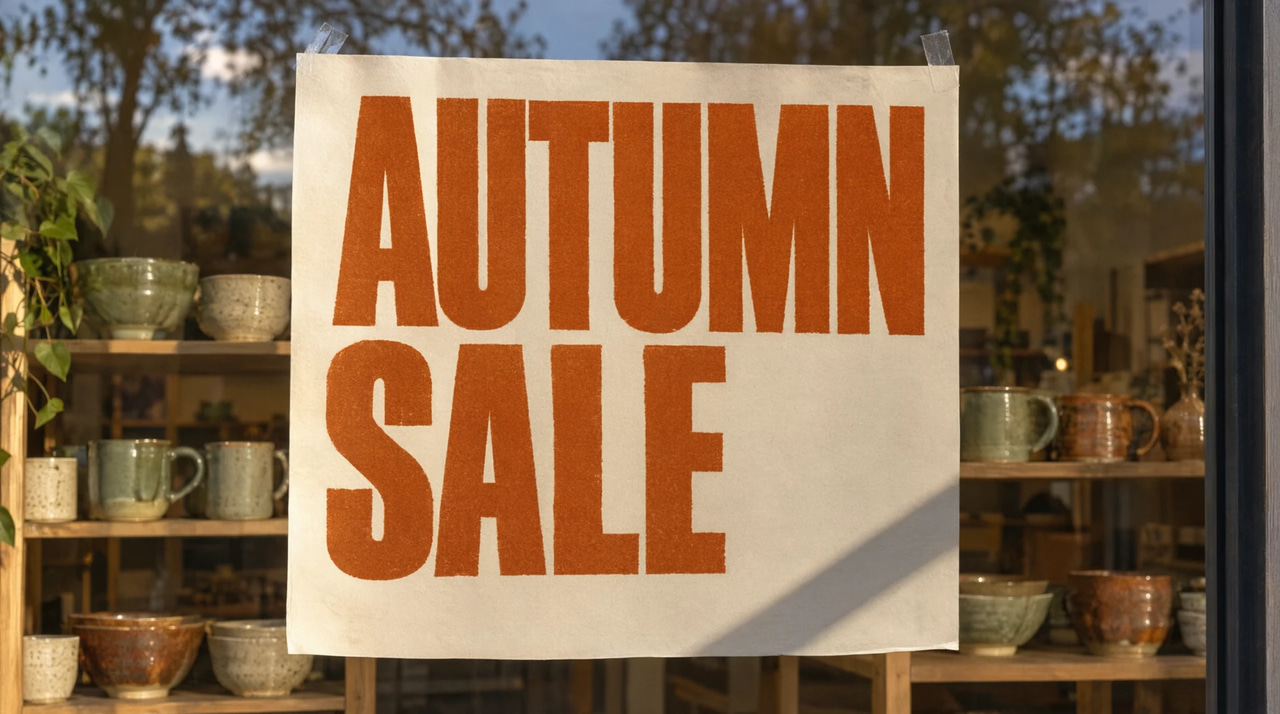
The before image is a generated illustration made for this guide. The after image is one real, unretouched run in Imagera's text-edit studio on its default engine, the tool behind the change text in image page.
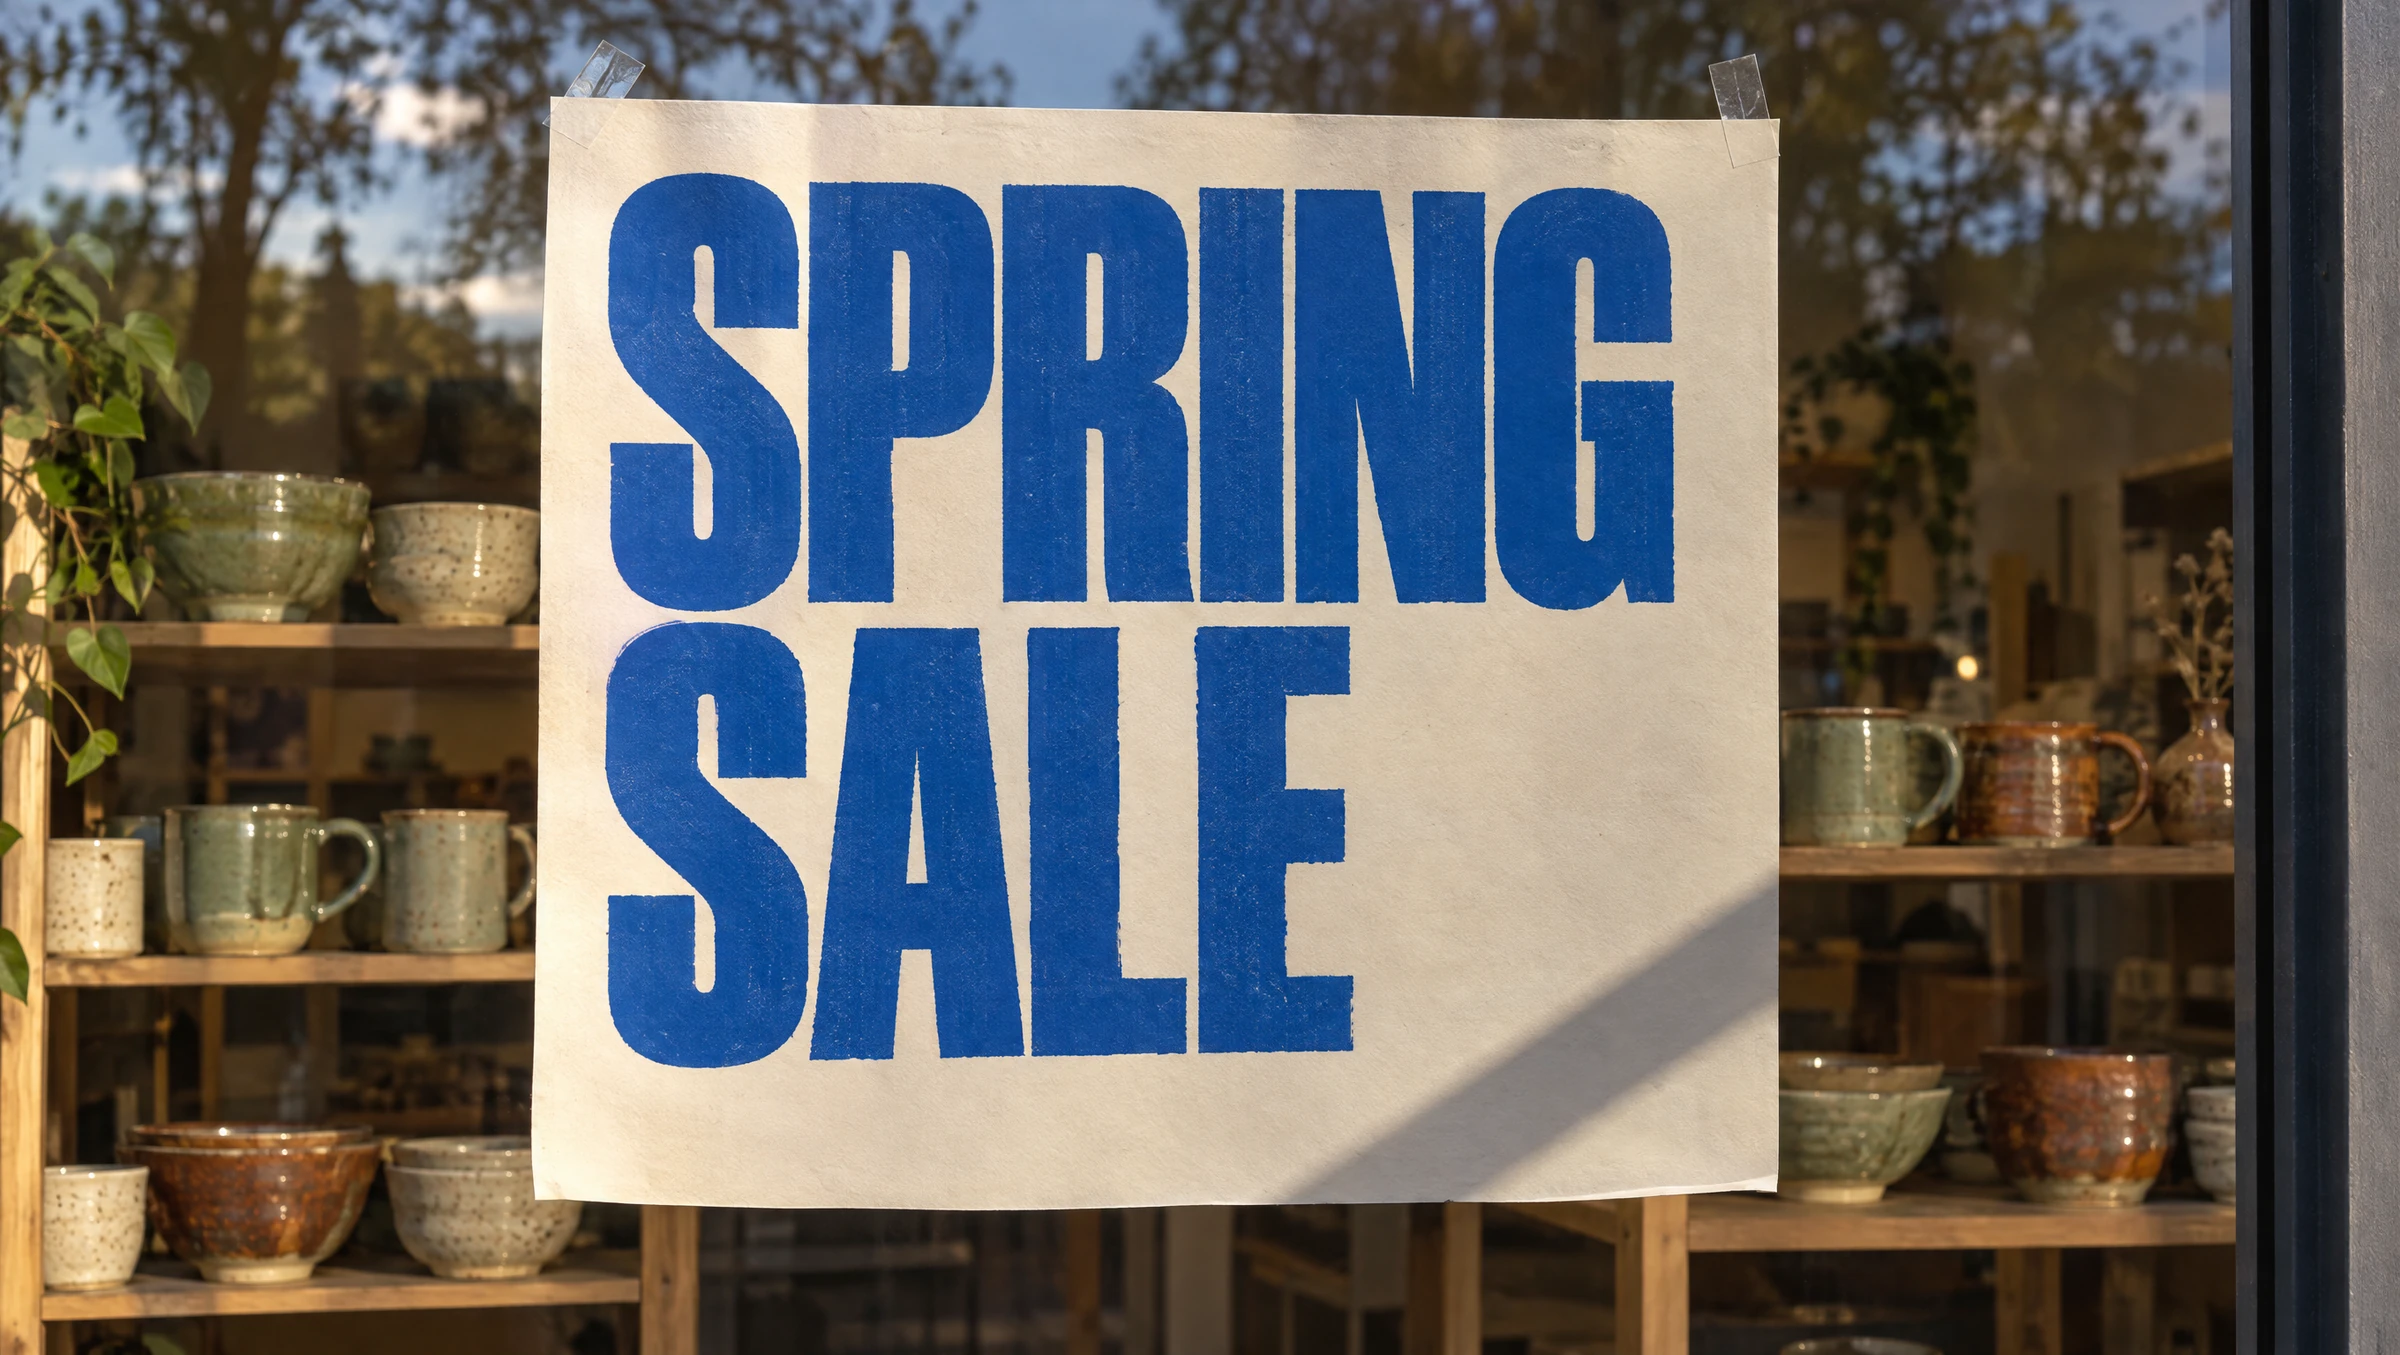
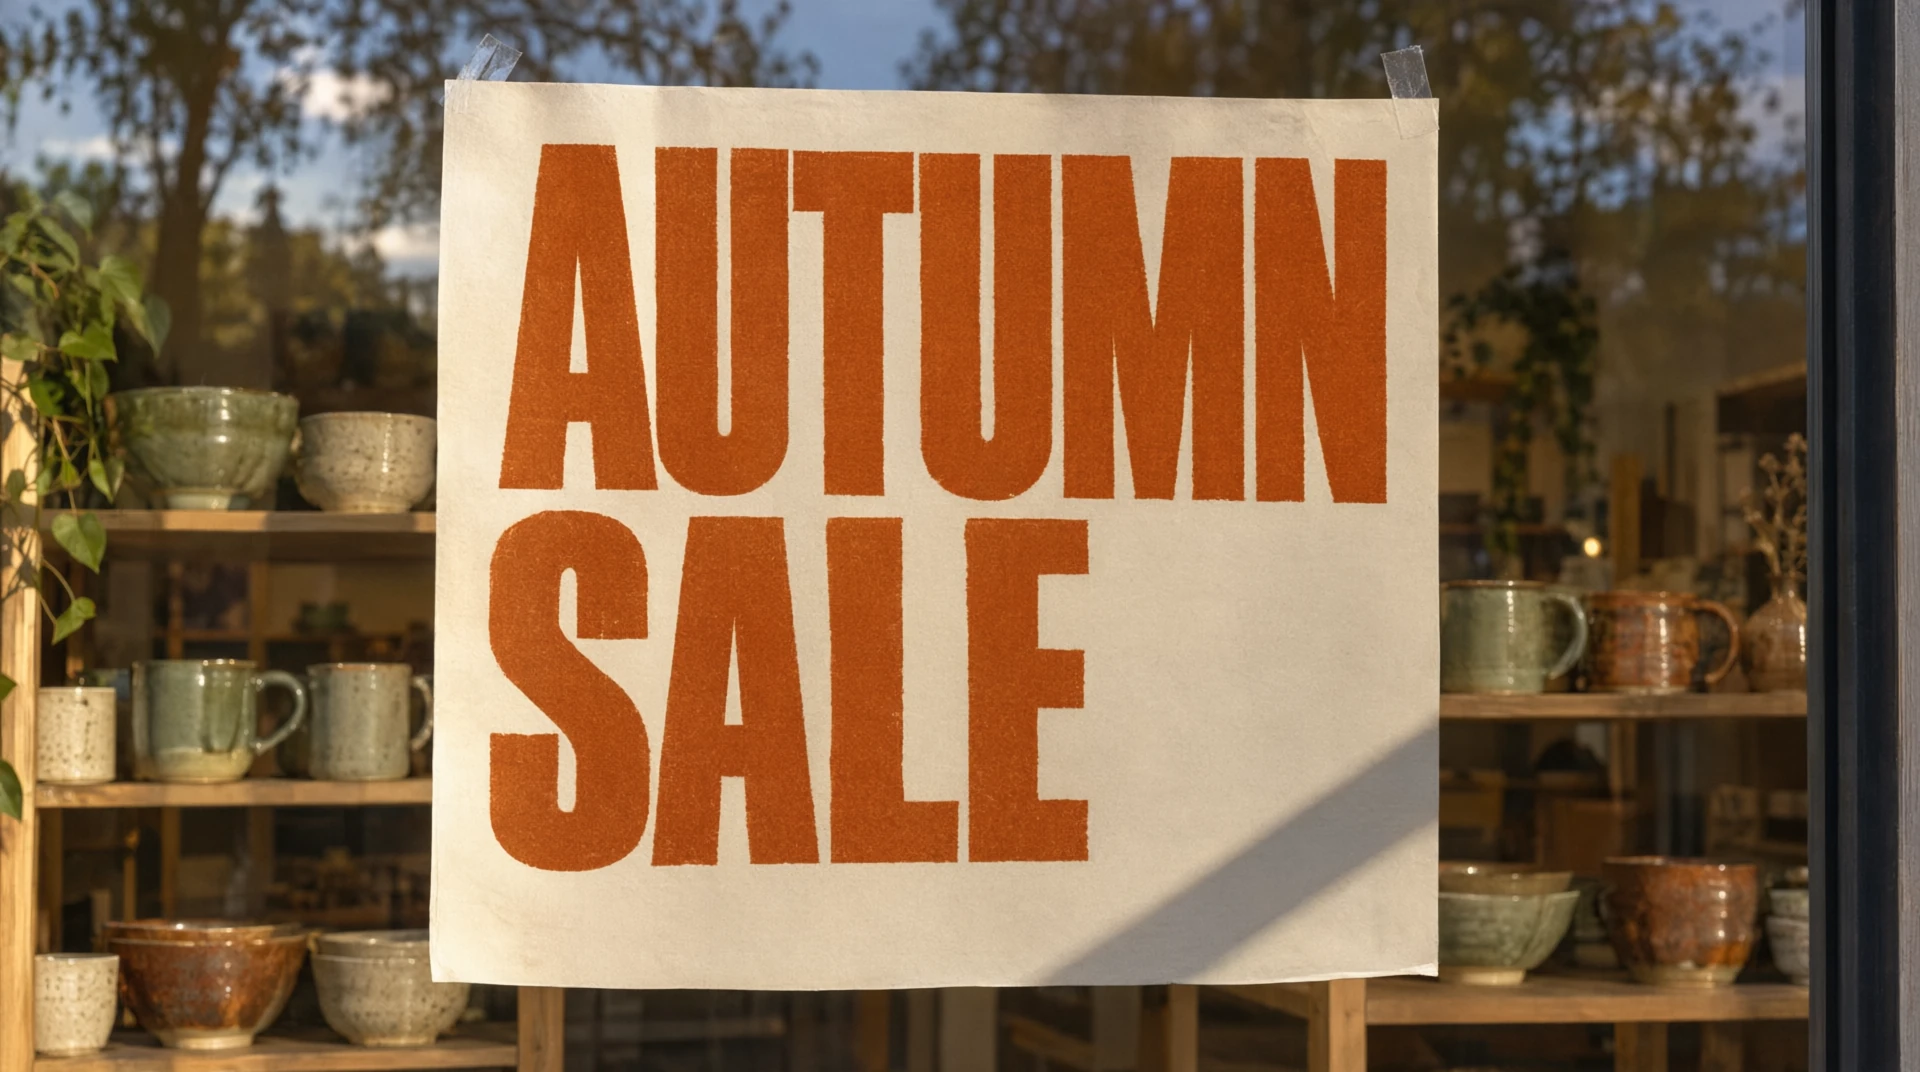
Prompt used: Replace "SPRING" with "AUTUMN" and change the ink of both words from cobalt blue to burnt orange. Keep the same heavy condensed sans-serif capitals, letter spacing, size, left alignment and two-line layout, and keep the paper, tape, window reflection, shelves and light exactly as they are.
Every letter came back right. Look closely and the paper grain and ink texture shifted slightly, because the whole frame is redrawn — which is why the proofreading step matters.
Start Editing Text in Your Images Now
Changing text inside an existing image used to mean hunting for the right font, manually painting over the original, and hoping the background matched. With AI, the process is a single upload and a typed instruction.
Go to Imagera's Edit Text in Image tool, upload your image, and replace the text with one instruction, with the font, color, and perspective matched for you. If the color or typeface should change as well, use change text in image instead.
If your image needs a resolution boost before or after editing, the image upscaler is one click away. And if you want to make broader changes to the image beyond the text, the Edit Image tool lets you describe changes to any other part of the composition.