The boxed action-figure picture looks simple until you try it: the face stops looking like you, the accessories come out as mush, and the name on the card is misspelled. This guide shows a photo-to-figure edit that keeps the likeness, the prompt that produced it, and how to fix the usual failures.
Quick answer: Upload one clear, well-lit photo to an image editor that follows instructions closely, ask it to turn the person into a boxed collectible figure, and name the packaging, the accessories and the printed text explicitly. On Imagera, use Precise Edit in Sandbox, which opens with a starter prompt filled in. The credit cost is shown on the Generate button before you run.
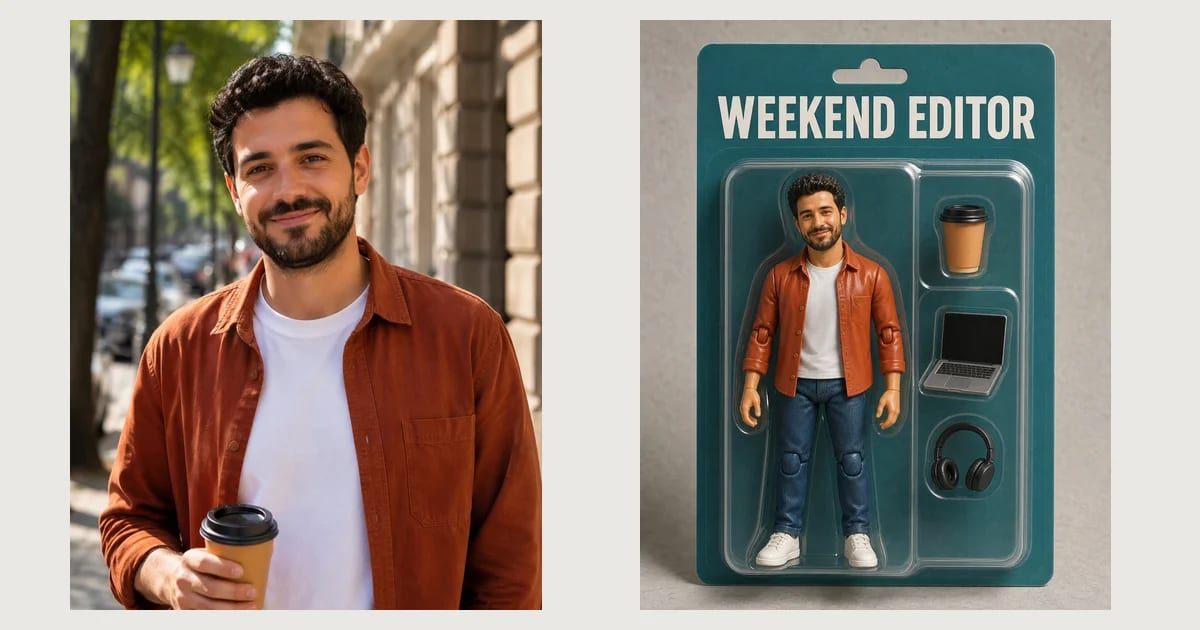
Photo to action figure: a real before and after

Before: an AI-generated portrait made for this article (not a real person), used as the source photo.
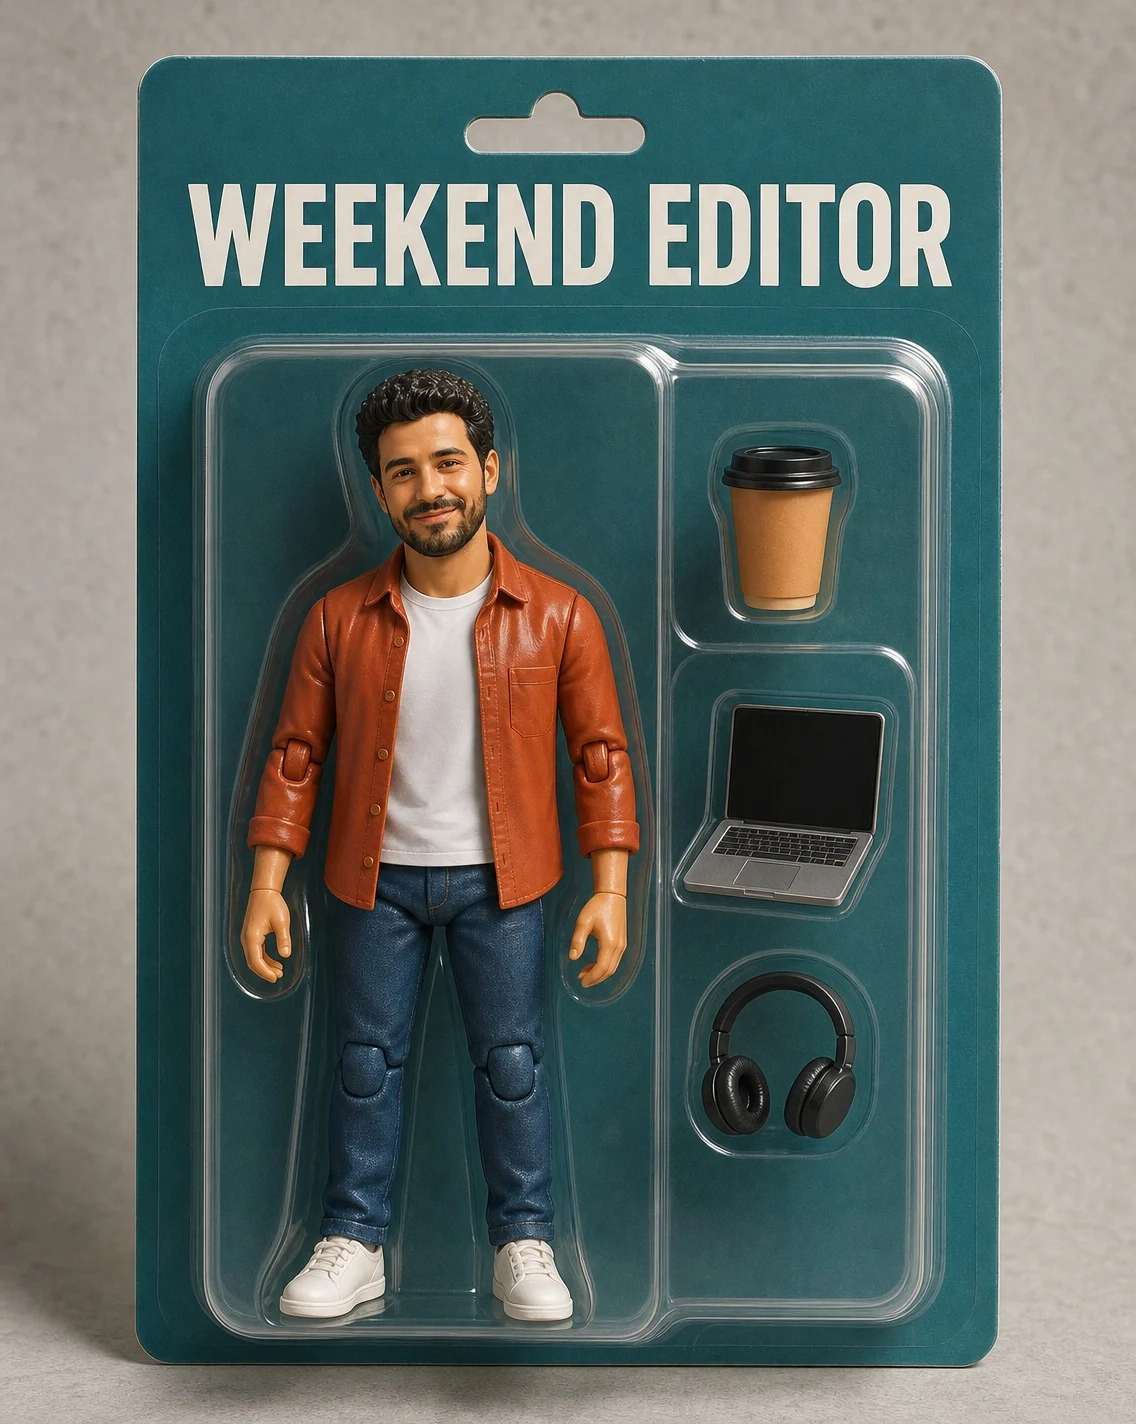
After: one edit with Precise Edit on Imagera, using the prompt below. Face, hair, beard and outfit carried over; the name and accessories came from the prompt.
The prompt used for that edit:
Turn the man in this photo into a boxed collectible action figure. Keep his face, hair, beard, rust-orange overshirt and white t-shirt recognisable, rendered as a glossy painted plastic figure about 15 cm tall with visible joint seams at the shoulders and knees. Place him inside a clear plastic blister pack on a teal cardboard backing card, with three small moulded accessories in their own compartments beside him: a takeaway coffee cup, a laptop and a pair of headphones. Print the name "WEEKEND EDITOR" in bold letters across the top of the card. Studio product photo on a light grey table, soft shadows, no logos, no brand names, no watermark other than the printed name.
How to make your own AI action figure
- Pick the photo. One person, face clearly visible, even light, waist-up or full body. Sunglasses, heavy filters and group shots make likeness harder.
- Open the editor. Precise Edit in Sandbox opens with a starter prompt; the Magic Photo Editor page explains the other edit engines.
- Upload the photo and edit the prompt. Replace the accessories and the printed name with your own.
- Check the credit cost on the Generate button, then run. Generate two or three versions and keep the one with the best likeness.
- Fix small issues with a follow-up edit instead of starting again: "make the name read MAYA THE BAKER", "swap the laptop for a rolling pin".
Prompt parts that decide the result
| Part | Say this | Why |
|---|---|---|
| Likeness | "Keep their face, hair and outfit recognisable" | Without it, the figure can drift to a generic toy face |
| Material | "glossy painted plastic, visible joints" | Makes it read as a figure, not a person in a box |
| Packaging | "clear blister pack on a teal card" | Colour and format give the image its toy-shelf look |
| Accessories | Three named objects, each "in its own compartment" | Specific objects are easier to get right than vague "hobby items" |
| Text | The exact name in quotes | Tells the editor exactly what to print; keep it short |
| Scene | "studio product photo, light grey table, soft shadows" | Keeps the focus on the box |
Swap the packaging line for other formats: a vinyl figure in a window box, a vintage cardboard card, a premium display case.
Common problems and fixes
- The face doesn't look like the person. Use a sharper, front-facing photo and repeat "keep the face recognisable".
- Misspelled name. Keep it to two or three short words in capitals and quote it exactly.
- Accessories melt together. Ask for fewer items, each in its own compartment.
- Real brand logos appear. Add "no logos, no brand names". Avoid naming toy brands in prompts; trademarked packaging is not yours to publish.
- It still looks like a photo of a person. Add "painted plastic", "visible joint seams" and "about 15 cm tall".
Can you use AI action figures commercially?
Only for people who agreed. Imagera's Terms prohibit generating content that impersonates real individuals without their explicit consent, so turn yourself, your team (with permission) or an invented character into figures. Leave real toy brands' names and logos off the packaging.
What does it cost?
Each edit is priced in credits and the cost is on the Generate button before you run. Plans start at $19.99/mo for 400 credits a month on the Starter plan, and credit packs start at $39.99 (pricing).
Turn your photo into an action figure →
Want the same character across a whole series of figures and scenes? Train a character LoRA once: how to train a LoRA online.