How do you increase a picture’s resolution?
Increase the picture’s pixel dimensions through resizing or resampling. In Photoshop, use Image > Image Size; turning off Resample keeps the pixels unchanged. In Canva, use Resize and Custom size. Changing only the DPI or PPI setting adds no detail. For a repeatable conventional resize, use our FFmpeg command below.
Pixel dimensions describe the image’s grid: its width and height in pixels. Enlarging that grid gives you more pixels to work with, but those extra pixels are calculated from the existing image. They do not contain newly captured detail. A soft letter can become larger while remaining just as unreadable.
The print-resolution setting serves a different purpose. It determines how densely those pixels are placed on paper. With resampling disabled, raising that setting makes the calculated print smaller; the image content stays unchanged.
Use plain resize (bicubic) as the conventional baseline when comparing an enlargement. Our FFmpeg command produces an output measuring 1280 × 848 pixels, giving you a repeatable reference for judging what further processing actually changes. Keep the image’s proportions intact so the resize does not stretch faces or objects.
ffmpeg -i input.jpg -vf "scale=iw*4:ih*4:flags=bicubic" -q:v 1 output.jpg
How do you upscale a picture with AI?
Use Imagera Image Upscale — Portrait as the starting choice for photographic enlargement because it produced the strongest result in our comparison. Start with the best available source, select that method, run the enlargement, and save the result separately. Choose plain resize instead when retaining the existing appearance matters more than adding apparent sharpness.
Keep the workflow simple:
- Start from the best original you have. Use the original image file rather than a screenshot, a compressed copy from a message, or an already enlarged version. If you have several copies, find the one closest to the original capture before doing any processing.
- Select Image Upscale — Portrait and run the enlargement. That is our pick for a photographic result where extra apparent sharpness is useful. You do not need to run every available method just to get started.
- Save the output as a separate file. Give it a distinct filename and keep the untouched source alongside it. Keeping both makes the later comparison straightforward and lets you return to the source without trying to undo processing.
For preservation-first work, use plain resize locally with FFmpeg instead. The conventional resizing command appears earlier; use that route when you want to avoid AI-generated interpretation, even if the result looks softer.
Try 16K AI Upscaler → Plans start at $19.99; credit packs from 350 credits.
What image size and format should you export?
For web use, export at the pixel dimensions required by the destination. For print, work backward from the intended physical size and the printer’s requested PPI. Choose JPG for a photographic delivery copy or PNG for lossless saving; Canva lets you enter dimensions and download either format.
Start with the actual placement: a full-width page image and a small preview have different requirements. Check the destination’s requested width and height, preserve the picture’s proportions, and export for that use. Automatically choosing the largest output gives you more pixels to manage without necessarily improving what viewers see.
For a print, confirm the finished width and height with the printer, along with the required pixels per inch. Each inch needs that many pixels across both dimensions. Set your target from those requirements before enlarging, rather than choosing an enormous file and hoping it fits.
We’d use JPG for the final photographic delivery copy and keep a separate working master. Pick PNG when preserving the exported pixels without further lossy compression matters more. Neither format repairs invented lettering or restores missing texture. The useful export is the one that meets the destination’s requirements and passes the checks above.
Does AI look better than ordinary resizing at the same size?
At 1280 by 848 pixels, Image Upscale — Portrait ranked above both alternatives in our test, while Imagera Image Upscale — Multi-Model finished only slightly above plain resize. We used FFmpeg for ordinary resizing and our studio’s models for AI. Our blind AI review scored outputs without knowing which method made them.
We started with downscaled, heavily JPEG-compressed copies of photographs. For the portrait comparison, every method produced the same pixel dimensions, so a larger output could not account for the advantage. The review ran in swapped-order passes, and disagreements were excluded from reported findings.
| Method | Output size | Blind AI review (0-10) | Processing time | Credits |
|---|---|---|---|---|
| Imagera Image Upscale — Portrait | 1280×848 | 5.2 | 5 s | 140 |
| Imagera Image Upscale — Multi-Model | 1280×848 | 4.6 | 9 s | 120 |
| plain resize (bicubic) | 1280×848 | 4.4 | 0.3 s | none (runs locally) |
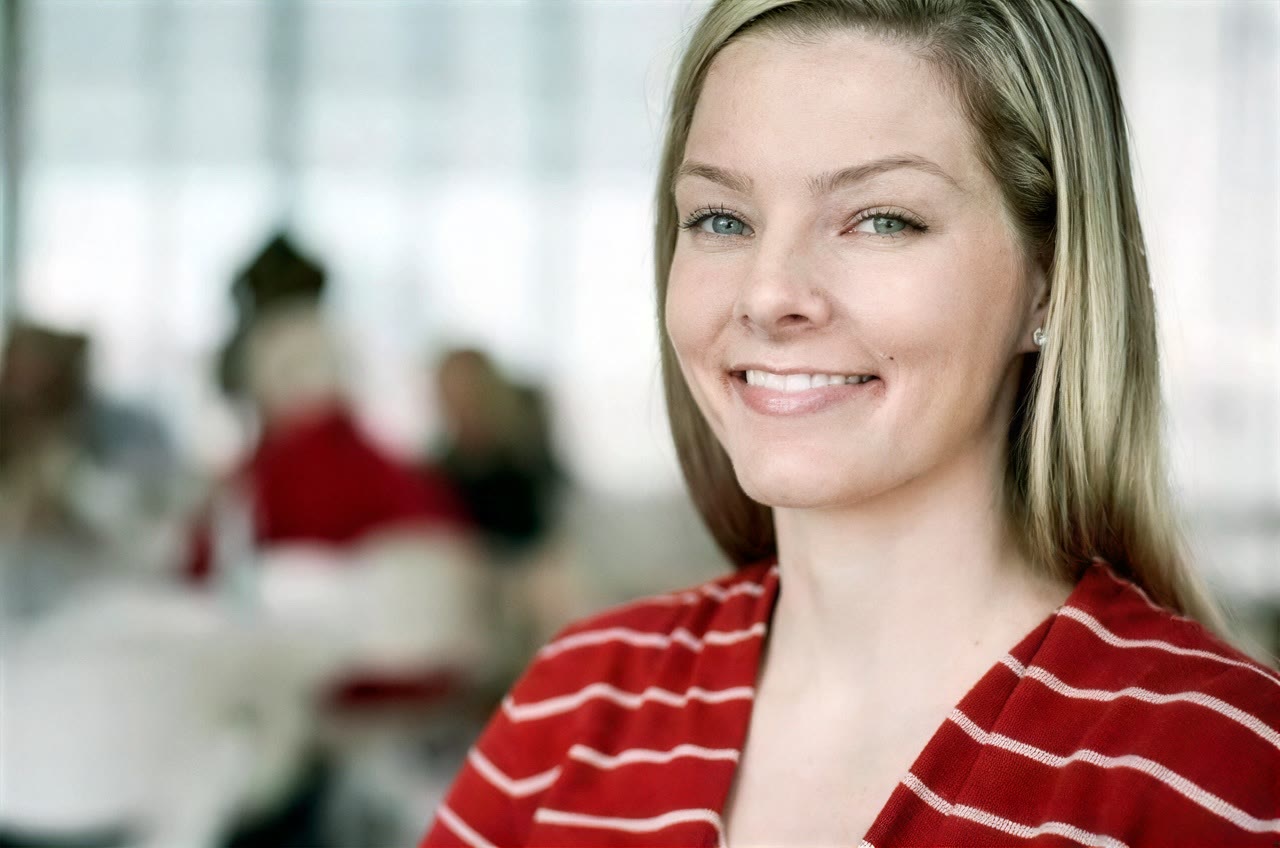
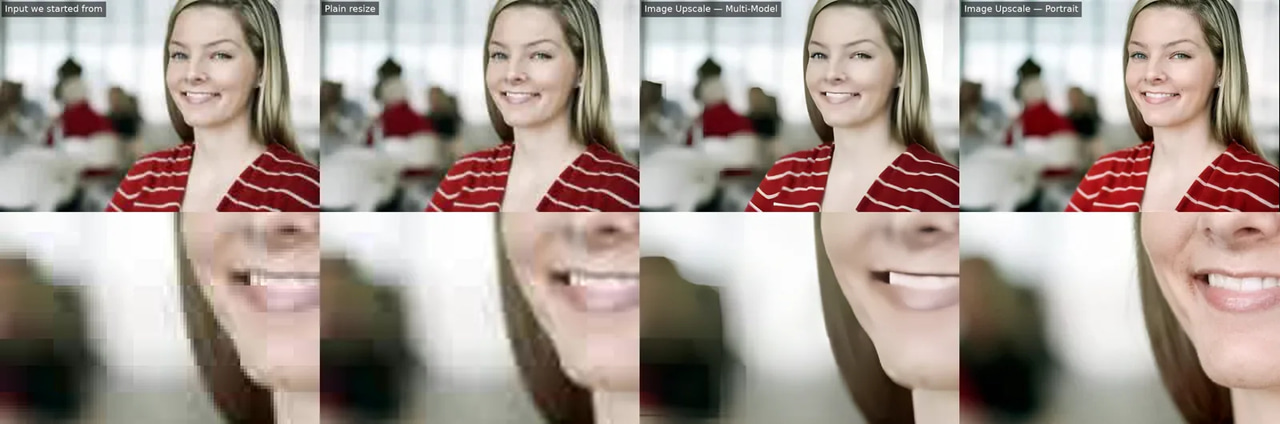
Image Upscale — Portrait scored 5.2 out of ten, compared with 4.6 for Image Upscale — Multi-Model and 4.4 for plain resize. For perceived sharpness, we would choose Image Upscale — Portrait from this comparison. Its sharper hair and added skin texture made a stronger visual impression, though the added mole near the mouth shows why fidelity still needs checking.
The disappointing Image Upscale — Multi-Model result makes sense when you examine the portrait: severe smearing, blocky background artifacts, and plastic-looking facial and hair texture undermined the enlargement. Its small scoring advantage over ordinary resizing did not translate into a convincing portrait. For a preservation-first job, use the conventional option discussed earlier.
Our test covered a small set of prepared photo inputs, with no native low-resolution capture comparison or larger-output sweep. Scoring was automated rather than human. These results support the matched-size choice here; they do not answer how the methods compare at much larger dimensions.
Which pictures upscale best, and how far should you enlarge them?
Pictures with usable structure and a modest size shortfall are the best candidates for AI enlargement. Stop at the smallest output that meets your delivery needs and still looks convincing at its intended viewing size. Missing factual detail cannot be recovered reliably, so extreme enlargement is a poor rescue strategy.
A clean photograph that needs a little more room for a layout is a strong candidate. So is a useful crop with clear edges and recognizable texture. Heavy JPEG compression makes the job harder: block boundaries and smeared surfaces leave less trustworthy structure for an upscaler to work with. Increasing the output size can make those defects more conspicuous or replace them with plausible-looking inventions.
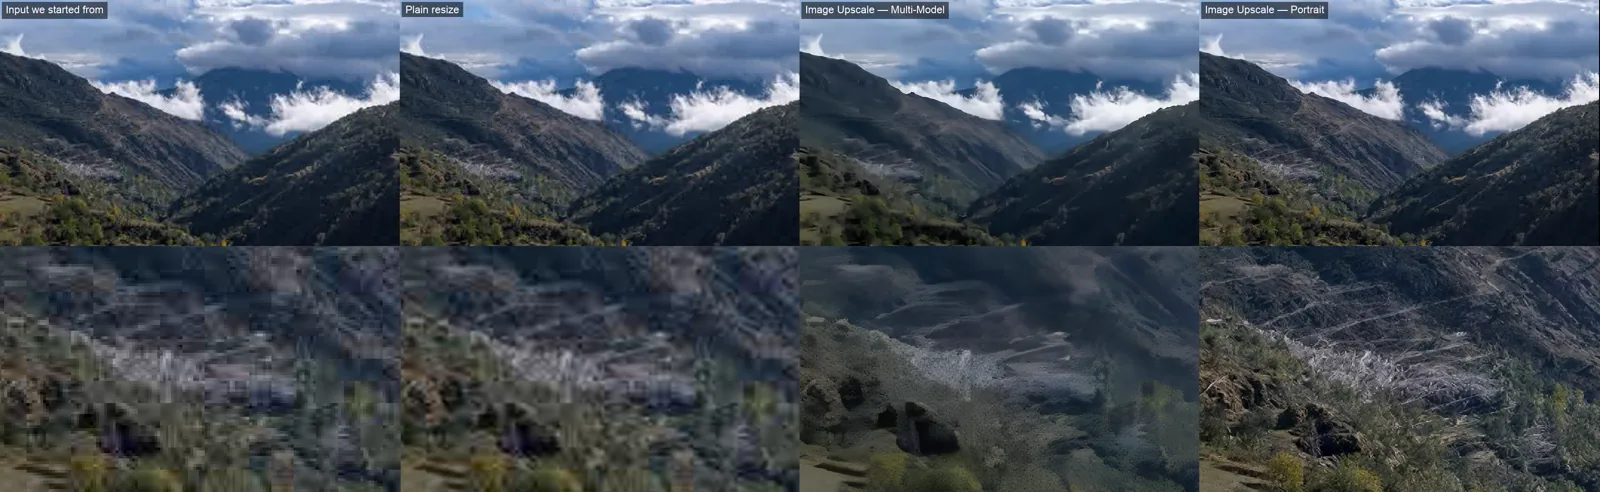
Landscape texture fidelity versus artificial detail at 4×: Input we started from · Plain resize · Image Upscale — Multi-Model · Image Upscale — Portrait. Photo: Trougnouf (Benoit Brummer), CC BY 4.0, via Wikimedia Commons. Bottom row: the same close-up of each, zoomed. Our test, Oct 27, 2026.
Use the outdoor comparison to judge whether surface patterns survive the enlargement. A more detailed-looking patch can still be less faithful to the source. In our test, Image Upscale — Multi-Model smoothed away authentic rust and concrete textures, sacrificing useful irregularities.
We would keep the smallest enlargement that works in the finished layout. Start with your required delivery dimensions, then judge the result at its intended viewing size using the checks above. If smoothing or artificial structure remains visible there, reduce the image’s placement size or choose a stronger source. Pushing the dimensions further gives those problems more space.
How do you check faces, text, edges, and textures?
Compare the source and enlargement side by side at matching display sizes, then inspect close crops. Check facial landmarks, individual letters, edge outlines, and repeated textures. In our results, Image Upscale — Portrait added skin texture, sharper hair, and a small mole near the mouth; its sharper label still contained invented side-panel characters.
Start with the face. Compare eye shape, mouth corners, skin marks, and the boundary between hair and background. The added mole is a reason to reject that version when someone’s likeness matters. Sharper hair also needs scrutiny: follow the strands back to the source and check whether their direction and boundaries agree.
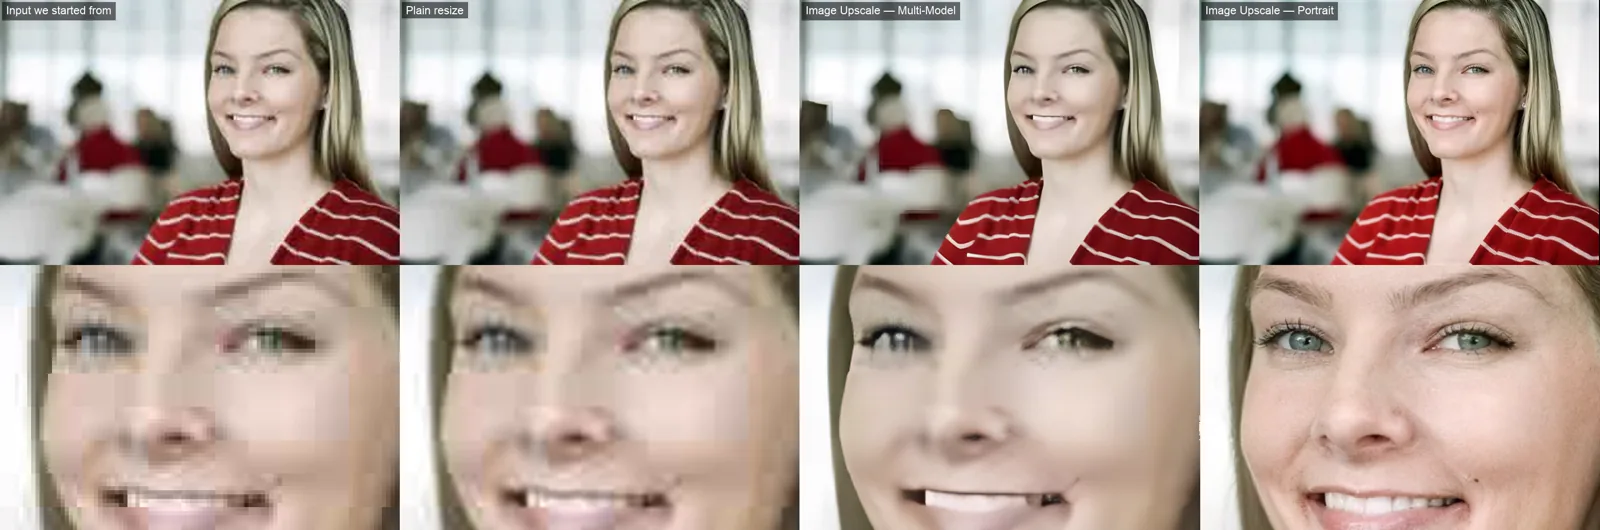
Facial fidelity versus apparent sharpness at 4×: Input we started from · Plain resize · Image Upscale — Multi-Model · Image Upscale — Portrait. Photo: Christopher Michel, CC BY 2.0, via Wikimedia Commons. Bottom row: the same close-up of each, zoomed. Our test, Oct 27, 2026.
Read label text character by character. The front label looked cleaner with Image Upscale — Portrait, but the side-panel lettering became illegible invented characters. For a design that depends on accurate wording, we would keep the source lettering rather than accept the AI version.
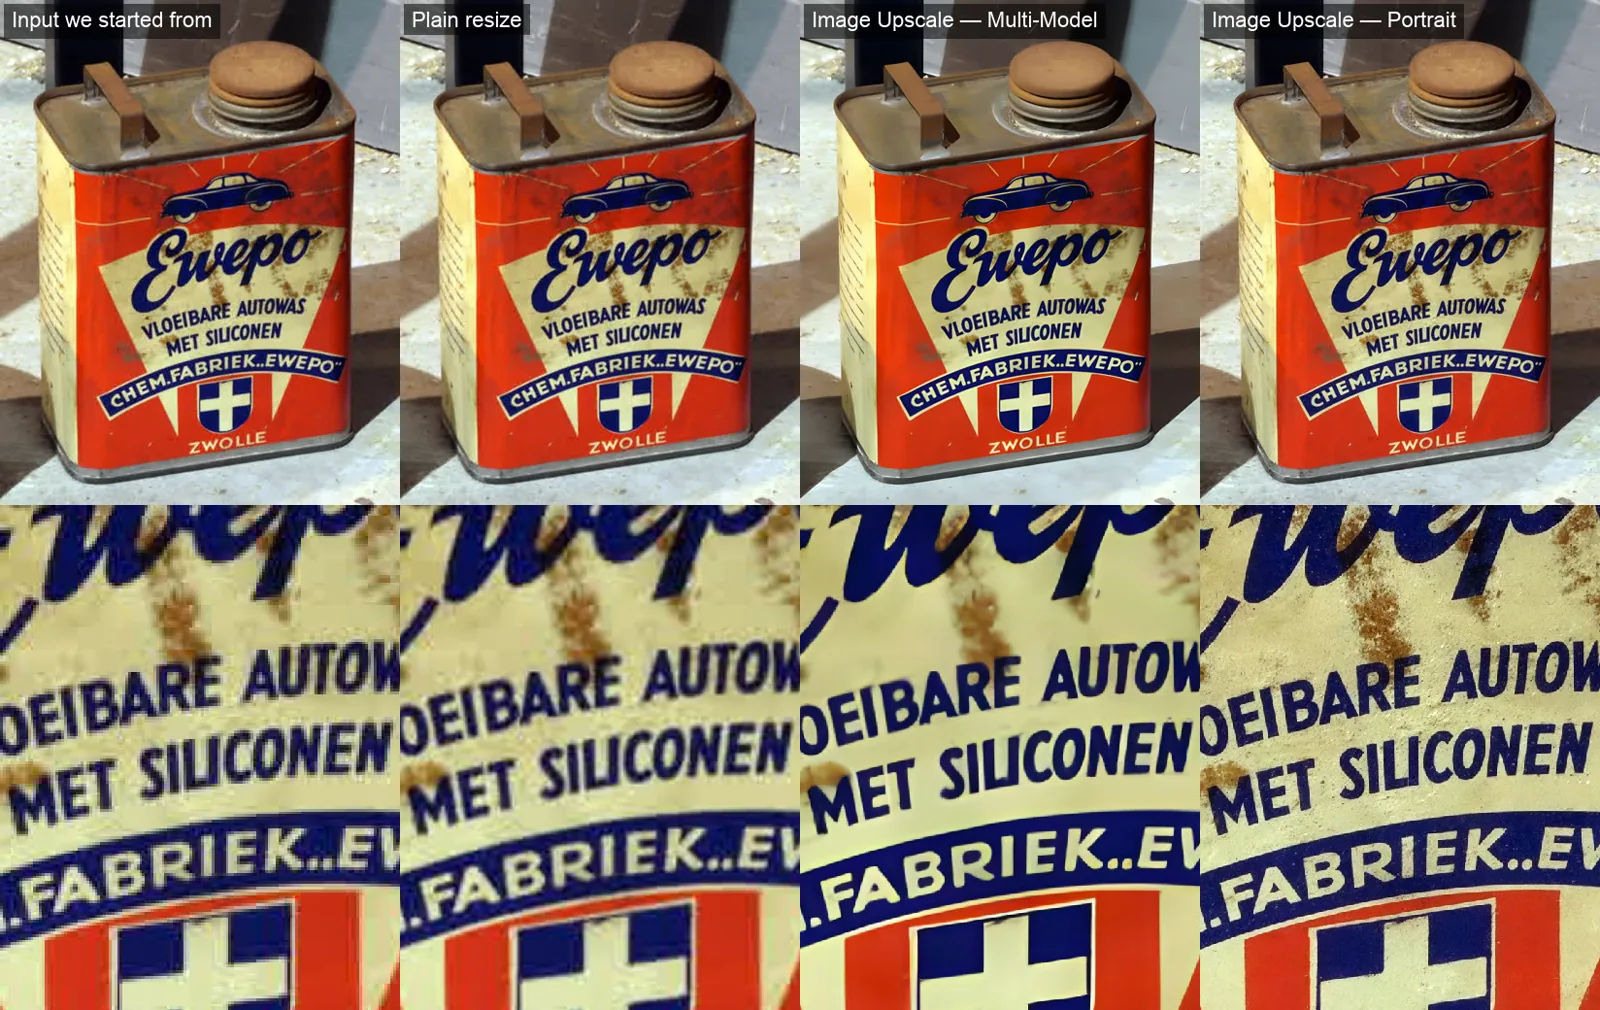
Readable label text versus invented characters at 4×: Input we started from · Plain resize · Image Upscale — Multi-Model · Image Upscale — Portrait. Photo: Alf van Beem, CC0, via Wikimedia Commons. Bottom row: the same close-up of each, zoomed. Our test, Oct 27, 2026.
Next, trace high-contrast edges around lettering, facial profiles, and object corners. Look for bright halos, doubled outlines, bent straight lines, or changed shapes. Compare rust, skin, and other textured areas by their pattern and placement. Extra grain can look convincing while changing the surface.
Finally, view the result at its intended delivery size. Use the close crop to catch changes, then judge whether the finished image remains useful at the size readers will actually see. Accept it only after both checks.