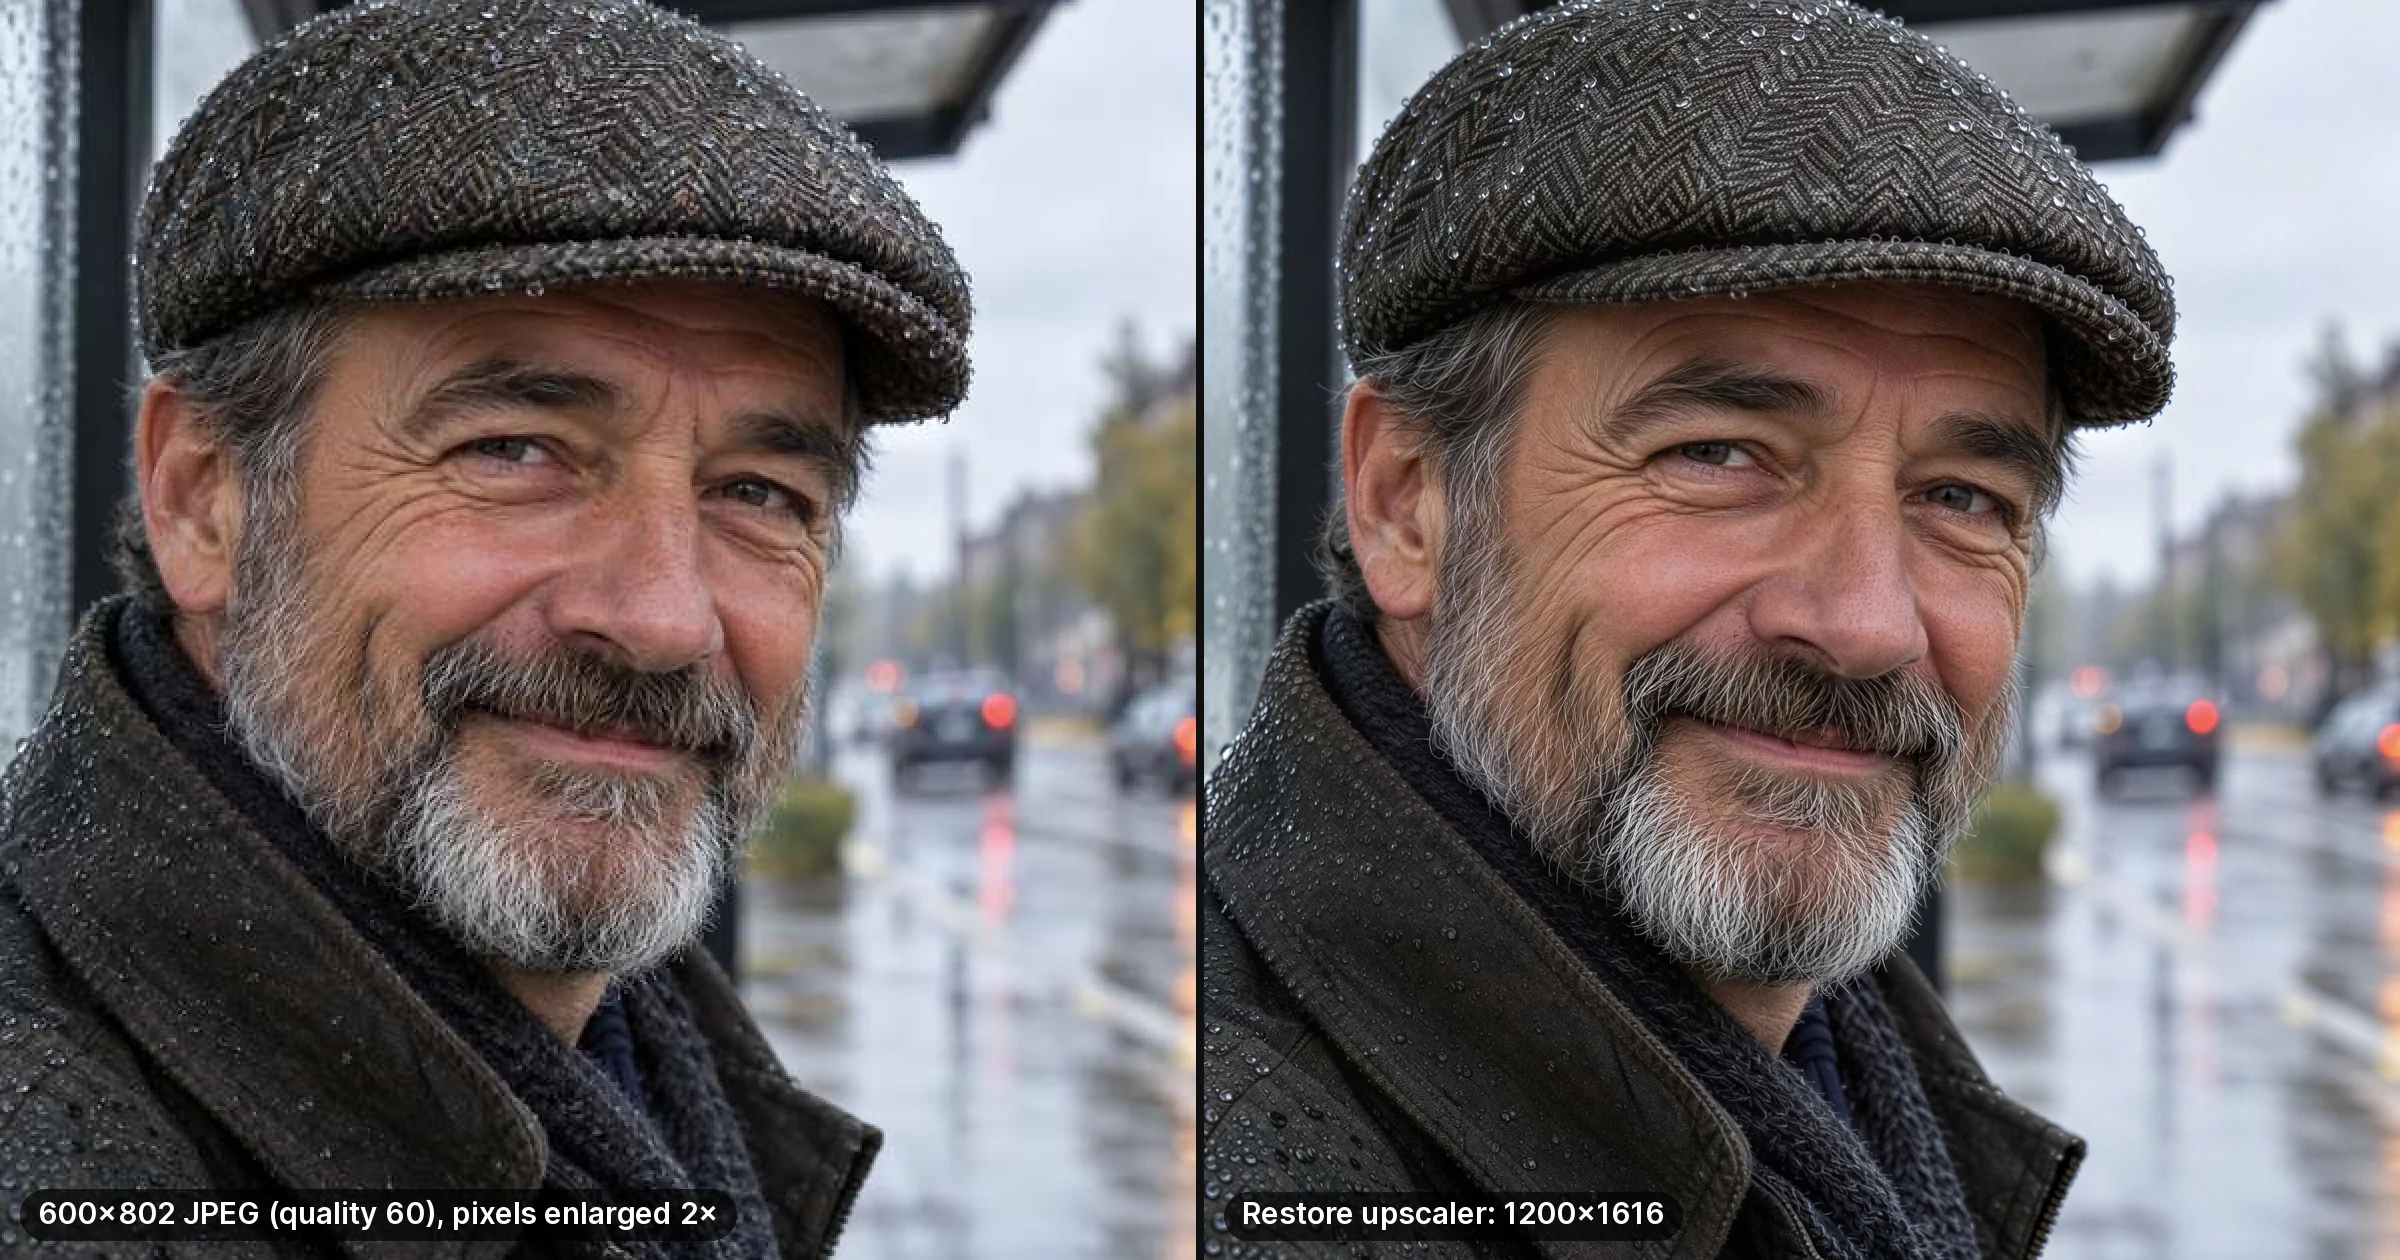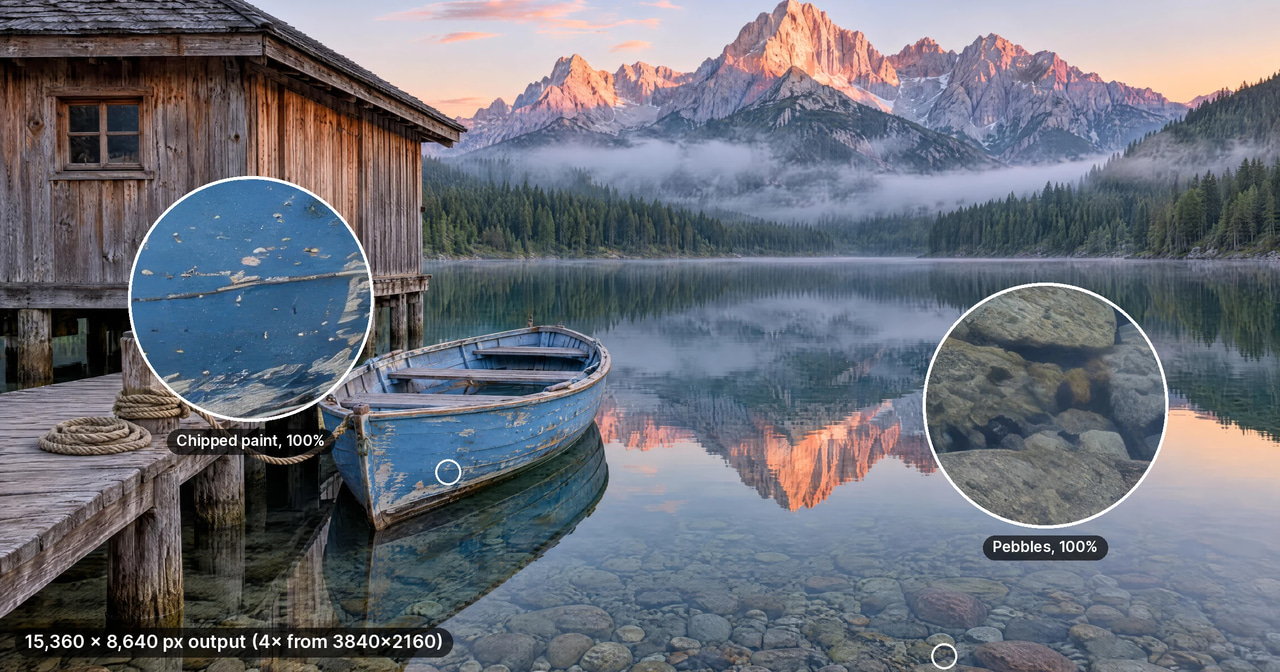
Short answer: 16K is 15,360 × 8,640 pixels (132.7 MP) on a display spec sheet, and some tools use the name for 16,384 px on the long edge instead. At 300 DPI a 15,360 px file prints 51.2 inches (130 cm) wide. Every tool on page one that advertises 16K caps something (a daily download count, the input size, or the output), and this guide lists where each one stops, with the numbers read from each tool's own page.
▶ On your device, nothing uploaded — up to 4×: Open the Image Enlarger → — a clean resize that never leaves your browser.
▶ AI detail up to 15,360 px — credits: Open the 16K image upscaler → — cloud super-resolution, up to 10 images per batch, 120 credits per image at 16K. The credit cost shows before you run.
To upscale an image to 16K with AI on Imagera: open the 16K image upscaler, upload a JPEG, PNG or WebP up to 50 MB, pick the 16K tier, and inspect the result before exporting. The 16K tier outputs up to 15,360 pixels on the longest edge (measured on completed runs) and costs 120 credits per image. Because 16K magnifies source defects as well as detail, start with the cleanest source available and review faces, text, edges, and repeating textures at 100% zoom. Any shape works: a square photo comes back 15,360 × 15,360. The one source the upscaler will not open is one above 179 MP, such as a square 16K result (236 MP) uploaded again, so start from the original.
0.1"16K" means two different numbers — check which one you are being sold
The word covers two figures, and tools quietly pick whichever flatters them:
- The 16:9 display standard: 15,360 × 8,640 pixels — 132.7 megapixels, four times the pixel count of 8K and 64 times 1080p.
- The power-of-two imaging convention: 16,384 pixels on the longest edge, which some upscalers use as their cap. Imagera's 16K tier writes 15,360 px, the display-standard width.
Both get called 16K, and neither is wrong. But a 16,384-pixel export and a 15,360-pixel export are not the same file, so match the number to your print spec rather than to the marketing badge. At 300 DPI, 15,360 px prints 51.2 in (130 cm) wide and 16,384 px prints 54.6 in (138.7 cm): over four feet either way.
0.2See the difference: before and after upscaling
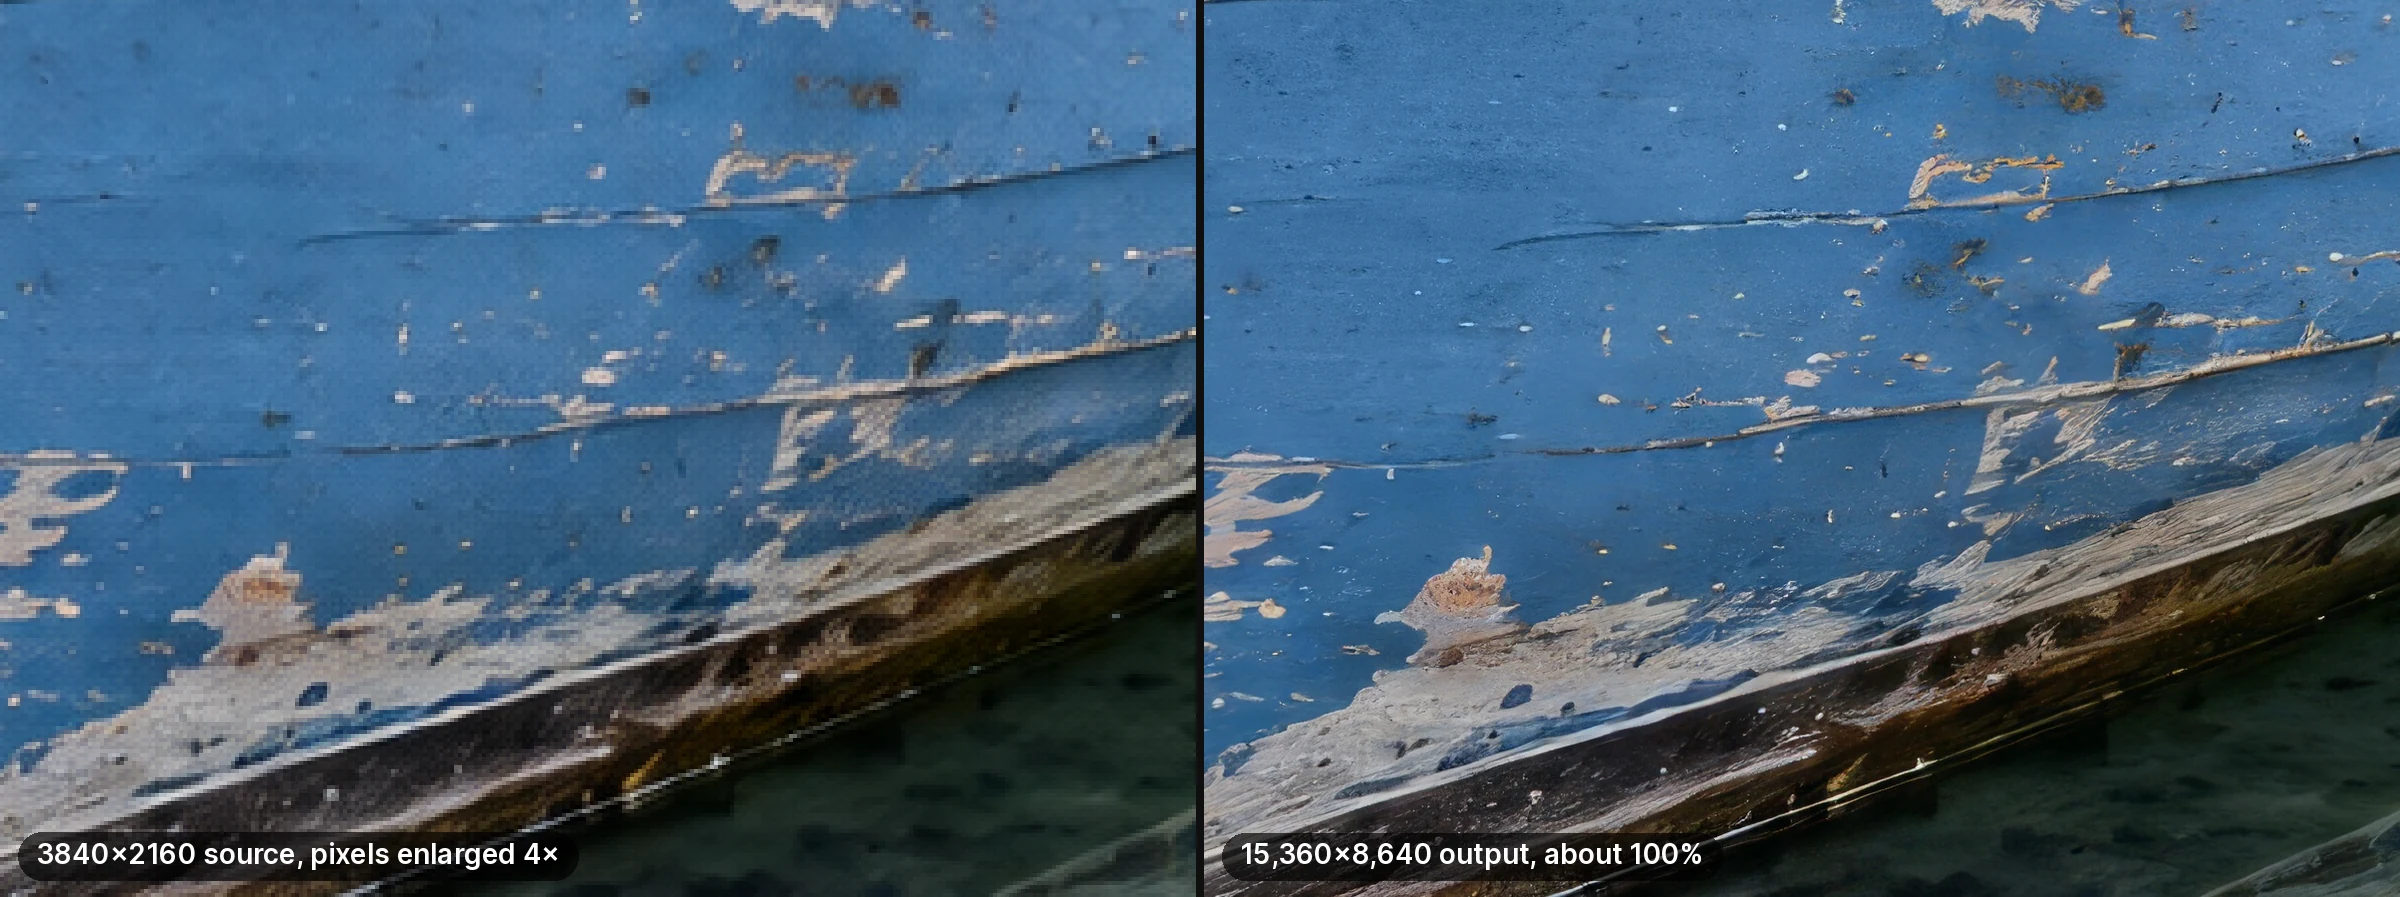
Real result: a 3840 by 2160 still generated for this test, upscaled 4× to 15,360 by 8,640 (the 16:9 "16K" display size) with the Studio upscaler in Imagera Sandbox (Imagera Image Upscale — Studio). Left: source pixels enlarged 4×; right: the output at about 100%. This run did not use the Image Upscaler's 16K tier described above.
Quick answer: Imagera has two upscalers and they do different jobs. The on-device Image Enlarger runs entirely in your browser, with no upload, and does a high-quality resize with edge sharpening up to 4×. The cloud upscaler runs AI super-resolution that reconstructs new detail and reaches 15,360 pixels on the longest edge, for credits. The enlarger cannot reach 16K; the cloud upscaler can.
1.Four routes to a 16K file, and where each one stops
Every route has a limit. Here is where each one stops, checked on 4 September 2026:
- On your device, but not AI. A browser-side enlarger such as Imagera's Image Enlarger resizes and sharpens on your own device. Nothing is uploaded, so there is no quota and no queue — but it is a clean enlarge, not reconstructed detail, and it stops at 4×.
- Cloud AI with a daily cap. The cloud tools that advertise 16K give you a daily allowance and then stop. The table below lists the limit each one publishes on its own page.
- Local, if you own the hardware. A local open-source upscaler such as Upscayl runs on your own GPU with no account and no cap. The cost is setup and a compatible graphics card.
- Cloud AI on credits. Imagera's cloud upscaler charges per image, from 15 credits at 2K to 120 at 16K, and the studio shows the cost of the tier you picked before you run it. Credit packs start at $39.99 for 350 credits; the Starter subscription is $19.99/month. You buy credits before your first run.
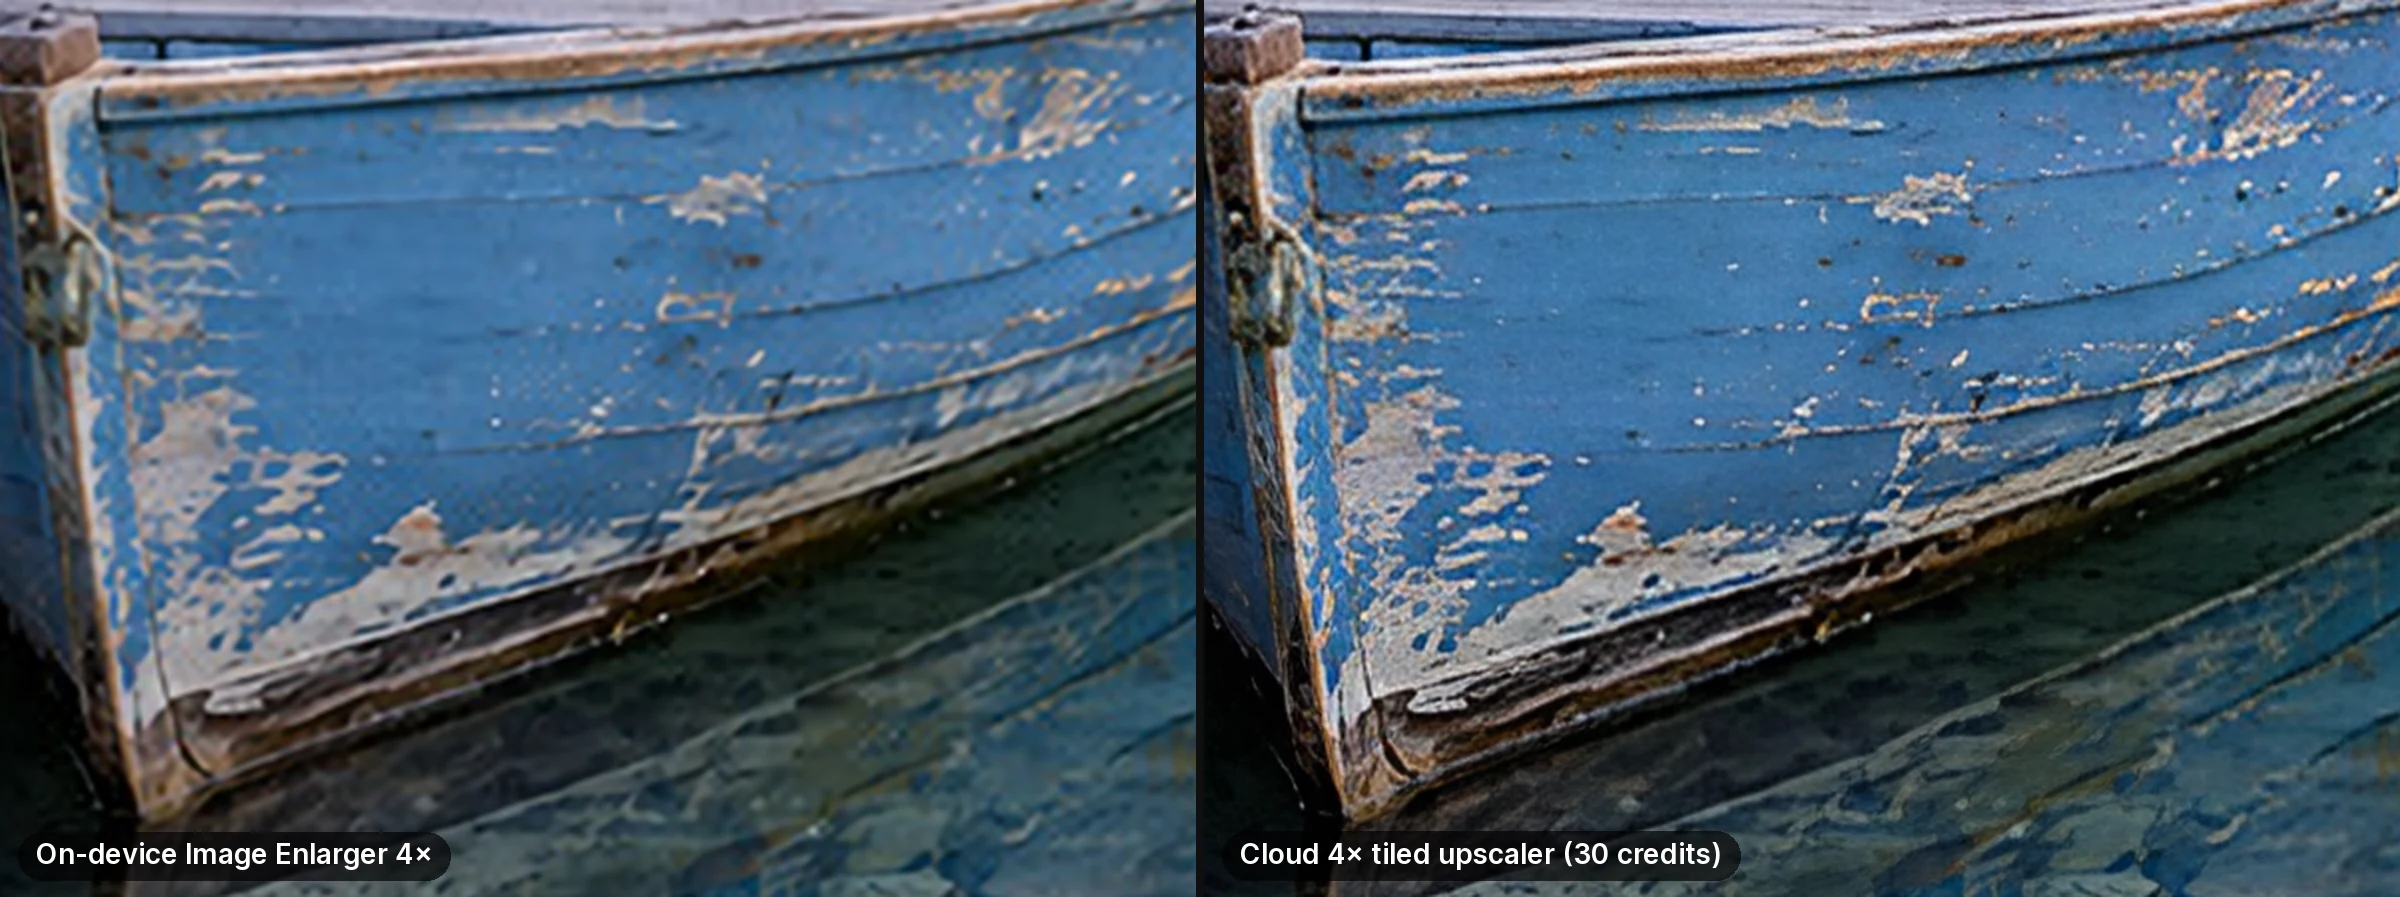
Left: demonstration with the Image Enlarger's on-device model run outside the browser. Right: real result from the 4× tiled upscaler in Imagera Sandbox (Imagera Image Upscale — Tiled 4×, 30 credits). Same 1024 by 576 source, both 4096 by 2304.
2.Where each 16K tool caps uploads and output
Most results on page one for a 16K photo enhancer promise 16K at no charge. All of them meter it somewhere. Below is the limit each service publishes on its own page, read on 4 September 2026, in the vendor's own wording. No prices — those change weekly and are not the interesting part.
| Tool (its own page, read 4 Sep 2026) | What its title promises | Where the limit sits |
|---|---|---|
| Pixelcut Image Upscaler | "Free AI Image Upscaler | Enhance Photo Quality to 4k & 16K" | Its FAQ: free "for up to 3 daily downloads." The same FAQ notes that reaching 16K requires selecting a specific model in the picker, which takes a 4K image up 4× or an 8K image up 2× — so 16K needs a large source to begin with. |
| image-upscaling.net | "Free AI Image Upscaler | No Sign-Up, No Watermarks, Up to 16K" | "100% free for small-scale use — no paywall, no sign-up. A daily free quota applies." Input is capped at 4096 × 4096, the queue runs "about 5 minutes", processed images are deleted 3 hours later, and "in times of high demand, paying users will be served first." |
| imgupscaler.ai | "AI Image Upscaler Online Free | Upscale Images to 16K", badged "100% Free", "No Sign-up", "No Watermark" | States no signup is required and offers standard / HD / 4K / 8K / 16K. It publishes no daily limit on the page — which is not the same as there being none. |
| ezenhancer.ai | "Upscale Images to 4K, 8K & 16K — AI-Powered Ultra-High Resolution" | "Free to start • No registration", with what the page itself calls "a generous free daily quota" — a quota all the same. It defines 16K as 15,360 × 8,640. |
| Imagera Image Enlarger | On-device resize, nothing uploaded | No quota and no queue, because nothing is ever sent to a server — but it stops at a 4× clean enlarge and adds no AI detail. 16K needs the cloud upscaler (credits). |
Two things fall out of that table.
First, a 16K render and a no-charge session rarely come together. The services that will actually render 16K meter you at a handful of images a day, and image-upscaling.net additionally caps your input at 4096 × 4096 — meaning the largest source it will accept is smaller than an 8K frame. If your plan is to feed it a big camera file and get a big print file back, that is the wall you hit first.
Second, every one of them is an upload. Your photo goes to someone else's server, waits in a queue, and is deleted on their schedule rather than yours. If the image is unpublished, confidential, or a client's, that is the real cost of a no-charge upload, and no daily quota describes it. It is also the one thing a browser-side enlarger removes outright: nothing is uploaded, so there is nothing to meter, queue, delete, or serve behind paying users.
So the real decision is not about the price tag. It is: do I need reconstructed detail, or just more pixels? If you need more pixels cleanly, the on-device route is unlimited and private. If you need detail that was not in the source, something has to run a model on a real GPU, and someone pays for that GPU — in credits, in a daily cap, or in your queue position.
3.Is a 16K upscale actually better than a 4K or 8K result?
Yes, when your final output is large. 16K packs far more pixels than 8K or 4K, which keeps billboards, gallery prints, and high-megapixel crops crisp. Added pixels only help detail when the upscaler reconstructs real texture rather than simply interpolating, which is exactly where Imagera's AI model outperforms plain resizing in 2026.
4.What Is 16K Resolution?
16K is a display and image resolution of 15,360 × 8,640 pixels at the standard 16:9 aspect ratio. Some imaging tools use 16K for 16,384 px on the long edge instead; Imagera's 16K tier writes 15,360 px, the display-standard width. Here's how it compares to resolutions you already know:
| Resolution | Dimensions | Megapixels | vs. 1080p | Typical JPEG Size |
|---|---|---|---|---|
| 1080p (Full HD) | 1,920 × 1,080 | 2.1 MP | 1× | 0.6–1 MB |
| 4K (UHD) | 3,840 × 2,160 | 8.3 MP | 4× | 2.5–4 MB |
| 8K (UHD-2) | 7,680 × 4,320 | 33.2 MP | 16× | 10–16 MB |
| 16K | 15,360 × 8,640 | 132.7 MP | 64× | 40–65 MB |
Each resolution jump doubles both horizontal and vertical pixel count, quadrupling total pixels. 16K contains 4× the pixels of 8K, 16× 4K, and 64× 1080p.
You cannot walk into a shop and buy a 16K screen — at this resolution, displays are bespoke installations rather than products. That is not a reason to skip 16K, because a print is not a screen. Resolution stops being about displays the moment the image leaves the browser and goes onto paper, canvas, or vinyl, and that is where 132.7 megapixels earns its size.
5.Print Size Guide: Resolution → Megapixels → Print Size at 300 DPI
One of the most practical applications of AI upscaling is enabling large-format printing. This table shows exactly how much physical print area each resolution tier unlocks at 300 DPI — the professional standard for close-viewing gallery prints.
| Resolution | Megapixels | Print Size at 300 DPI | Best For |
|---|---|---|---|
| 1080p | 2.1 MP | 6.4 × 3.6 inches | Social media, web thumbnails |
| 4K (UHD) | 8.3 MP | 12.8 × 7.2 inches | A4/Letter prints, photo books |
| 5K | 14.7 MP | 17 × 9.6 inches | A3/Tabloid prints, framed photos |
| 6K | 21.2 MP | 20.5 × 11.5 inches | Small posters, framed art |
| 8K | 33.2 MP | 25.6 × 14.4 inches | Medium posters, canvas prints |
| 10K | 59 MP | 34 × 19.2 inches | Large canvas, trade show displays |
| 12K | 79.6 MP | 41 × 21.6 inches | Large-format posters, retail signage |
| 16K | 132.7 MP | 51.2 × 28.8 inches (4.3 × 2.4 ft) | Gallery exhibition, billboard source, archival print |
Key insight: 16K is the only resolution that reliably clears 300 DPI at sizes above 40 × 22 inches — the threshold where most professional print labs classify a job as "large format." For anything smaller than 24 × 13 inches, 8K is sufficient. For gallery wall pieces and exhibition-scale prints, 16K is the minimum.
6.Why 16K Upscaling Matters (Even Without 16K Displays)
6.1Large-Format Printing
A 16K image at 300 DPI prints at 51 × 29 inches — large enough for gallery exhibition pieces. At 150 DPI (acceptable for prints viewed from 2+ feet), the same image prints at over 8.5 × 4.8 feet. Photographers can sell large-format prints from smaller source images by upscaling to 16K first.
6.2Crop Flexibility
Start with 16K and crop aggressively — you'll still have 4K+ resolution in the cropped region. Stock photographers and designers use this to extract multiple compositions from a single upscaled source.
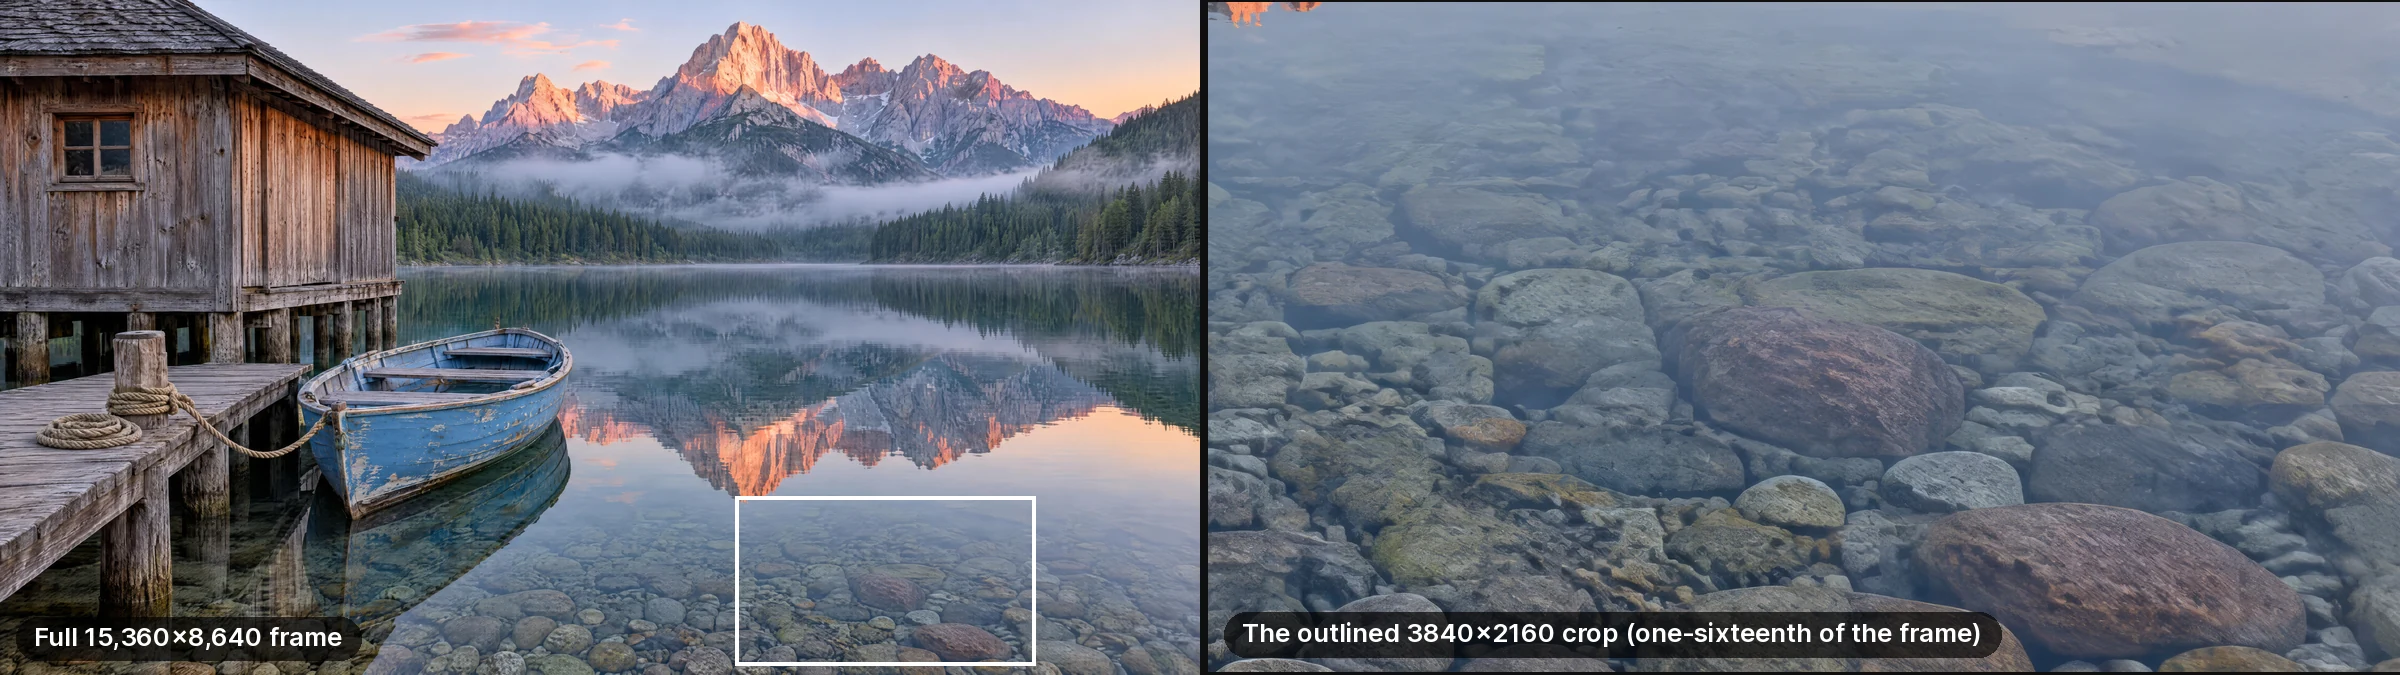
A 3840 by 2160 (4K) crop is exactly one-sixteenth of a 15,360 by 8,640 frame, so a 16K file leaves room to crop hard and still deliver 4K. Same real run as above.
6.3Future-Proofing Archives
Museums and cultural preservation organizations digitize artwork and artifacts at maximum resolution. AI upscaling brings older, lower-resolution scans to modern archival standards.
6.4Digital Signage and Billboards
Urban digital installations at close viewing distances need 50–100+ DPI source imagery. 16K resolution feeds these massive displays without visible pixelation.
6.5Stock Photography Premiums
Agencies like Getty and Shutterstock rank results by resolution. Images above 50 MP qualify for premium licensing tiers. A 132.7 MP 16K image exceeds all current tier requirements.
7.AI upscaler comparison: what each type can actually do
This table deliberately carries no prices. Vendor pricing moves constantly and a figure quoted in an article is stale within a release; what actually decides a 16K job is where the ceiling sits, whether your photo has to leave your machine, and what the limit costs you in quota or hardware.
| Imagera (cloud) | Imagera (on-device) | Desktop apps (Topaz Gigapixel and similar) | Open-source local (Upscayl and similar) | Metered cloud tools | |
|---|---|---|---|---|---|
| Max output | 15,360 px on the longest edge | 4× enlarge | Factor-based — check current release notes | Model-dependent | Advertised 16K, often behind a model picker |
| Adds new detail? | Yes — AI super-resolution | No — clean resize with edge sharpening | Yes | Yes | Yes |
| Does your photo leave your device? | Yes (cloud) | No | No | No | Yes |
| Install needed | None — browser | None — browser | Yes, desktop app | Yes, desktop app | None |
| GPU needed | No | No | Yes | Yes | No |
| Batch | Up to 10 per run | No | Yes | Yes | Usually paid-only |
| The limit you will hit | Credits — pay-first, cost shown before you spend | 4× ceiling, no AI detail | Licence plus your own hardware | Your own hardware | Daily download quota |
| Best for | Print-resolution output, generate-then-upscale pipelines | Fast private enlarges, sensitive or unpublished images | Volume local photo work, RAW input | Unlimited local work if you own the GPU | One or two images |
7.1When to choose which
Imagera's cloud upscaler when you need genuine 16K output in a browser, batch processing, or a generate-then-upscale pipeline that stays in one place. It is pay-first — you see the credit cost of the tier you selected before anything is spent.
Imagera's on-device enlarger when the image is sensitive, or when you simply need it bigger and cleaner rather than reconstructed. It runs on your device, so there is no queue, no quota, and nothing uploaded.
A desktop app when you process large volumes locally, need RAW input directly, or work under a policy that prohibits uploading images at all. Check the vendor's own release notes for the current model roster and maximum factor — desktop upscalers ship new model versions on their own cadence, and any count quoted in an article goes stale fast.
An open-source local upscaler when you own a suitable GPU and want unlimited local processing with no account. The trade is setup time and hardware rather than money, and nothing is uploaded.
A metered cloud tool for one or two images. Past the daily quota you are choosing between waiting until tomorrow and paying — which is the same decision as buying credits, taken later and with less control over the output.
8.How AI Super-Resolution Works (Under the Hood)
To choose the right upscaler for your project, it helps to understand what the AI is actually doing when it takes a 2 MP image and outputs a 132 MP file. The short answer: it depends entirely on which family of algorithms the tool uses, and each family makes a fundamentally different trade-off between accuracy and creativity.
8.1The Core Problem: Inventing Pixels
When you double the dimensions of an image, you need to fill in 3 out of every 4 pixels that did not exist in the original. Classical software (Bicubic, Lanczos) simply blends neighboring pixels to estimate the missing values. This produces soft, blurry results at high magnification. Modern AI super-resolution replaces that guesswork with neural networks trained on millions of high-resolution image pairs, learning what high-frequency detail should look like given a low-resolution input.
8.2GAN upscalers: the workhorse of practical upscaling
GAN (generative adversarial network) upscalers are the 2021-era workhorse that most open-source and desktop upscalers were built on, and a great deal of shipping software still runs them. The practical versions are trained on degraded real-world images — images with compression artifacts, noise, and blur — rather than synthetically downsampled ones. This makes it significantly more robust on "real" inputs like old scanned photos, screenshots, and social media downloads.
A GAN upscaler works by training two networks simultaneously: a generator that produces upscaled images and a discriminator that tries to tell them apart from genuine high-resolution photographs. Over millions of training iterations, the generator learns to produce outputs the discriminator cannot distinguish from real images. The result is sharp, plausible-looking detail — though not necessarily the exact detail that was in the original scene.
Upscayl, the open-source desktop upscaler, ships a GAN model of this family as its default. Imagera's cloud upscaler runs one engine per job at the output size you pick: Imagera AI for 2K to 16K, or Imagera Pro for a 2× or 4× enlargement.
8.3Transformer restorers: precision over flair
Transformer-based restorers replace the convolutional layers in earlier architectures with windowed attention. Transformers model long-range pixel relationships — meaning they can use context from across the full image to restore fine details, not just the local neighborhood around each pixel.
In benchmark tests (PSNR and SSIM metrics), transformer restorers consistently outperform GAN upscalers on clean inputs. It is more computationally expensive but produces more accurate results when fidelity to the original signal matters. Medical imaging tools and scientific visualization systems often prefer transformer-based architectures for this reason.
8.4Diffusion-Based Upscaling: The Generative Frontier
The newest generation of upscalers uses stable diffusion as the backbone. Tools like Magnific AI use a high-resolution diffusion model conditioned on the low-resolution input, allowing the model to hallucinate plausible high-frequency texture using the full generative power of a diffusion process.
The result can be visually stunning — skin that looks photographic, foliage with individual leaf vein detail, fabric with realistic weave patterns. But these outputs diverge from the original pixel data in ways that conservative upscalers do not. A freckle might move; a hair might shift. For photography, this can be problematic. For AI-generated art or creative work, it is often exactly what you want.
8.5What changed by 2026 — and the ceiling that did not
The architectures above explain the mechanics, but they are no longer the frontier. The best-known GAN and transformer restorers are 2021 papers; the current cohort of restorers is built on video- and diffusion-derived models rather than pure GANs, and is markedly better on faces, text, and fabric than anything an article written in 2023 would have recommended. If a comparison you are reading names only 2021-era GAN and transformer models and waifu2x, it is describing the state of the art from five years ago.
What has not changed is the ceiling, and the newer tools are refreshingly blunt about it. One diffusion-based restorer's own review page (published 31 July 2026, updated 23 August 2026) states that upscaling "cannot invent missing detail" and "cannot guarantee recovery of information that was never visible in the source" — and its own showcase demo runs 768 px to 2048 px, a 2.7× jump rather than an 8× one. That is a vendor with every incentive to claim more, describing the honest shape of the technology.
Read that next to the "16K at no charge" claims. Any tool can genuinely write a 16,384-pixel file from a 1,000-pixel source. Whether that file contains 16K worth of information is a separate question, and the answer is no. The useful skill is not finding the biggest number on a button — it is knowing which source deserves the big number.
8.6Conservative vs. Generative Upscaling: The Key Trade-Off
| Aspect | Conservative (GAN and transformer restorers) | Generative (Diffusion-Based) |
|---|---|---|
| Pixel accuracy | High — preserves original structure | Low — synthesizes new detail |
| Visual sharpness | Moderate to high | Very high |
| Hallucination risk | Low | High |
| Best for photography | Yes | No |
| Best for AI art | Acceptable | Yes |
| Best for documents/text | Yes | No |
| Best for medical/scientific | Yes | No |
| Speed | Fast (1–30 seconds) | Slow (30 seconds–5+ minutes) |
| Upscale range | 2×–8× typical | 2×–16× |
| Artifacts | Occasional sharpening halos | Texture inconsistency, drift |
| Control over output | Limited | High (via prompt guidance) |
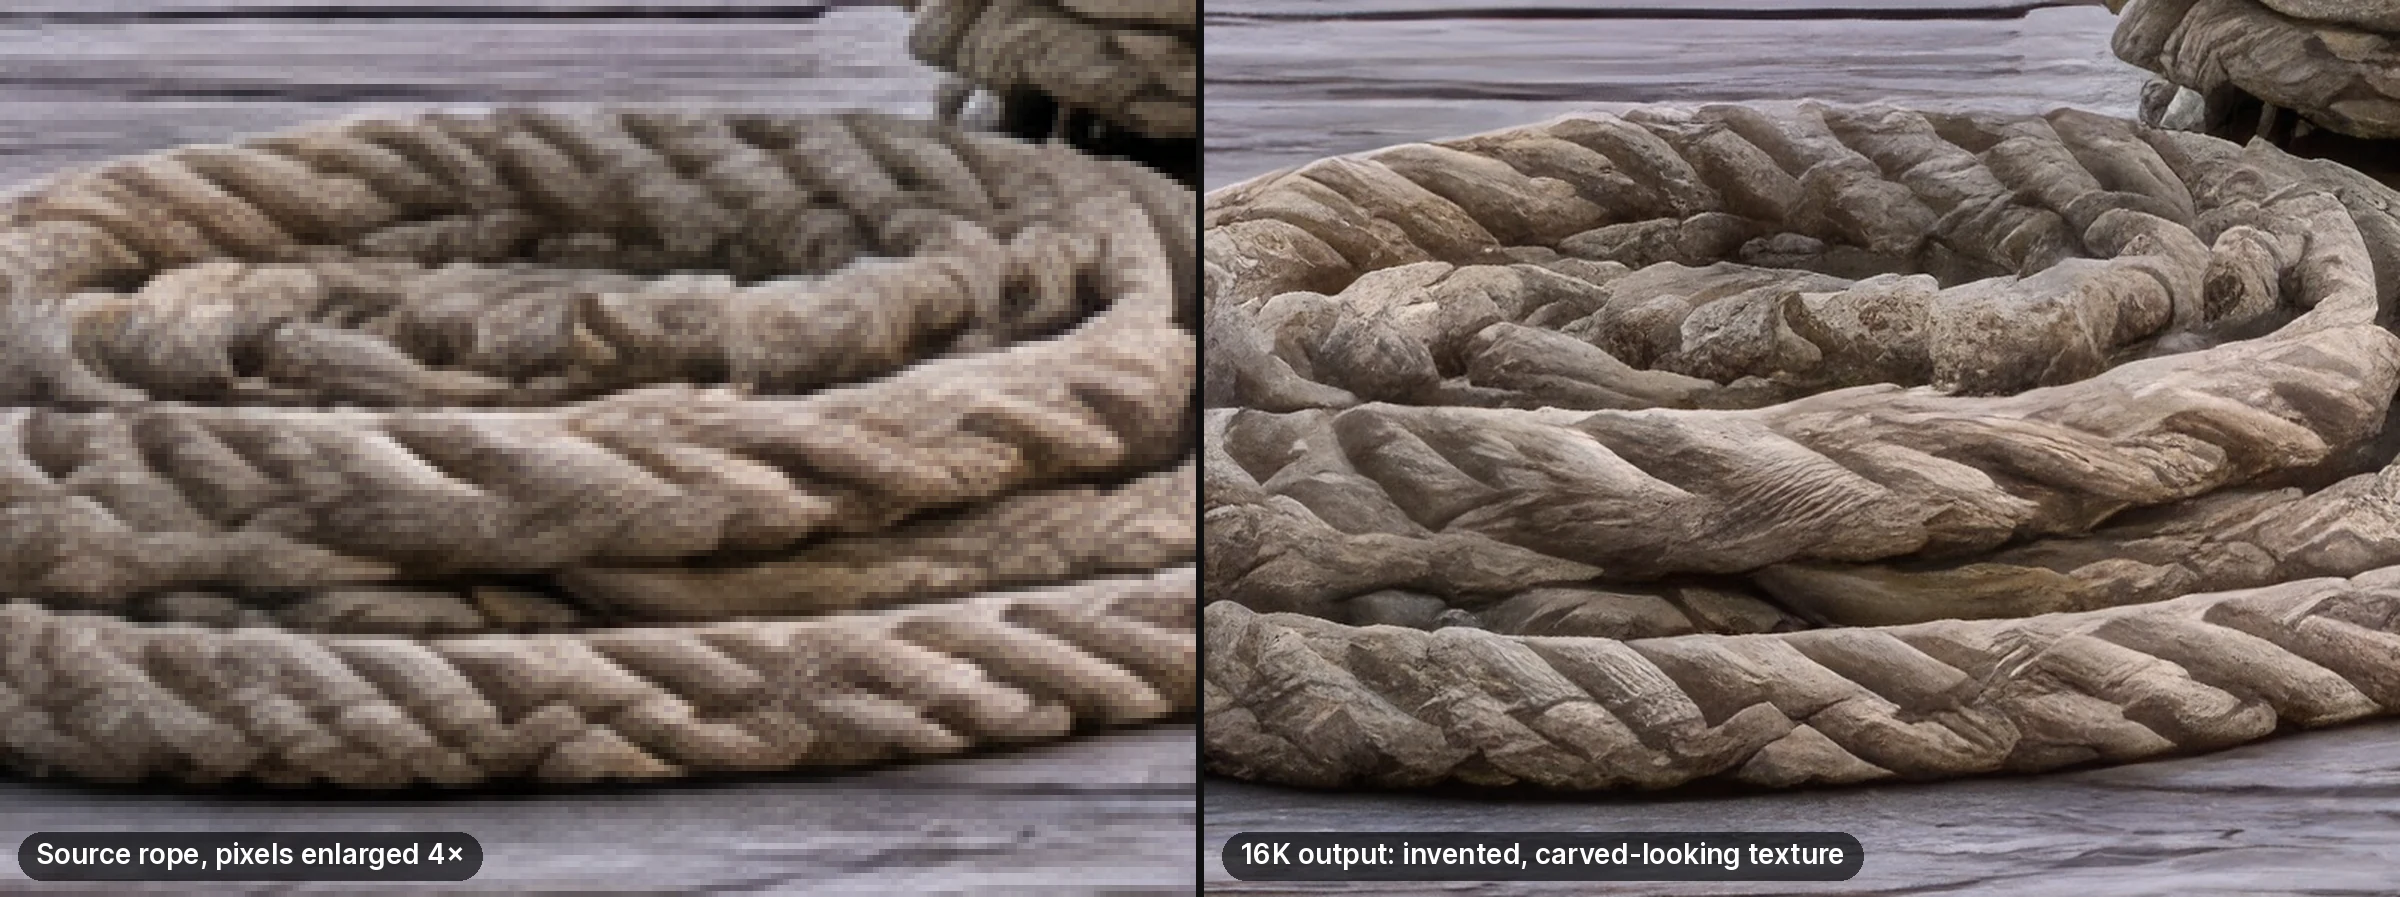
Same real run, 100% crops. Generative upscaling invents texture: here the rope reads more like carved wood than fibre. Check high-detail areas at 100% before you print.
8.7Algorithm Comparison Summary
| Algorithm | Approach | Best For | Hallucination Risk | Speed |
|---|---|---|---|---|
| Bicubic / Lanczos | Classical interpolation | Quick previews only | None (blurs, not invents) | Instant |
| GAN upscalers | GAN-based generative | General photos, social media | Low–Medium | Fast |
| Transformer restorers | Transformer-based discriminative | High-fidelity restoration | Very Low | Medium |
| GAN + face model | GAN + specialized decoder | Portrait photography | Low (face-specific) | Fast |
| Diffusion-based (e.g., Magnific) | Full generative synthesis | AI art, creative upscaling | High | Slow |
| Anime4K / waifu2x | Anime-optimized CNN | Illustration, manga, anime | Low (within style) | Fast |
| Document-optimized CNN | Text-aware sharpening | Scans, documents, OCR | Very Low | Fast |
Understanding which algorithm a tool uses tells you immediately whether it is trustworthy for your use case. For increasing image resolution without quality loss, conservative architectures are generally the safer choice for real-world photography.
9.AI Image Upscalers That Reach 16K
| Tool | Reaches 16K? | Route without a purchase | Approach |
|---|---|---|---|
| Imagera's upscaler | Yes — 15,360 px on the longest edge | Separate on-device enlarger: 4×, no upload | AI super-resolution, one engine per run |
| Desktop photo upscalers (Topaz Gigapixel and similar) | Via chained passes | Trial only | Conservative, photo-trained models |
| Diffusion upscalers (Magnific AI and similar) | Yes, at high factors | No | Generative detail synthesis |
| Open-source local (Upscayl and similar) | Model-dependent | Yes, unlimited — you supply the GPU | Local GAN models |
| Anime and illustration specialists (waifu2x and similar) | No | Yes, with a queue | CNN tuned for flat colour and hard edges |
| Metered cloud "16K" tools | Advertised | Daily quota — see the limits table above | Mixed; usually a hosted third-party model |
Specifications for third-party tools change with every release, so this article does not quote their prices or version numbers — anything it printed would be wrong by the time you read it. Where a number matters to your decision, check that vendor's own page on the day you decide.
9.1Two approaches to AI upscaling
Conservative and preservative (desktop photo upscalers, most open-source models): these sharpen edges and infer pixels without inventing detail that was not implied by the source. Best for photography, documents, and product images where accuracy matters.
Generative and creative (diffusion-based upscalers): these analyse your image and synthesise plausible detail — skin pores, leaf veins, fabric weave. Best for AI art, creative work, and low-resolution sources where some invention is acceptable.
Imagera's cloud upscaler sits between the two: super-resolution that preserves structure while adding detail. It has two engines, and each job runs one: Imagera AI enlarges up to 16K and handles photos, art and screenshots; Imagera Pro enlarges 2× or 4× and keeps skin, hair and fabric more natural.
Imagera's 16K tier writes up to 15,360 pixels on the longest edge for 120 credits per image, with the credit cost shown before you run. Upscale an image to 16K
10.Imagera AI vs Topaz Gigapixel: Detailed Comparison
Topaz Gigapixel is the best-known desktop upscaler; Imagera is the browser alternative that reaches 16K with no install. Desktop upscalers ship new model versions on their own cadence, so any model count or maximum factor quoted in an article dates quickly — check their release notes for current specs. What follows is the structural comparison, which does not move.
| Feature | Imagera AI | Topaz Gigapixel AI |
|---|---|---|
| Business model | Pay-first credits — buy a pack, cost shown per tier before you generate | Paid desktop licence |
| Platform | Browser-based (any OS) | Windows, macOS (desktop app) |
| Max Output Resolution | Up to 15,360 px on the longest edge | Factor-based, no fixed pixel ceiling — see current release notes |
| Max Upscale Factor | Set by the output tier (2K to 16K); Imagera Pro works in 2× or 4× | Vendor-published — see current release notes |
| Route without a purchase | Separate on-device enlarger — 4×, no upload. The cloud upscaler runs on credits. | Trial |
| Installation Required | No | Yes — desktop installer (size varies by release) |
| Where it runs | Cloud GPUs, from any modern browser | Your own computer (CUDA GPU recommended) |
| Batch Processing | Up to 10 images per run | Yes (unlimited, offline) |
| File Format Input | JPEG, PNG, WebP (up to 50 MB) | JPEG, PNG, TIFF, DNG, HEIC |
| File Format Output | JPEG (quality 95) | JPEG, PNG, TIFF |
| Quality at 2× | Excellent | Excellent |
| Quality at 4× | Excellent | Excellent |
| Quality at 8×+ | Mostly generated detail — check faces and text at 100% | Reached by chaining passes |
| Number of AI Models | 2 engines: Imagera AI (up to 16K) and Imagera Pro (2× or 4×) | Several content-specific models — see vendor |
| Face Enhancement | No separate face model; Imagera Pro (2× or 4×) keeps skin and hair more natural | Yes (dedicated face model) |
| Suppress Noise | Part of the upscale; no separate setting | Yes (with noise reduction model) |
| Fix Compression Artifacts | Part of the upscale; no separate setting | Yes (JPEG artifact model) |
| ControlNet / LoRA Support | Integrated with Imagera's generation tools | No |
| API Access | Yes (developer API) | No public API |
| Privacy / Offline Processing | Images uploaded to cloud | Fully local — no upload |
| Speed (16K output) | About 4.5 minutes median per image, plus queue | Bounded by your own GPU |
| Sharpening Controls | No — each run is one engine at one size | Yes (minor/medium/strong) |
| Color Profile Preservation | No — convert Adobe RGB or ProPhoto files to sRGB before upload | Yes |
| RAW File Support | No (convert to TIFF first) | Yes (DNG support) |
| Upscale + Generate Workflow | Yes (generate with AI Image Generator, then upscale) | No |
10.1When to Choose Imagera AI
Imagera AI is the better choice when you need browser-based access on any device, want output at the full 15,360-pixel ceiling, want to combine upscaling with AI image generation in a single workflow, or need API integration for automated pipelines. It is also the lower-commitment entry point: you buy a credit pack rather than a licence, and the studio shows the credit cost of the tier you picked before you generate. It runs on credits; for a quick pass that never leaves your device, use the on-device enlarger first and move up only when you need reconstructed detail.
10.2When to Choose Topaz Gigapixel
Topaz Gigapixel remains the best option for photographers who process large volumes locally, require RAW file input directly, need the highest accuracy on photographic subjects using models purpose-built for specific content types, or have privacy requirements that prohibit uploading images to cloud infrastructure.
For photographers building a generate-then-upscale workflow — creating images with an AI image generator and then scaling them to print resolution — Imagera AI's integrated pipeline is significantly more efficient than switching between tools.
For a full breakdown, see the dedicated Topaz Gigapixel alternative comparison.
11.How to Upscale an Image to 16K with Imagera AI
11.1Step 1: Upload Your Image
To upscale an image to 16K, open the studio and upload your source: JPEG, PNG or WebP, up to 50 MB each and up to 10 per run.
For best results, start with the highest quality source available. A lossless format (PNG) gives the AI more data to work with than a compressed JPEG.
11.2Step 2: Select Your Target Resolution
Pick the Imagera AI engine and the 16K tier: 120 credits per image, shown before you run. The tier sets the output size, so a 1,920 px (1080p) source is enlarged 8× and a 3,840 px source 4× to reach 15,360 px.
Any shape works. The long edge becomes 15,360 px and the short edge follows your photo, so a square source comes back 15,360 × 15,360. The one source the upscaler will not open is one above 179 MP, such as a square 16K result (236 MP) uploaded again, so start from the original.
11.3Step 3: Process and Download
Start the job. A 16K run took about 4.5 minutes at the median (2 to 14 minutes across completed runs), plus any time in the queue; a few very large 16K jobs have hit the 30-minute timeout instead. The result is delivered for download at up to 15,360 pixels on the longest edge.
11.4Step 4: Check at 100% and Export
The result downloads as a JPEG at quality 95. Before you send it to a print lab, zoom faces, text and repeating textures to 100%. If the lab wants TIFF, convert the JPEG in your editor; conversion adds no detail but avoids a second round of compression.
After downloading your upscaled image, run it through Imagera's Extreme Detailer to fix any AI artifacts and add photorealistic skin texture, fabric detail, and surface depth that upscaling alone cannot produce. Try Extreme Detailer
12.16K Print Size Calculator
Understanding DPI (dots per inch) is critical for print. DPI is a print instruction — it tells the printer how many pixels to squeeze into each inch. Here's what a 16K image (15,360 × 8,640 px) gives you at different DPI settings:
| Target DPI | Print Size | Use Case |
|---|---|---|
| 300 DPI | 51 × 29 inches (4.3 × 2.4 ft) | Gallery prints, close viewing |
| 200 DPI | 77 × 43 inches (6.4 × 3.6 ft) | Large-format matte prints |
| 150 DPI | 102 × 58 inches (8.5 × 4.8 ft) | Posters, trade show graphics |
| 100 DPI | 154 × 86 inches (12.8 × 7.2 ft) | Retail signage, event banners |
| 50 DPI | 307 × 173 inches (25.6 × 14.4 ft) | Building wraps, stadium graphics |
Quick formula: Desired print width (inches) × required DPI = horizontal pixels needed. For a 36-inch gallery print at 300 DPI, you need 10,800 horizontal pixels — well within 16K range.
13.Use Cases: Starting Resolution, Target, and Tool Recommendations
Not every project needs a 16K output. This table maps real-world use cases to the right starting resolution, target resolution, recommended tool, and practical workflow tips.
| Use Case | Starting Resolution | Target Resolution | Tool | Tips |
|---|---|---|---|---|
| Photography print (portrait/landscape) | 4K–6K camera RAW | 16K | Imagera AI or Topaz Gigapixel | On Imagera, pick Imagera AI at 16K, or Imagera Pro (2× or 4×) for skin and hair; the result is a JPEG (quality 95), so convert it to TIFF if the lab asks |
| AI art poster | 1K–2K generated image | 8K–16K | Imagera AI | Generate at a moderate size first, then pick the 8K or 16K tier; check hands, eyes and text at 100% |
| Old photo restoration | 480p–720p scan | 4K–8K | Imagera AI | Repair scratches in the photo restorer first; Imagera Pro (2× or 4×) keeps faces natural; one engine and one size per run |
| Product photography (e-commerce) | 2K–4K studio shot | 8K | Imagera AI or Let's Enhance | Convert to sRGB before upload for accurate colour; the result is a JPEG, so cut out the background afterwards if you need transparency |
| Desktop wallpaper / digital art | 2K AI art | 5K–8K | Imagera AI | Match the tier to the screen: 4K for a 3,840 px display, 8K for a 7,680 px one |
| Billboard / large-format signage | 4K–8K source | 16K | Imagera AI | Agree the DPI with the print lab first; the result is a JPEG, so convert it to TIFF if the lab asks |
14.Best Source Formats for AI Upscaling
Not all image formats upscale equally. The AI works with whatever pixel data exists in your source — lossless formats preserve more data, giving better results.
| Rank | Format | Quality for Upscaling | Notes |
|---|---|---|---|
| 1 | RAW (CR2, NEF, DNG) | Excellent | Maximum data. Convert to TIFF before upscaling |
| 2 | TIFF (16-bit) | Excellent | Professional standard. Large files |
| 3 | PNG | Excellent | Lossless, widely supported |
| 4 | WebP (lossless) | Very Good | Lossless, smaller files than PNG |
| 5 | JPEG (95-100%) | Good | Acceptable if saved at high quality |
| 6 | JPEG (70-90%) | Fair | Compression artifacts may be amplified |
| 7 | JPEG (<70%) | Poor | Significant artifacts will be amplified |
Key rule: Never re-save a JPEG multiple times before upscaling. Each save introduces generation loss. If you only have a JPEG, convert it to PNG first — this doesn't add quality, but prevents further degradation during processing.
Need to upscale a batch of images quickly? Imagera's Super Resolution tool takes up to 10 images in one run — 1080p, 2K, or 4K with a single batch job. Try Super Resolution
15.Complete Resolution Guide: From 720p to 16K
One of the most common questions when planning an upscaling project is: "How far do I actually need to go?" The answer depends on your starting resolution, your output destination, and the minimum pixel density acceptable for that medium. This table maps the complete landscape of practical resolutions and the upscale factor required to reach 16K from each starting point.
15.1Resolution Reference Table
| Resolution Name | Dimensions (16:9) | Megapixels | Common Use Cases |
|---|---|---|---|
| 720p (HD) | 1,280 × 720 | 0.9 MP | Streaming, web video, older smartphones |
| 1080p (Full HD) | 1,920 × 1,080 | 2.1 MP | DSLR video, consumer cameras, YouTube |
| 1440p (2K / QHD) | 2,560 × 1,440 | 3.7 MP | PC gaming monitors, mirrorless photo |
| 2K (DCI) | 2,048 × 1,080 | 2.2 MP | Digital cinema projection |
| 4K (UHD) | 3,840 × 2,160 | 8.3 MP | Modern cameras, streaming, prosumer |
| 4K (DCI) | 4,096 × 2,160 | 8.8 MP | Cinema cameras, professional production |
| 5K | 5,120 × 2,880 | 14.7 MP | iMac Retina, high-end mirrorless |
| 6K | 6,144 × 3,456 | 21.2 MP | RED cameras, medium-format digital |
| 8K (UHD-2) | 7,680 × 4,320 | 33.2 MP | High-end cinema, archival scanning |
| 10K | 10,240 × 5,760 | 59 MP | Digital cinema max, large format |
| 12K | 12,288 × 6,480 | 79.6 MP | RED V-RAPTOR 12K, billboard production |
| 16K | 15,360 × 8,640 | 132.7 MP | Maximum AI upscale, giant format print |
15.2Aspect Ratio Variants at Common Resolutions
Different content types use different aspect ratios. Here are the pixel counts for the most common aspect ratio and resolution combinations:
| Resolution / Ratio | 16:9 (Widescreen) | 4:3 (Classic/Photo) | 1:1 (Square) | 3:2 (DSLR Standard) |
|---|---|---|---|---|
| 4K equivalent | 3,840 × 2,160 | 2,880 × 2,160 | 2,160 × 2,160 | 3,240 × 2,160 |
| 8K equivalent | 7,680 × 4,320 | 5,760 × 4,320 | 4,320 × 4,320 | 6,480 × 4,320 |
| 16K equivalent | 15,360 × 8,640 | 11,520 × 8,640 | 8,640 × 8,640 | 12,960 × 8,640 |
15.3Upscale Factor Needed to Reach 16K
| Starting Resolution | Starting MP | Upscale Factor to 16K | Recommended Approach |
|---|---|---|---|
| 720p | 0.9 MP | 12× | Three-pass: 4× then 2× then 1.5× |
| 1080p | 2.1 MP | 8× | Two-pass: 4× then 2× |
| 1440p | 3.7 MP | 6× | Two-pass: 4× then 1.5× |
| 4K | 8.3 MP | 4× | Single 4× pass |
| 5K | 14.7 MP | ~3× | Single 3× pass |
| 6K | 21.2 MP | ~2.5× | Single 2× or 3× pass |
| 8K | 33.2 MP | 2× | Single 2× pass |
| 10K | 59 MP | ~1.5× | Single pass (minor upscale) |
| 12K | 79.6 MP | ~1.25× | Single pass or direct export |
Practical note on multi-pass upscaling: Each additional pass multiplies quality gains but also compounds any artifacts. For very low starting resolutions (720p or below), consider whether the source material has enough genuine detail to support a 12× upscale at all. A blurry 720p photo upscaled to 16K will be a sharp-edged but fundamentally blurry 16K image. For extremely low-resolution sources, combining AI image generation with upscaling often produces better results than upscaling alone.
16.6 Tips for Better AI Upscaling Results
16.11. Start with the Highest Quality Source
AI upscaling amplifies what exists — it cannot create detail that was never captured. Always use the original file, not a screenshot or re-saved copy.
16.22. Use Two-Pass Upscaling for Extreme Jumps
For 8×+ upscales (like 1080p to 16K), process in two passes: 4× first, then 2× on the result. This produces sharper detail than a single large jump.
16.33. Choose the Right AI Model for Your Content
Professional upscalers offer specialized models — photography, illustration, text/document, low-resolution recovery. Test 2-3 models on a crop before committing to a full upscale.
16.44. Don't Confuse DPI with Resolution
Changing the DPI tag on an image does NOT add pixels. A 3000×2000 image at 72 DPI and 300 DPI contains identical pixel data. You must actually upscale to add real resolution.
16.55. Keep Upscale Factors Reasonable
2×–4× gives the best quality-to-accuracy ratio for photography. Beyond 4×, AI begins hallucinating detail — great for art, less accurate for photos and documents.
16.66. Choose Local Tools for Sensitive Images
Cloud upscalers upload your images to remote servers. For confidential, medical, or legal images, use local tools like Upscayl or Topaz Gigapixel that process entirely on your machine.
17.Upscaling for Different Use Cases: Settings Guide
A single AI model setting does not work equally well across all image types. Portrait photography demands different handling than a scanned manga panel. Medical scans require different accuracy standards than a hero banner for a website. This section maps each major use case to its optimal upscaling configuration.
17.1Photography (Landscape, Portrait, Street)
Photographic content benefits most from conservative upscaling with controlled sharpening. The goal is to enlarge without inventing detail the camera never captured.
Use a photo-specific model (not anime or illustration). Apply noise reduction before upscaling if the source has visible grain — the AI will otherwise sharpen the noise along with the real detail. Enable face enhancement as a separate post-processing pass for portrait work rather than during the upscale itself, which can cause the face model to over-smooth background textures.
Sharpening: set to medium. Over-sharpening is the most common error in photographic upscaling — it creates the characteristic "HDR halo" look around high-contrast edges.
The Real Camera Pipeline: Upscale with Imagera's AI Upscaler → fix AI skin artifacts with Extreme Detailer → add realistic pores and texture with Skin Detailer → finish with Real Camera Noise for authentic film grain. Try Extreme Detailer | Try Skin Detailer | Try Real Camera Noise
17.2AI-Generated Art
AI art upscaling benefits from a more generative approach. Images created with Imagera's generators often contain coherent high-level structure but lack fine texture at the pixel level — exactly the gap generative upscaling fills best. Using a generative diffusion upscaler on AI art can add skin texture, fabric weave, and surface detail that was not present in the original output.
For AI art specifically, consider the generate-then-upscale workflow: create your image at 1024×1024 or 1536×1536, then scale to 4K or 8K with a generative upscaler. This is often faster and produces better results than generating natively at high resolution. The AI Image Generator on Imagera hands its results straight to the upscaler for exactly this workflow.
17.3Documents, Scans, and Text
Documents require a specialist model, not a general-purpose photo model. Text-optimized upscaling prioritizes hard edges, contrast at character boundaries, and OCR legibility over photorealistic texture. Never use a generative upscaler on documents — hallucinated detail on a text character can change its meaning.
Enable "suppress artifacts" or "JPEG recovery" if the source is a scanned or photographed document with compression. A document scan upscaled 4× with a text-aware model should produce crisp, OCR-readable characters even at very high magnification.
17.4Medical and Scientific Imaging
Accuracy is the only metric that matters for medical or scientific upscaling. Use conservative architectures (transformer restorers) with zero hallucination tolerance. Never use generative upscaling on medical imagery — synthesized detail in an MRI scan or satellite measurement is not enhanced data, it is fabricated data.
Where possible, retain original image metadata (bit depth, color profile, calibration data). Process in TIFF 16-bit throughout. For peer-reviewed publication or diagnostic use, document the upscaling algorithm and parameters in your methodology.
17.5Anime and Illustration
Anime and illustrated content has unique characteristics — flat color regions, very sharp edges, minimal photographic noise — that general photo models handle poorly. Dedicated anime models (Anime4K, waifu2x, or Bigjpg's CNN) are trained specifically on illustrated content and handle these characteristics correctly.
General photo upscalers applied to anime content typically introduce grain-like texture into flat color regions and over-smooth or incorrectly render clean line art. Use the dedicated illustration or anime model even if the general model looks "close enough" at small sizes.
17.6Use Case Settings Summary
| Use Case | Recommended Model Type | Upscale Factor | Key Setting | Privacy Note |
|---|---|---|---|---|
| Landscape photography | Photo (conservative) | 2×–4× per pass | Sharpening: Medium | Cloud OK |
| Portrait photography | Photo + Face Enhancement | 2×–4× | Face model post-pass | Cloud OK |
| AI-generated art | Generative / diffusion | 4×–8× | Texture synthesis on | Cloud OK |
| Document / scan | Text-optimized | 2×–4× | Artifact suppression on | Local preferred |
| Medical / scientific | Conservative (transformer) | 2× max | Zero hallucination | Local required |
| Anime / illustration | Anime-specific CNN | 2×–4× | No noise addition | Cloud OK |
| Product photography | Photo (conservative) | 2×–4× | Color accuracy priority | Cloud OK |
| Satellite / aerial | Scientific conservative | 2× max | No texture synthesis | Local required |
18.Common AI Upscaling Mistakes (And How to Fix Them)
Even experienced users make these errors. Each one produces a specific, recognizable artifact — and each has a straightforward solution.
18.1Mistake 1: Over-Sharpening and Halo Artifacts
The symptom: bright or dark rings appear around high-contrast edges — the silhouette of a building against the sky, hair against a bright background, a person's shoulder against a wall. This is the most common artifact in upscaled images and the most visible at normal viewing distance.
The cause: sharpening is applied too aggressively, either by the upscaler's built-in sharpening slider or by post-processing in a photo editor after upscaling.
The fix: set the upscaler's sharpening to medium or low. Apply any additional sharpening manually in Photoshop or Lightroom using an Unsharp Mask with a large radius and low amount, then inspect at 100% zoom before saving. Halos are far easier to prevent than to remove.
18.2Mistake 2: Upscaling Already-Compressed JPEGs
The symptom: blocky, mosaic-like patterns in flat-color regions (sky gradients are particularly revealing), mosquito noise around text and high-contrast edges, and a general "over-processed" look.
The cause: JPEG compression artifacts are pixel-level patterns that the AI treats as genuine image information. When upscaled, these artifacts are enlarged and sharpened along with the real content.
The fix: use a JPEG artifact recovery model before or during upscaling — most professional tools offer this. Alternatively, use the original file at a higher JPEG quality setting. For severely compressed sources, the artifact recovery pass is more important than the upscale factor — run artifact reduction at the original size, then upscale the cleaned result.
18.3Mistake 3: Wrong Model for Content Type
The symptom: anime characters have photorealistic skin grain; product photos have illustrated-looking flat-color regions; scanned text is blurry with rounded letter edges.
The cause: photo models are trained on real-world photographic content with complex surface textures. Illustration models are trained on flat-color vector-like content. Using one on the other's domain produces characteristic cross-contamination artifacts.
The fix: identify your content type before selecting a model. When in doubt, test a 500×500 pixel crop through 2–3 models and compare at 100% zoom before committing to a full upscale of a large image.
18.4Mistake 4: Ignoring Color Profile Management
The symptom: colors shift after upscaling — greens become slightly more yellow, reds more orange, or the overall image appears subtly desaturated or over-saturated compared to the source.
The cause: if the source image has an embedded ICC color profile (Adobe RGB, ProPhoto RGB, or a camera-specific profile) but the upscaler processes in sRGB without converting correctly, the resulting output has incorrect color values even if the pixel structure is perfect.
The fix: before upscaling, ensure your source image is in sRGB if your upscaler does not explicitly support wide-gamut profiles. Use a tool like ColorSync (macOS) or IrfanView (Windows) to convert the profile before upload. For professional print production, verify that the output retains the correct profile by checking in Photoshop after download. This detail is easy to overlook and expensive to discover after a large-format print has been produced.
18.5Mistake 5: Expecting 16K Quality from a Thumbnail Source
The symptom: the output is technically 16K in pixel dimensions but appears to have the "painted" or "hallucinated" look of an image with detail that is too uniform — every surface has the same apparent texture depth, and there are no areas of genuine fine detail.
The cause: if the source is a 300×300 thumbnail, the AI has almost no genuine pixel information to work with. It is constructing 99%+ of the 16K output from its training priors rather than from actual image content. The result may look sharp at first glance but will not hold up under close examination.
The fix: understand what level of upscaling is realistic for your source. A 300×300 source can be made larger and less blurry, but it cannot be made genuinely photographic at 16K. For very low-resolution sources, the ceiling for believable upscaling is typically 4×–6×. For anything requiring true 16K quality, start with the best source you can obtain. If no good source exists, use an AI image generator to create a high-quality image from scratch, then upscale the generated result. This combination — generate at 1K, upscale to 16K — consistently outperforms upscaling a poor original.
18.6Mistake 6: Skipping the Crop Test
The symptom: you process a full 20 MB image through a 4× upscale, wait 3 minutes, and discover the results are wrong — the model choice was incorrect, the sharpening is too aggressive, or a compression artifact mode was needed.
The cause: processing the full image without testing settings first wastes significant time and, if you are on a credit-based plan, credits.
The fix: crop a 600×600 representative region from your image — include the most complex area (faces, fine textures, text, or high-contrast edges). Run that crop through your target settings first. Evaluate the crop at 100% zoom. Only commit to the full image when the crop result is satisfactory. This workflow costs a fraction of the time and credits and eliminates the most common rework cycle in upscaling projects.
19.Real-World Use Cases for 16K Upscaling
19.1Fine Art and Gallery Prints
Photographers sell large-format prints from older or lower-resolution source images. A 12 MP archive image upscaled to 132 MP qualifies for gallery-wall exhibition at 300 DPI.
19.2Museum and Cultural Heritage
The Google Art Project and similar initiatives capture artwork at gigapixel resolution. AI upscaling brings older digital scans to modern archival standards, preserving brushstroke detail for future restoration reference.
19.3Stock Photography
Higher resolution images command premium pricing on stock platforms. Upscaling an archive of 12 MP images to 132 MP unlocks higher-revenue licensing tiers on Getty, Shutterstock, and Adobe Stock.
19.4Game Textures and Virtual Production
Unreal Engine 5 and Unity support 8K+ texture maps. VFX studios upscale source photographs used in photogrammetry to create hyper-realistic 3D models and virtual production backgrounds.
19.5Video Upscaling
Need to upscale footage, not just stills? Imagera's Video Enhancer takes video from 240p all the way to 4K cinema quality — frame by frame, with the same neural super-resolution that powers the image upscaler. Enhance video now
20.How to Do This with Imagera AI
Imagera offers a complete post-processing pipeline for upscaling — from the initial resolution boost all the way to photorealistic finishing. Here is which tool to use at each step:
Upscale to 2K, 4K, 8K or 16K — two engines, one per run, up to 10 images per batch, 15 to 120 credits per image. Open Imagera's 16K upscaler
Batch upscale up to 10 images at once to 1080p, 2K, or 4K — faster than processing one at a time. Try Super Resolution
Fix AI artifacts and add photorealistic skin texture after upscaling — eliminates the plastic "AI look" that upscaling can amplify. Try Extreme Detailer
Add realistic pores, freckles, and skin imperfections to portrait upscales — makes faces look photographed, not generated. Try Skin Detailer
Add authentic film grain and camera noise to your upscaled images — the final step before print. Try Real Camera Noise
Upscale video from 240p to 4K cinema quality — the same neural super-resolution, applied frame by frame. Try Video Enhancer
21.Start upscaling — two doors, honestly different
On your device, nothing uploaded — up to 4×: Open the Image Enlarger → Runs entirely in your browser. Your photo is never uploaded or stored on any server, and there is no daily quota and no queue. It is a clean enlarge with edge sharpening — not AI-invented detail, and not 16K.
AI detail up to 15,360 px — credits: Open Imagera's 16K upscaler → Cloud super-resolution, 15 to 120 credits per image by tier, up to 10 images per batch. You buy credits first and see the cost of the tier before you run it.
22.Related Resources
- Imagera's 16K upscaler — 2K to 16K, credit cost shown before you run
- How to Increase Image Resolution Without Quality Loss — General guide to AI upscaling
- Topaz Gigapixel Alternative — Desktop vs. cloud upscaler comparison
23.Start creating (credit cost shown before you spend)
Imagera cloud tools are pay-first — buy credits, then generate. Every cloud run is paid in credits. Credit packs start at $39.99 for 350 credits; the Starter subscription is $19.99/month.
Next step: open a tool page, check the credit cost, buy a pack if you need one, then generate.