How do you create an illustration in Ultra HD Image Generator?
Start in Ultra HD Image Generator, choose Nano Banana Pro, enter your visual instructions, and generate a candidate. Check the result against your requirements before saving the chosen image. Keep the original instructions with the file so that later revisions preserve the same subject, visual direction, and intended use.
Treat generation and selection as separate jobs. The first produces something to assess. The second decides whether it belongs in your project. A pleasing illustration can still miss a requirement that matters to the finished design.
Before generating, turn your written requirements into a compact description of the image you need. For our balcony-gardening header, the job was more specific than “a gardener with plants”: the illustration needed to work alongside a headline and follow a restrained editorial style. Keep that intended use visible while you work.
After generation, compare the candidate with those requirements rather than choosing on appearance alone. If it needs changes, retain the useful instructions and revise the part that missed the mark. Save promising alternatives separately so you can compare them without losing an earlier direction.
Download the selected image, keep its instructions alongside it, and move it into the intended layout for the checks below. Saving a candidate is a handoff to inspection, not automatic approval.
Try Ultra HD Image Generator → Plans start at $19.99; credit packs from 350 credits.
What should you tell the image generator?
Describe the subject and action first, then the setting, illustration style, colors, and intended use. For our gardening header, that means a gardener watering separate potted plants, flat geometric shapes, solid fills, and a tightly controlled palette. Add specific exclusions only where they protect a requirement, such as avoiding rendered lettering.
Build the request in this order. Adobe’s breakdown of subject, background, style, color, and lighting makes a useful writing reference.
- Subject and action. Name the gardener and the watering action. State exact counts for people, pots, and tools rather than leaving “some plants” open to interpretation.
- Setting and viewpoint. Specify an apartment balcony and a side-on view. Identify the floor and railing so the scene has a clear spatial structure.
- Style and color. Ask for flat geometric silhouettes, solid fills, and minimal texture. Name the permitted colors explicitly. For this flat treatment, avoid requests for dramatic lighting that compete with solid fills.
- Intended use. Say “editorial blog header.” Unlike a standalone illustration, a header must work alongside typography and survive placement in a wider page design.
- Required details and exclusions. Describe the hand gripping the watering-can handle and the other arm resting naturally. Exclude extra limbs, duplicate tools, and rendered lettering.
Use concrete instructions over adjectives such as “beautiful” or “professional.” They give you clearer criteria for selecting a candidate, although exact compliance still needs checking.
How do you leave room for a headline?
Reserve a specific blank area and place the illustrated group on the opposite side before generating. Our gardening examples kept useful headline space on the left, even when other details went wrong. Describe the background of that empty area, the grouping of objects, and an outer safety margin together.
Choose the canvas for its destination. Use a wide composition for a blog banner and a square composition for a square social post, following this aspect-ratio guidance. Make that decision before generation so the illustration is composed around the space your text needs.
For this header, keep the gardener, plants, floor, and railing grouped on the right. Ask for an uninterrupted warm-cream field on the left, with no objects, shadows, or texture. That negative space has a job: it gives the headline a quiet, readable background. An outer safety margin serves a different purpose, keeping illustrated elements away from the canvas edges.
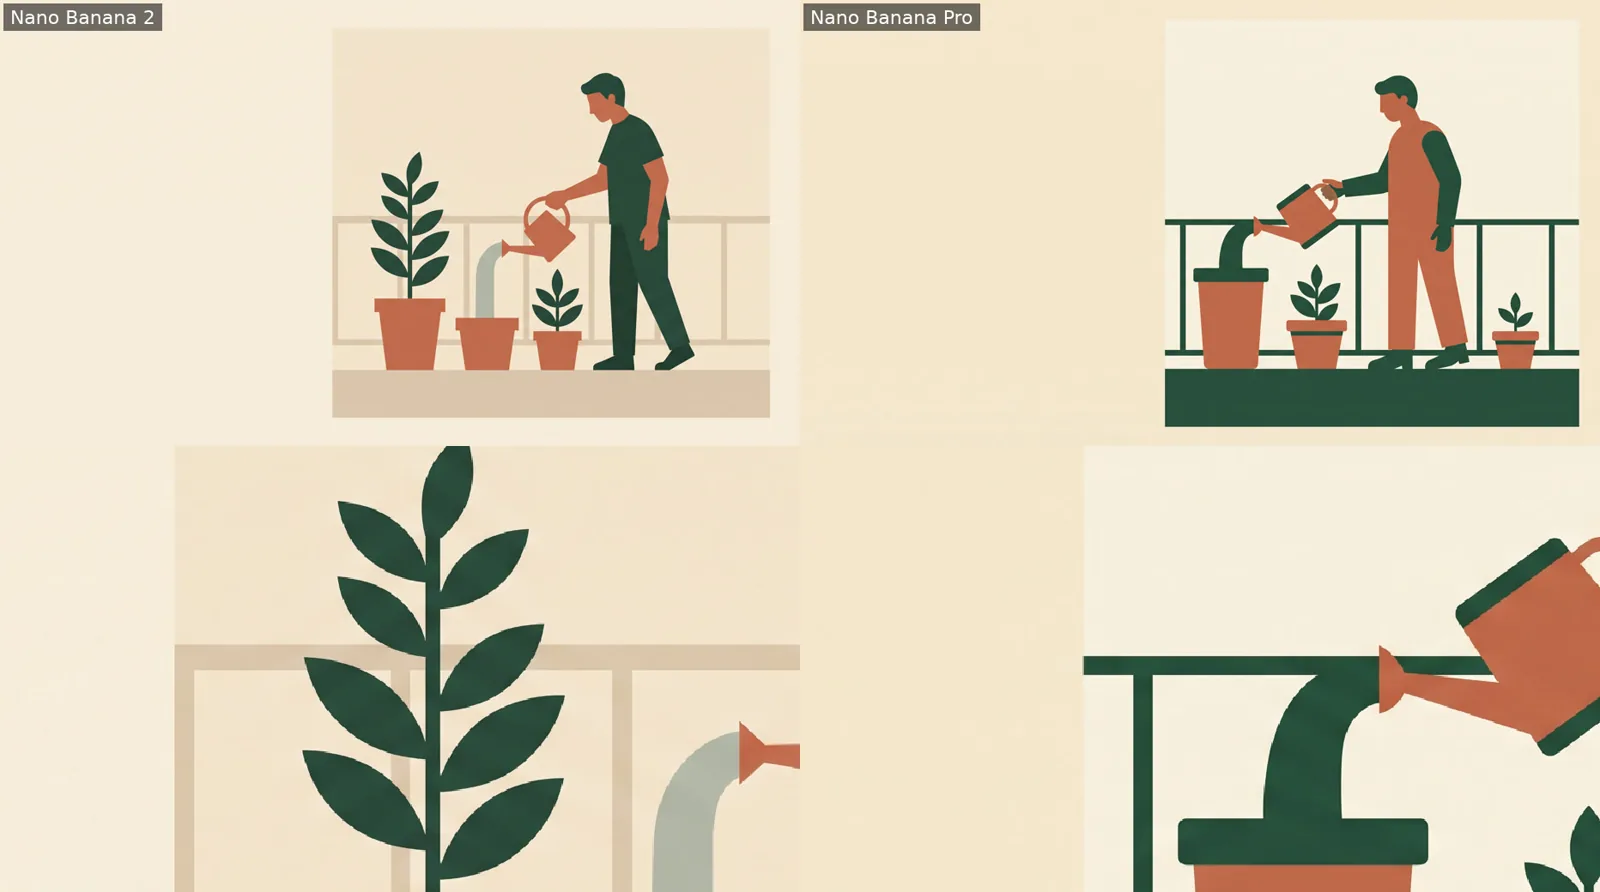
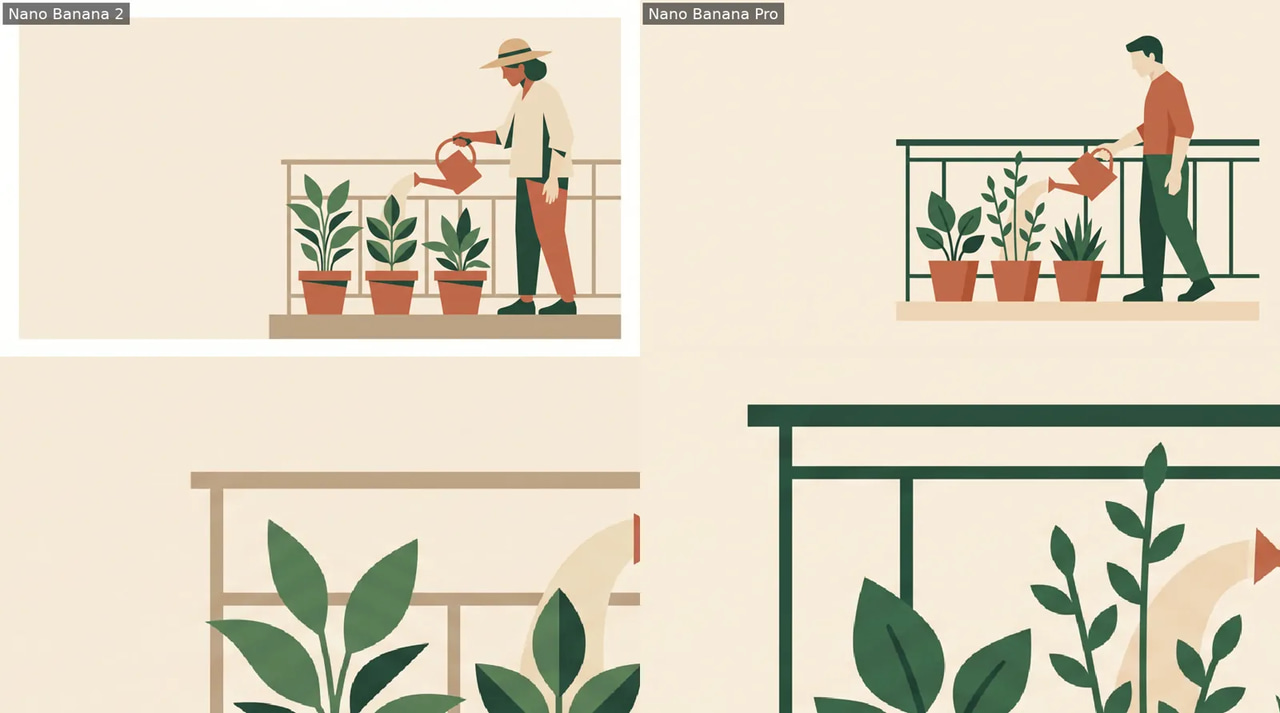
Structured composition: headline space and palette control: Nano Banana 2 · Nano Banana Pro. Test prompt. Bottom row: the same close-up of each, zoomed. Our test, Nov 21, 2026.
The comparison shows useful headline space despite imperfect color control. Nano Banana Pro reserved the left field well but introduced a lighter cream background on the illustrated side. Successful spacing does not guarantee a uniform background.
Add the headline in your layout rather than asking the generator to draw it. That keeps the wording, type size, line breaks, and placement editable without regenerating the artwork.
Which approach worked best in our test?
Choose Nano Banana Pro for this example, but expect to inspect it closely. A blind AI review used a vision model to score results without knowing which method made them. All tested instructions were detailed; cleanup requirements were written before generation, and exported-image crops were not assessed, so this is no short-description or completed revision comparison.
Nano Banana Pro scored 5.2, compared with 5 for Nano Banana 2. That small lead makes it our pick when choosing a candidate for closer inspection. It took 33 seconds; Nano Banana 2 took 22 seconds. Choose the latter when quicker iteration matters more than the scoring difference.
| Method | Output size | Blind AI review (0-10) | Processing time | Credits |
|---|---|---|---|---|
| Nano Banana Pro | 2752×1536 | 5.2 | 33 s | 60 |
| Nano Banana 2 | 2752×1536 | 5 | 22 s | 50 |

The initial detailed request already specified the gardener’s pose, separated pots, headline space, palette and exclusions. The composition-focused alternative changed the facing direction and specified watering the nearest pot. The cleanup-focused alternative emphasized a compact grouping, coherent perspective and avoiding unintended intersections.
Those are different instruction choices, rather than successive fixes to a selected image. Compare how each engine interprets them before deciding which request to reuse.
The comparison below carries a “short” label, but its starting description was already highly constrained. Read it as a comparison of detailed requests, with the overall scores guiding the engine choice.
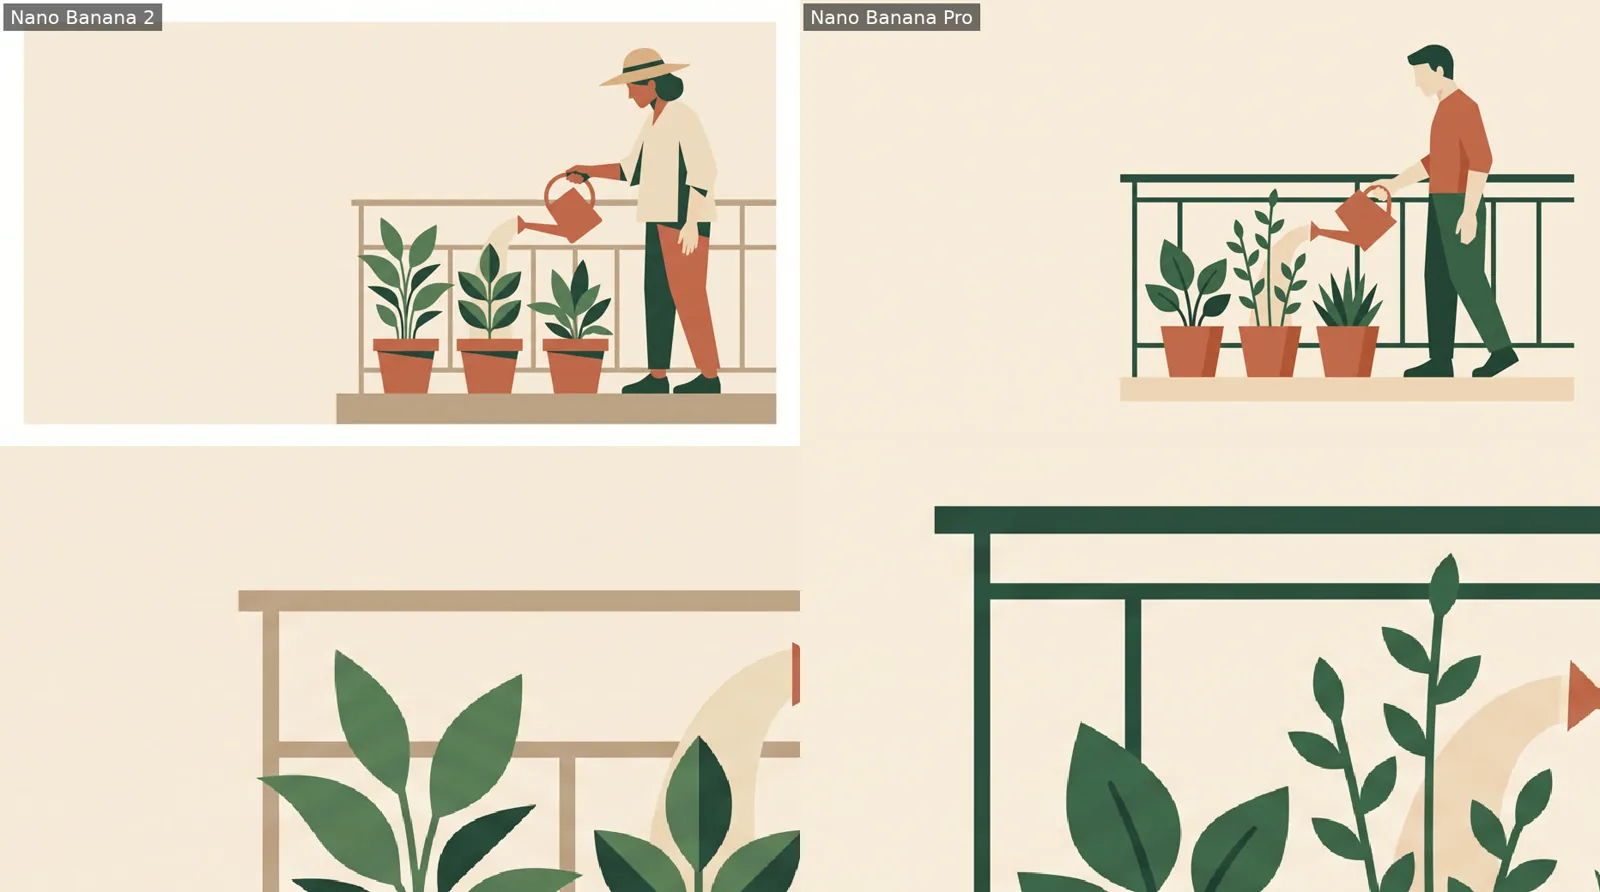
Short prompt: show all three samples per engine: Nano Banana 2 · Nano Banana Pro. Test prompt. Bottom row: the same close-up of each, zoomed. Our test, Nov 21, 2026.
How do you correct extra objects and awkward details?
Correct the most consequential mismatch first, then generate another candidate and compare the same detail. Our results included extra overlapping pots, the wrong facing direction, additional colors, and watering aimed at the wrong pot. Name the exact relationship you need rather than asking vaguely for a cleaner or better image.
Start with object counts and physical connections. Count people, limbs, pots, and watering cans against your brief. Then inspect the hand gripping the handle, where the water ends, and whether feet and containers sit on the floor. Look for intersections that make separate objects merge.
In our results, Nano Banana 2 produced an extra pot and overlapping containers. Prioritize that structural error over cosmetic polish. Make the instruction concrete: “Keep every pot separate, with visible space between containers.” Retain the required count in your revised request.
Nano Banana Pro showed a different relationship problem: the gardener watered the furthest pot while the nearest pot lacked a visible plant. Specify the receiving pot directly, require a plant inside it, and say that the stream must end within its opening. Check facing direction against your brief separately.
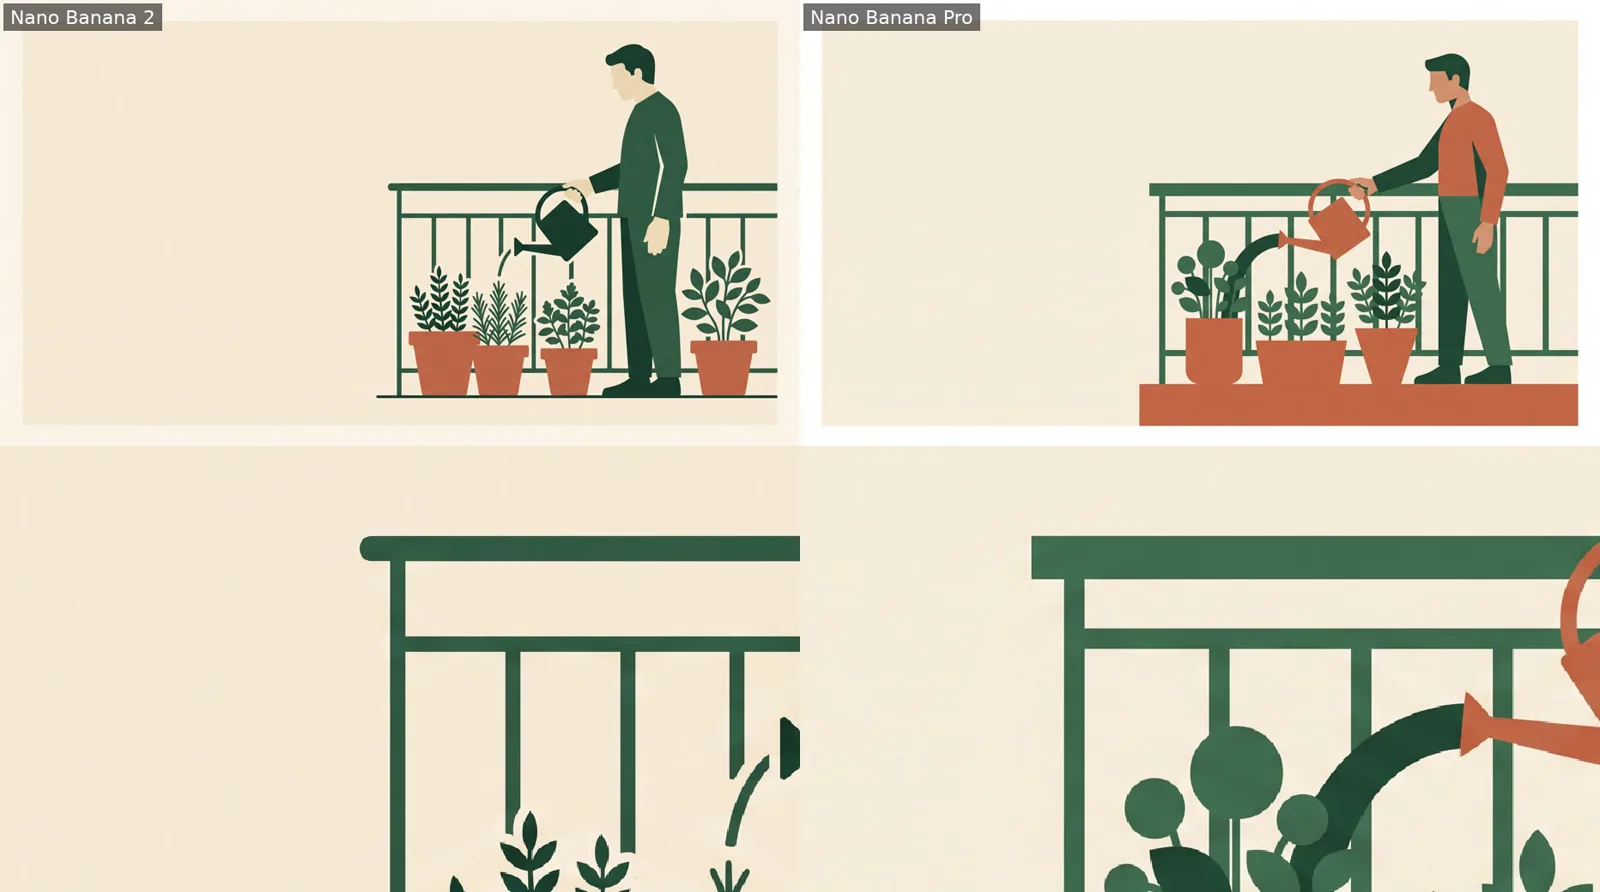
Predeclared cleanup: anatomy, clutter and edge quality: Nano Banana 2 · Nano Banana Pro. Test prompt. Bottom row: the same close-up of each, zoomed. Our test, Nov 21, 2026.
For unwanted shading or a mismatched style, restate “flat geometric shapes, solid fills, minimal texture” and the intended palette. More decorative adjectives will only muddy the instruction.
Generate another candidate, then compare the troublesome detail side by side. Keep a revision only when the visible result improves; a more explicit request is no guarantee that the error has disappeared.
Does the downloaded illustration look clean at display size?
Check the downloaded file at its intended display size and inspect enlarged crops of edges, hands, handles, and plant leaves. Both methods produced images measuring 2752 pixels wide by 1536 pixels high. Those dimensions describe the canvas; judge useful detail by what remains clear in your actual header layout.
Place the selected download in the destination layout before approving it. Apply the crop you intend to publish and add the headline. Check that the gardener and plants remain comfortably inside the frame, with enough blank space for the text. A generous canvas cannot rescue a crop that clips a watering can or pushes foliage into the headline.
Then enlarge the downloaded image to inspect the silhouette against the cream background. Look for pale halos, ragged curves, rough color transitions, and texture inside supposedly solid shapes. A narrow band of blended pixels along a curved edge is normal smoothing. Broader tonal patches inside an arm, pot, or leaf are interior shading and deserve a separate style decision.
Inspect hands, handles, and leaf clusters next, then return to display size. Prefer the candidate whose shapes stay readable after resizing over one that looks intricate only when enlarged. If a defect remains visible in the finished header, reject that candidate and regenerate. Approve the downloaded file only after this layout check, rather than relying on the generation preview.
What should you check before commercial use?
Confirm commercial-use permission for the selected model, then inspect the illustration for recognizable brands, characters, people, and unintended lettering. Check any client-specific requirements as well. Keep a record of the model, generation date, written instructions, and final artwork so the approval trail stays attached to the delivered asset.
Start with the terms for the model you actually used. Adobe Firefly’s commercial-use assurances apply to its own models; they do not answer the permission question for Nano Banana Pro or Nano Banana 2. Confirm that permission before approving an illustration for a campaign or client delivery.
Then review what the image depicts. Look for a clothing emblem that resembles a brand, a pot decoration that reads like a logo, or a figure that resembles a recognizable character or person. Scan small marks, too. Accidental lettering can look harmless at thumbnail size and become conspicuous in the published header. If a recognizable element is unnecessary to the brief, choose a candidate without it or regenerate with that element explicitly excluded.
For client work, check the agreed rules on AI-generated assets, brand suitability, and approval responsibilities. Send the final artwork for approval alongside its generation record, and keep that record with the delivered file. Commercial-use permission and a clean publication review are separate checks. Complete both before publishing.