How do you turn a picture into anime with Magic Style Transfer?
Use Magic Style Transfer to select your photo, describe the desired anime treatment, and generate the image. Keep the original open for comparison. If you already use Canva, its alternative workflow is to open Apps, choose Animeify, select the photo, then click Animeify and replace.
Start with “soft anime illustration with natural facial proportions.” That gives the conversion a clearer direction than “make this anime,” without asking for an exaggerated character redesign. For a personal portrait, this is the starting point we recommend: establish an illustrated look before pushing toward a more dramatic treatment. You can describe the intended finish in ordinary language rather than trying to name a particular anime series.
Keep the description focused on the image you want to see. A useful starting description is “soft anime illustration, natural facial proportions, clean linework, and gentle shading.” Select the photo, enter that direction, and generate the result. The style description guides the treatment; it is not a guarantee that every detail will land exactly as intended. The matched comparisons below show how that distinction plays out.
What photos work best, and how should you crop them?
A clear portrait with room around the hair and chin gives the conversion a useful starting point. Choose a photo with clear facial details, crop away distractions, and keep the whole face visible. Avoid cutting through glasses or curls. Save a separate cropped copy so you can compare compositions.
Start with a head-and-shoulders crop. Leave breathing room above the tallest curls, beside loose strands, and below the chin rather than fitting the frame tightly around the face. Keep the outer edges of glasses inside the crop, including the arms where they meet the temples. Distinctive hair needs space to remain part of the silhouette.
Choose the clearest portrait over the most dramatic pose. Look for visible eyes, a readable mouth, and enough detail to distinguish the nose and jaw. If a hand, scarf, or deep shadow hides much of the face, choose another shot when you can. Cropping cannot recover hidden features.
Trim background clutter only as far as the portrait allows. A distracting object near the edge is worth removing; cutting into the hairstyle to remove it is a poor trade. Keep some shoulders in view so the head has a natural relationship to the frame.
Keep the untouched original alongside your working copy. That makes it easier to return to a wider composition if the tighter crop feels cramped.
How do you keep facial features, glasses, and textured hair recognizable?
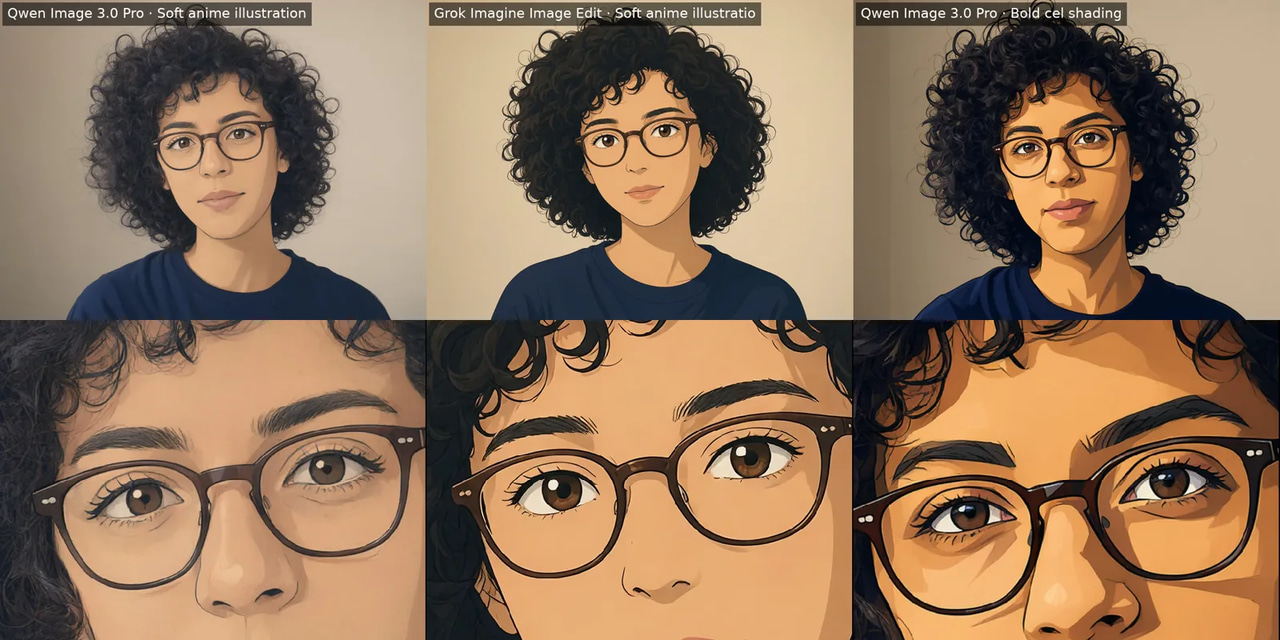
Preserve the features that distinguish the person: face shape, eye spacing, hairline, curls, and glasses. Describe those details explicitly rather than asking only for an anime portrait. Our matched examples show that glasses and textured hair can survive the conversion cleanly; inspect their shapes rather than accepting a broadly similar face.
The comparison below uses an AI-generated source image and shows Soft anime illustration and Bold cel shading directions. Compare the cheek and jaw outlines, eye placement, and curl silhouette against the source. In our test, Grok Imagine Image Edit preserved curly hair, glasses, and facial features cleanly, without visible artifacts.
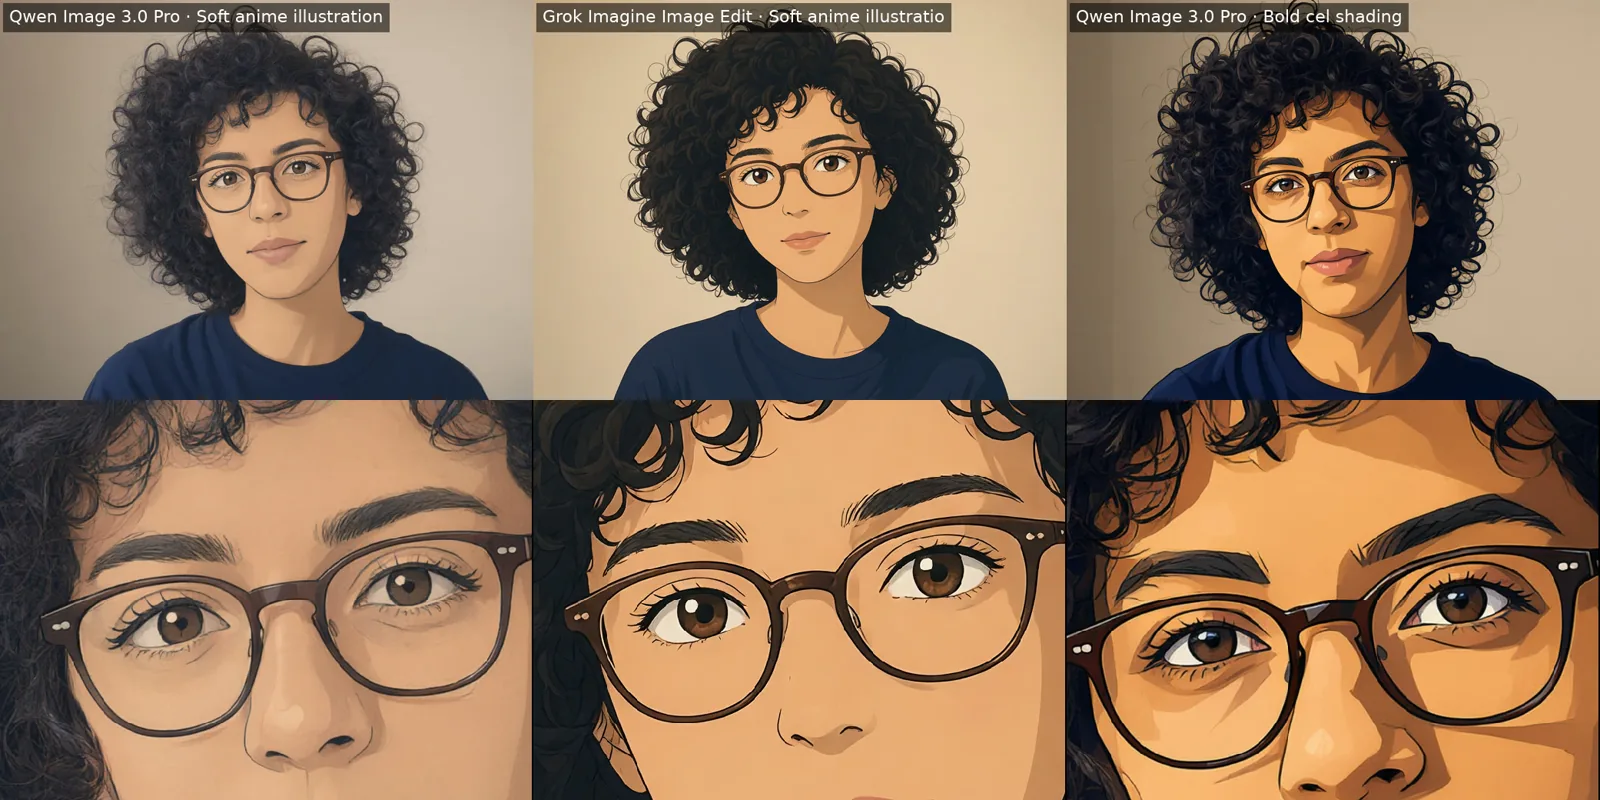
Source/output pairs: glasses and textured hair across both anime directions: Qwen Image 3.0 Pro · Soft anime illustration · Grok Imagine Image Edit · Soft anime illustratio · Qwen Image 3.0 Pro · Bold cel shading. AI-generated test image, made for this test, not a real photo. Bottom row: the same close-up of each, zoomed. Our test, Nov 14, 2026.
Make the identity requirements concrete. Try “keep the same face shape, eye spacing, hairline, curl pattern, and glasses shape while changing the rendering to anime.” Include only details that actually appear in your picture.
For glasses, follow the frame outline, lens shape, and bridge placement across the nose. Similar-looking frames can still change the face. For textured hair, prioritize overall volume, the hairline, and distinctive curl groupings over individual strands.
Choose recognizable facial structure over decorative polish. Larger eyes or a narrower jaw may make an appealing anime portrait while losing the person you started with. Keep those proportions anchored to the source and let linework, color, and shading carry the stylistic change.
How do soft anime and bold cel shading change the same picture?
Soft anime illustration aims for gentler transitions, while bold cel shading asks for stronger outlines and flatter shadow shapes. Change the style direction while keeping the source and identity instructions consistent. Judge the actual result by its drawing treatment as well as its likeness.
Start with soft anime illustration for a restrained finish. Ask for natural facial proportions and gentle shading, then decide if the image needs a more graphic treatment. Choose bold cel shading when you want outlines and clearly separated areas of light and shadow to carry more of the image. Stronger contrast alone is not the same thing as deliberate cel shading.
Keep your requirements for facial proportions, hairstyle, and accessories unchanged between versions. Replace only the style description. That gives you a useful comparison: you can judge what the new direction changes without also asking for a different-looking subject.
Return to the matched comparison above and look at the overall drawing treatment. Are shaded areas softly blended or sharply divided? Do outlines define the forms, or does tonal shading do most of the work?
Recognizable likeness and a convincing anime aesthetic are separate goals. Keep the version that satisfies both. If the person remains recognizable but the finish misses your target, refine the style description rather than loosening the identity requirements.
Can it handle multiple faces and busy backgrounds?
Multiple faces and busy backgrounds need separate checks for each person and for the scene around them. In a group image, compare each face with its own source features. For a detailed background, inspect edges around hair and shoulders, then decide whether preserving the setting matters more than stronger stylization.
The group comparison below uses an AI-generated source image. Compare each person separately before judging the pair together. A convincing anime treatment can still lose the distinction between people if it gives everyone similar eyes, face shapes, or expressions.
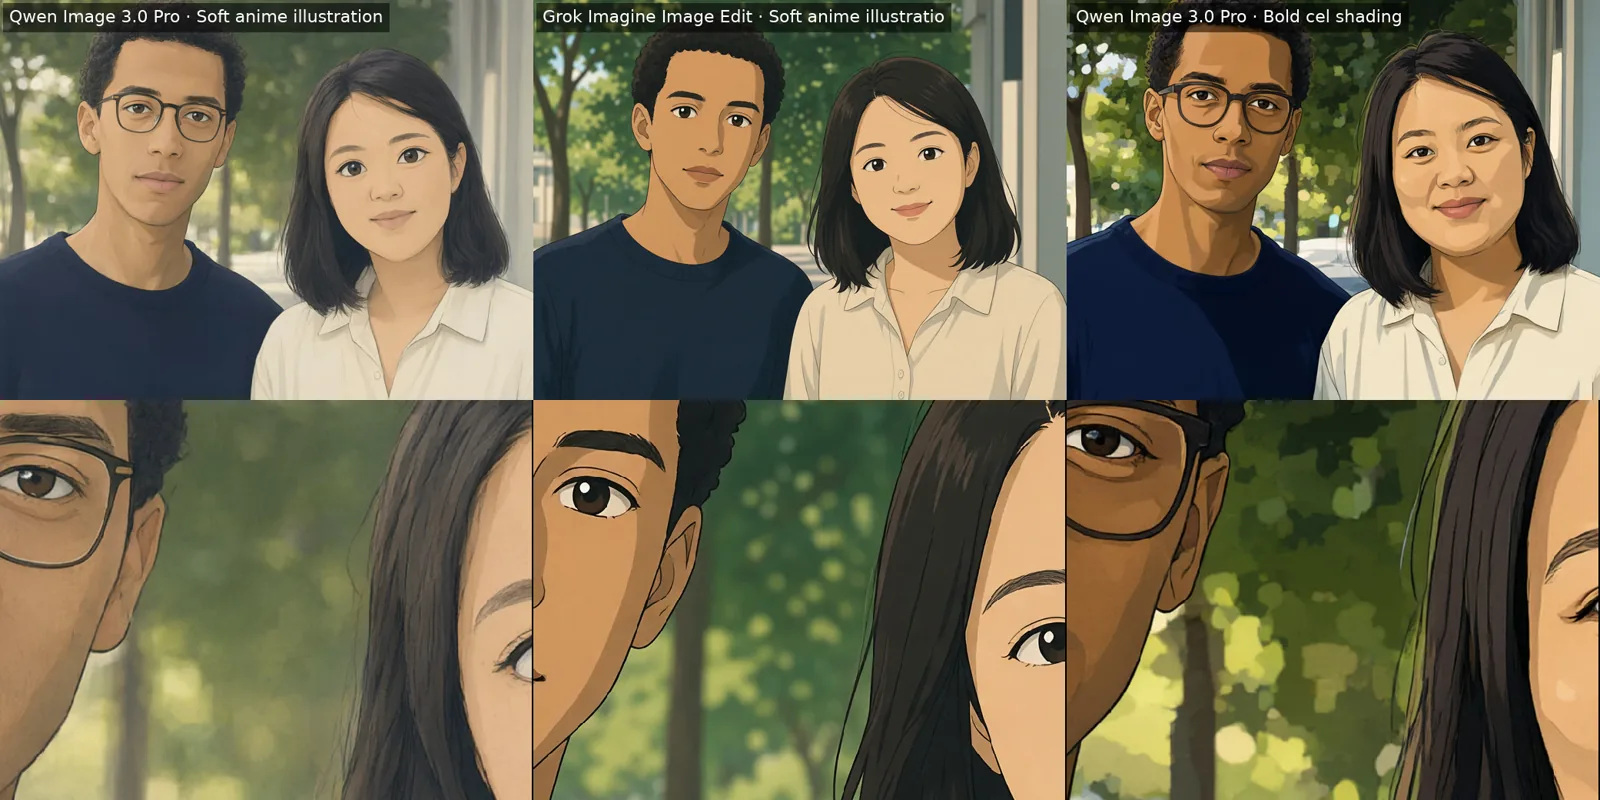
Source/output pairs: preserving two distinct faces across styles: Qwen Image 3.0 Pro · Soft anime illustration · Grok Imagine Image Edit · Soft anime illustratio · Qwen Image 3.0 Pro · Bold cel shading. AI-generated test image, made for this test, not a real photo. Bottom row: the same close-up of each, zoomed. Our test, Nov 14, 2026.
Cover the other person while comparing a face with the source, then switch. Finally, look at the whole image. Do the people still look distinct? Are their relative positions and proportions preserved? An appealing group portrait should pass those checks as well as look stylistically consistent.
For a busy scene, prioritize a coherent setting before pushing the style harder. The background comparison below also uses an AI-generated source image.
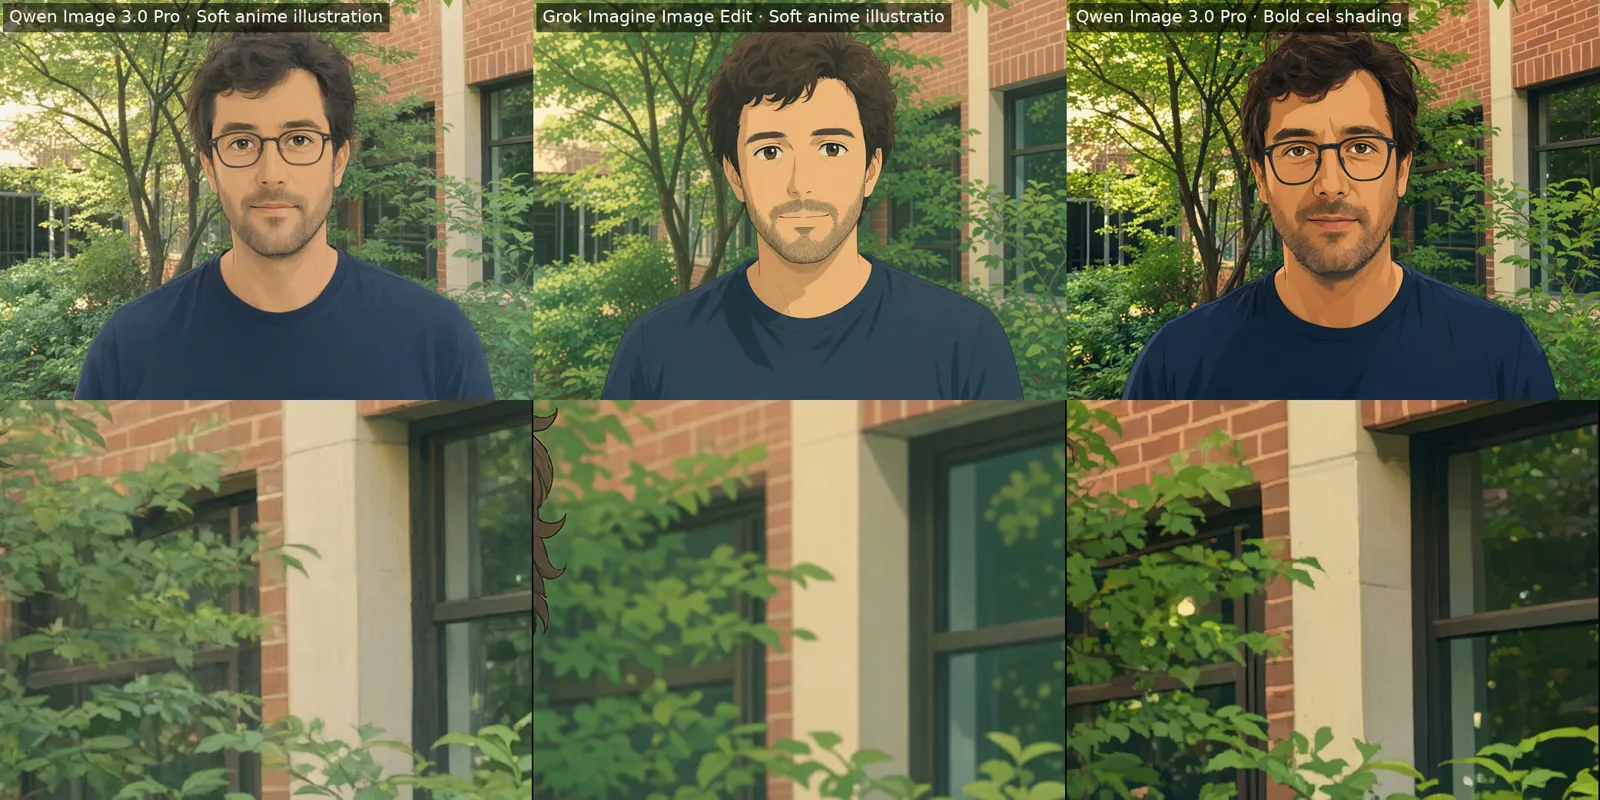
Source/output pairs: background coherence versus stronger stylization: Qwen Image 3.0 Pro · Soft anime illustration · Grok Imagine Image Edit · Soft anime illustratio · Qwen Image 3.0 Pro · Bold cel shading. AI-generated test image, made for this test, not a real photo. Bottom row: the same close-up of each, zoomed. Our test, Nov 14, 2026.
Look beyond the faces. Follow the subject’s outline into the surrounding scene, and check whether background shapes still make sense together. Simplified detail can suit anime well; the setting does not need to retain every texture.
Keep more of the setting when it carries the memory of the picture. Choose stronger stylization when the scene is incidental and the people remain recognizable. Compare the whole composition at normal viewing size before inspecting individual details.
Which method worked best in our test?
19 seconds versus 61 seconds makes Grok Imagine Image Edit our pick: it also delivered cleaner anime styling than Qwen Image 3.0 Pro (Edit). A blind AI review compared results with their sources without knowing the method. We tested unprepared inputs, including AI-generated images and a photograph; preparation changes were not tested. Start with soft anime illustration for a gentler treatment; choose bold cel shading when you want a more graphic look.
Try Magic Style Transfer → Plans start at $19.99; credit packs from 350 credits.
The winning result combined convincing anime styling with recognizable features. Curly hair, glasses, and facial structure survived the conversion without visible artifacts. A coastal portrait result also retained hair strands and the twilight setting while brightening dark shadows. That balance makes Grok Imagine Image Edit the strongest starting choice here.
| Method | Output size | Blind AI review (0-10) | Processing time | Credits |
|---|---|---|---|---|
| Grok Imagine Image Edit | 2368×1776 | 6.9 | 19 s | 20 |
| Grok Imagine Image Edit | 2368×1776 | 6.8 | 18 s | 20 |
| Qwen Image 3.0 Pro (Edit) | 2364×1773 | 6 | 61 s | 15 |
| Qwen Image 3.0 Pro (Edit) | 2364×1773 | 5.7 | 62 s | 15 |
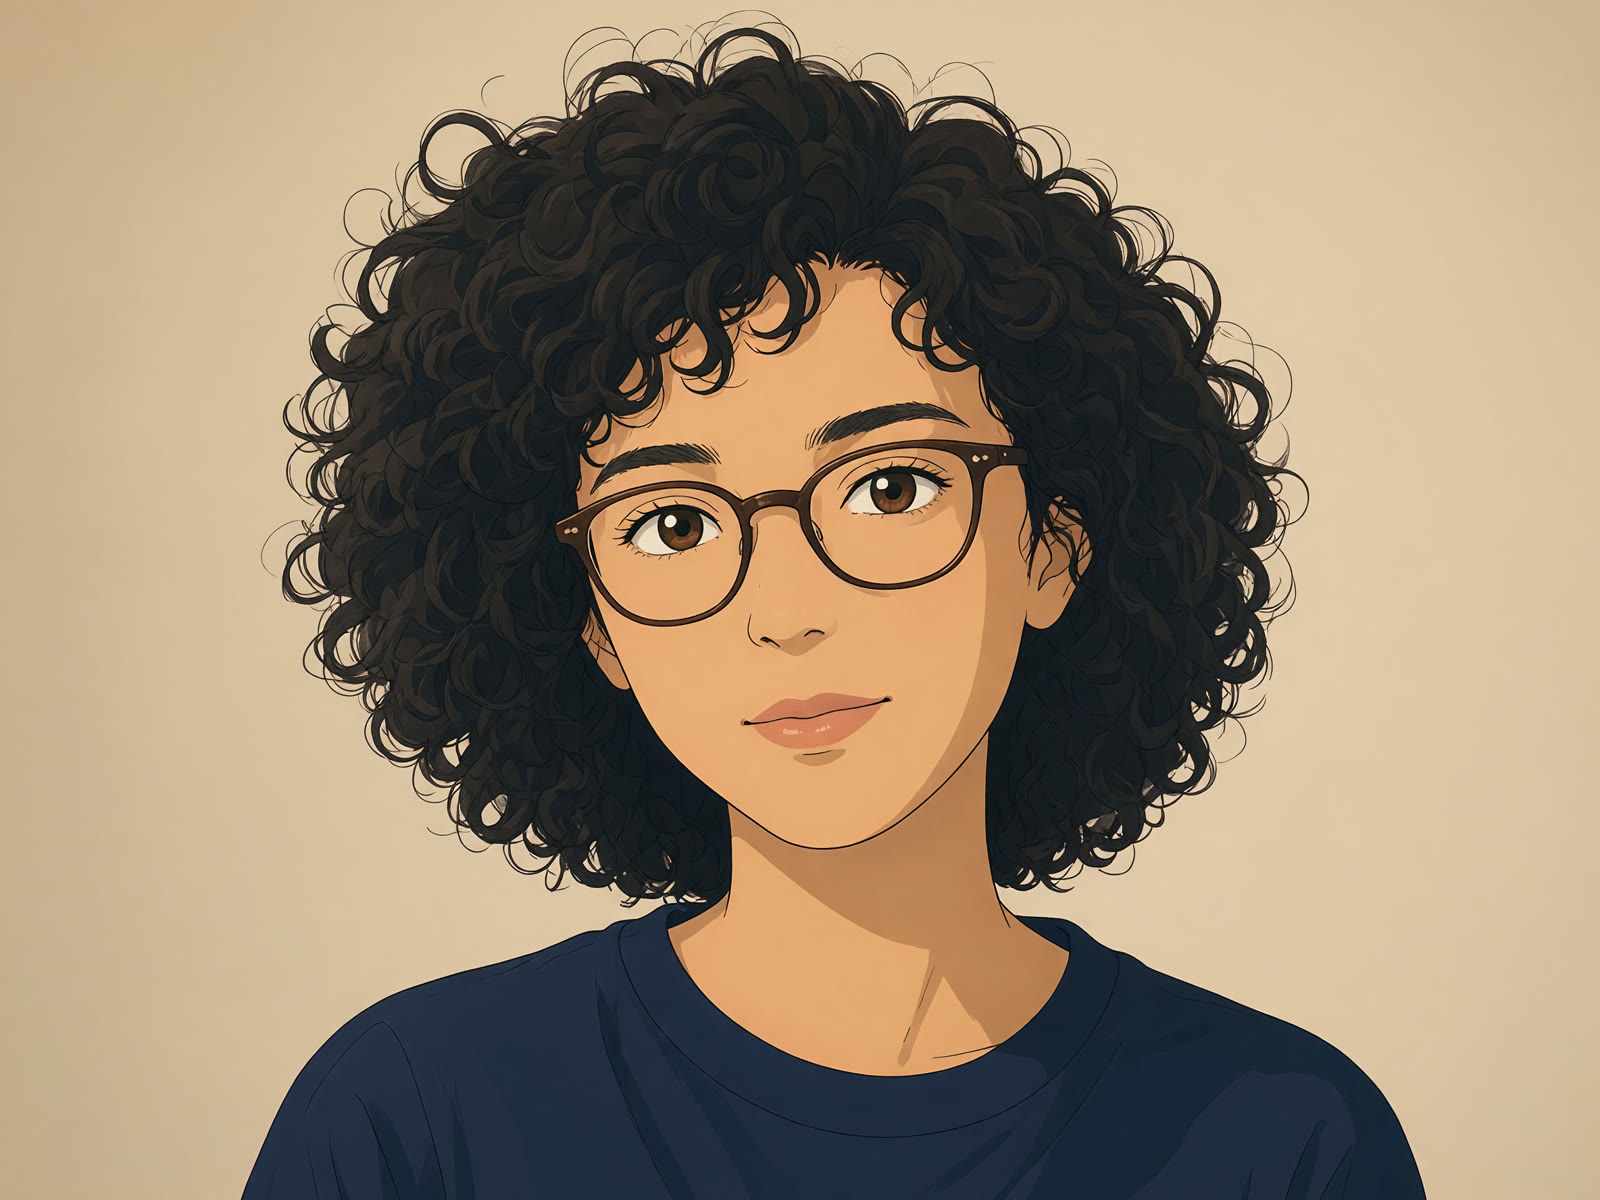
The repeated model names represent separate results across the tested directions, soft anime illustration and bold cel shading. Compare their finishes as well as their measured scores.
The more graphic result from Grok Imagine Image Edit preserved likeness well, but its vector-like rendering looked closer to western comic illustration than traditional anime. Pick that finish deliberately if it suits the picture.
Qwen Image 3.0 Pro followed the source features closely, yet looked more like a traced comic filter and introduced minor blocky sky artifacts. For this task, close tracing was less persuasive than a clean anime conversion. The table captures the remaining measured differences; the visual finish decides which result is worth keeping.
What should you retry, and what should you check before sharing?
Retry the specific feature that failed, then inspect the next result beside the original at full size. If glasses appear on someone who has none, explicitly request no glasses. For likeness drift, reduce the requested exaggeration. Before downloading or sharing, check eyes, teeth, accessories, hair edges, background artifacts, and framing.
Keep each retry narrow. If the face has become generic, retain the same style direction and ask for less exaggerated eyes, jaw shape, or facial proportions, whichever actually changed. Changing the crop, style, and identity instructions together makes it harder to tell what helped.
For blocky patches in the sky, request a cleaner, smoother background treatment while keeping the subject unchanged. Compare that area beside the previous version, then check that the correction has not flattened useful background detail. Prefer a targeted retry over restarting with a completely different look.
Inspect the whole composition too. A tested output changed the source aspect ratio, so check whether the new framing trims hair, shoulders, or meaningful surroundings.
Before accepting the image, look closely at pupils, teeth, glasses rims, earrings, and hair boundaries. Then zoom out. The face should still read as the same person, and the finished image should hold together beyond the face. Keep the version that passes both checks, even if another looks more dramatic.