How do you change a photo background to blue?
Choose Nano Banana 2.1 Edit in the background changer, add your portrait, and request a plain blue background while keeping the person unchanged. Generate the replacement, then inspect the result before saving. For a conventional solid-fill workflow, Media.io lets you remove the background and choose blue from its solid-color menu.
Use this replacement instruction to make the edit repeatable:
Replace only the background with a plain blue backdrop. Keep the person’s appearance unchanged, including their face, skin tones, hair, fine flyaway strands, glasses and clothing. Preserve the original pose, expression and framing. Keep the blue background clear of objects, patterns and added scenery.
Nano Banana 2.1 Edit is our default choice for this studio workflow. Start with it when you want to describe the replacement in words and generate the edit.
Try Luxury Background Changer → Plans start at $19.99; credit packs from 350 credits.
Keep that instruction unchanged across a portrait set when you want the same editing intent throughout. If an output changes the person, revise the request to identify the specific detail that must stay unchanged, such as the glasses frame or shirt color. Save only after checking that the requested background change has left those details intact.
Which blue should you choose, and can you match an exact color?
Choose the required brand or destination color first; otherwise, start with a restrained medium blue that separates clearly from the subject’s clothing. For exact matching, use a solid-color fill. NanoPic offers a Custom Color picker and HEX field. A generated blue backdrop needs checking for unwanted shading or texture.
An attractive blue is a visual choice. An approved blue is a repeatable specification. If a client gives you a HEX value, copy it into an editor’s explicitly supported HEX field and apply it as the background fill. Choosing something similar by eye can look convincing while still missing the required color.
For portraits without a fixed color requirement, judge the blue beside the clothing. A blue shirt needs enough difference in brightness or hue to keep the shoulders readable. Avoid choosing a shade in isolation, then discovering that it swallows the subject’s outline.
Use a solid fill for consistent profile portraits, catalog images or a branded series. Choose a generated backdrop when a softer studio-style treatment matters more than a fixed color.
Check consistency with a color sampler in several unobstructed background areas, including near the corners and beside the shoulders. Compare those readings with the approved value. Visible shading or differing readings means the backdrop is varying; replace it with the specified solid fill when uniformity is the priority.
Which photos give you the cleanest background replacement?
Start with a sharply focused portrait, clear lighting and a visible outline around the subject. A clearly defined subject helps preserve hair, fabric, glass and small contours. Prefer an image where hair separates from the original background, and keep the original file rather than working from a compressed screenshot.
Choose the source with the clearest edges, even if another shot has a more appealing pose. Individual strands should be visible around the crown and beside the face. Dark hair against a dark wall gives the replacement less to work with; a lighter, contrasting background makes that boundary easier to distinguish.
Check clothing, too. Shoulders, collars and sleeves need readable boundaries rather than deep shadows that merge into the surroundings. For glasses, favor lighting that leaves the frames and lens edges distinguishable from the skin. Strong reflections that obscure those boundaries make the job harder.
Soft, even light is the best starting point. More brightness alone will not help if it washes out pale hair or white fabric.
If the portrait is blurred, heavily compressed or partly obscured, choose another source when possible. Background replacement cannot reliably recover strands or contours that are already missing. For a reshoot, move the subject away from the wall and focus carefully on the face. Those small changes are worth making before generating replacements.
How well does the replacement preserve hair, glasses and clothing?
Nano Banana 2.1 Edit preserved fine flyaways well, with small dark remnants in some hair gaps; ChatGPT 2.6 Sunburst Edit showed occasional fringing or softness. In our blind AI review, an automated vision model scored results against their inputs without knowing which method made them. We tested a small set of AI-generated portraits, not a broad camera-photo trial.
Choose Nano Banana 2.1 Edit for its narrow quality lead: it scored 6.6 against 6.5 for ChatGPT 2.6 Sunburst Edit. Its hair preservation makes it our pick, although it also clipped some fine strands around the crown.
| Method | Output size | Blind AI review (0-10) | Processing time | Credits |
|---|---|---|---|---|
| Nano Banana 2.1 Edit | 2752×1536 | 6.6 | 26 s | 20 |
| ChatGPT 2.6 Sunburst Edit | 2560×1440 | 6.5 | 16 s | 30 |
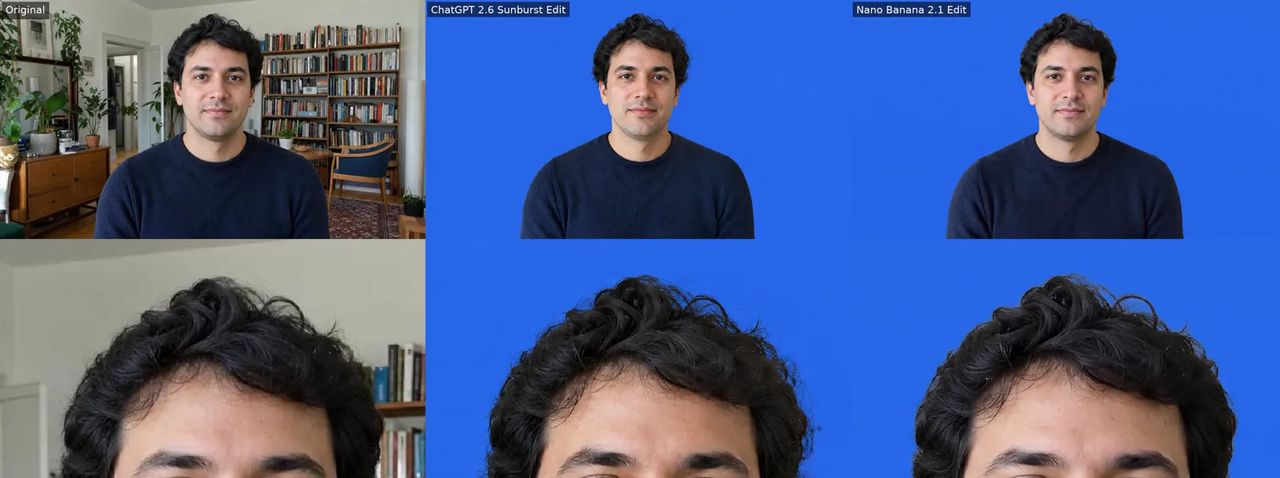
The busy-room comparison shows why the spaces inside dark hair matter as much as the silhouette. Nano Banana 2.1 Edit retained fine strands but left small dark remnants between some locks. ChatGPT 2.6 Sunburst Edit preserved most flyaways, with minor color fringing in hair gaps.
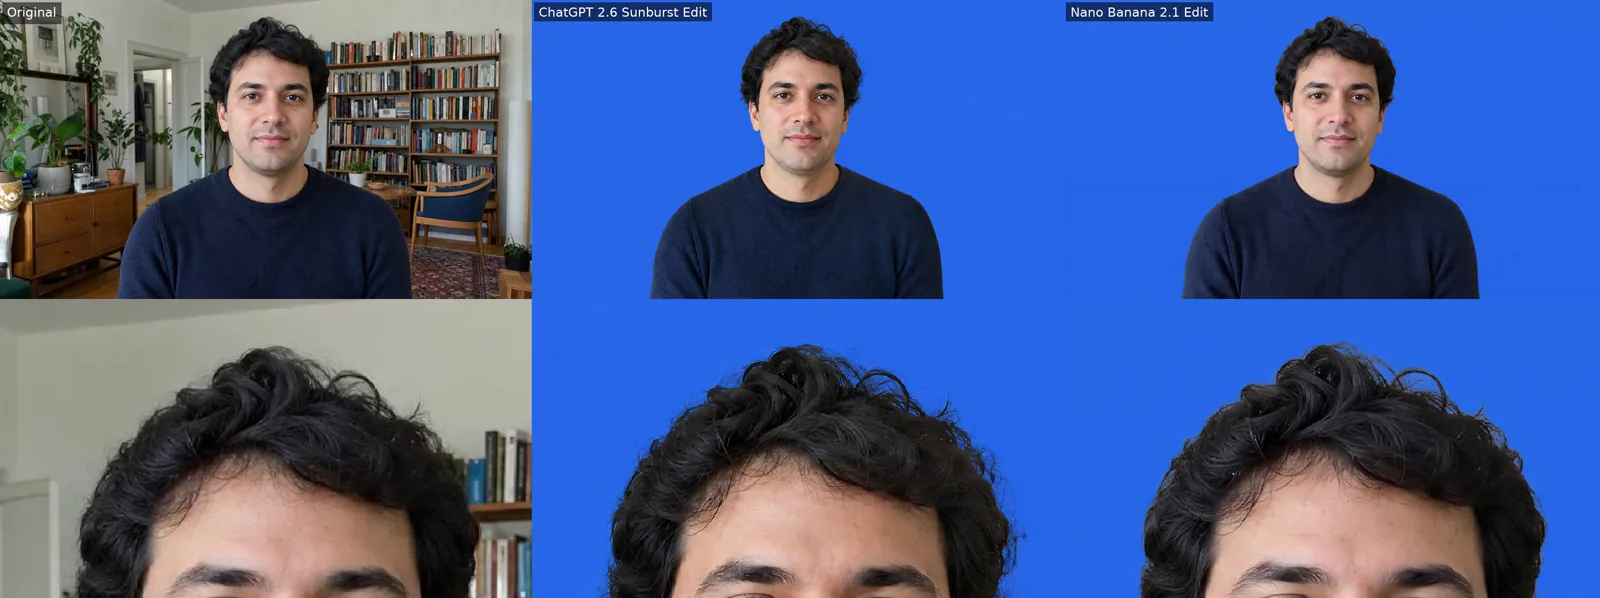
Busy-room removal and dark-hair edges: Original · ChatGPT 2.6 Sunburst Edit · Nano Banana 2.1 Edit. AI-generated test image, made for this test, not a real photo. Bottom row: the same close-up of each, zoomed. Our test, Nov 21, 2026.
Fine, light flyaways expose a different trade-off. Nano Banana 2.1 Edit kept delicate strands while clipping some around the crown; ChatGPT 2.6 Sunburst Edit lost a few faint outer strands and showed slight softness along hair edges. Neither retained every strand.
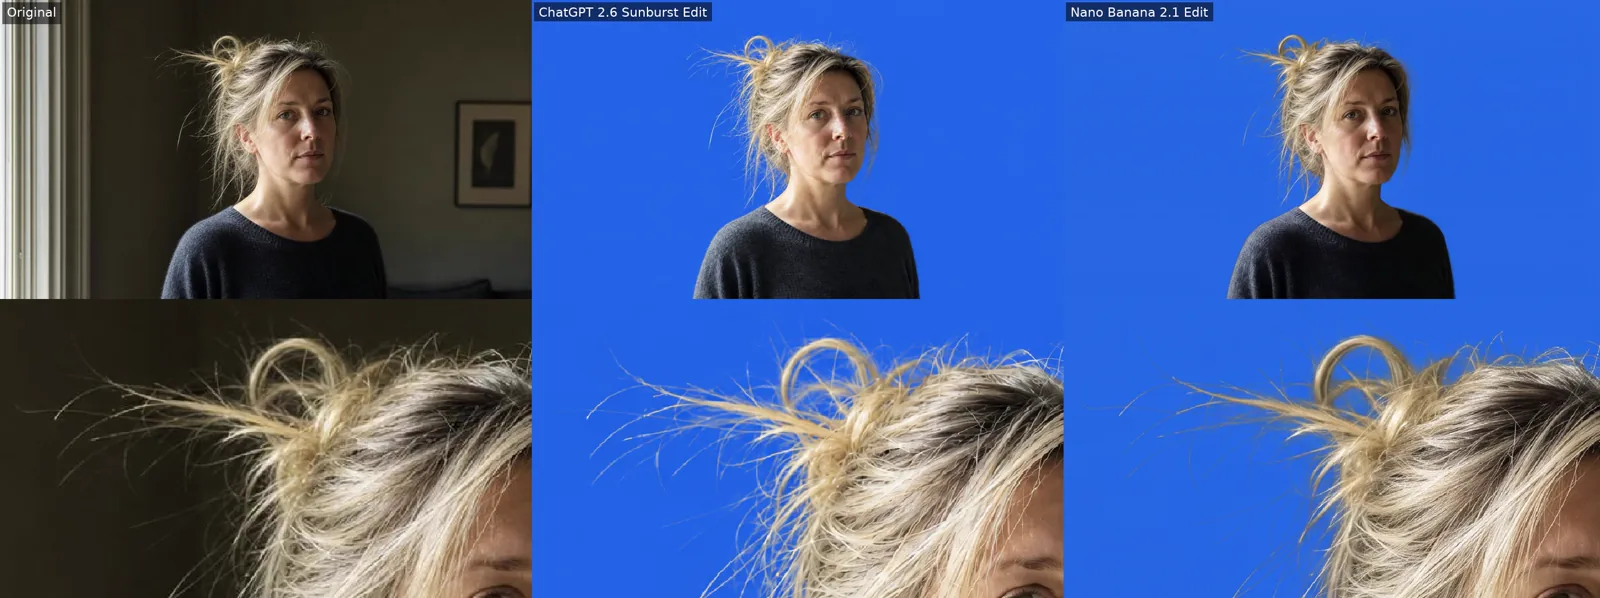
Flyaway light-hair preservation: Original · ChatGPT 2.6 Sunburst Edit · Nano Banana 2.1 Edit. AI-generated test image, made for this test, not a real photo. Bottom row: the same close-up of each, zoomed. Our test, Nov 21, 2026.
The blue-clothing comparison places blue fabric against a uniformly replaced blue backdrop, making the shoulder and sleeve boundaries especially useful for judging subject separation. The recorded findings favor overall subject-detail preservation rather than establishing a glasses-specific winner. Compare visible frames and lens areas directly with the original.
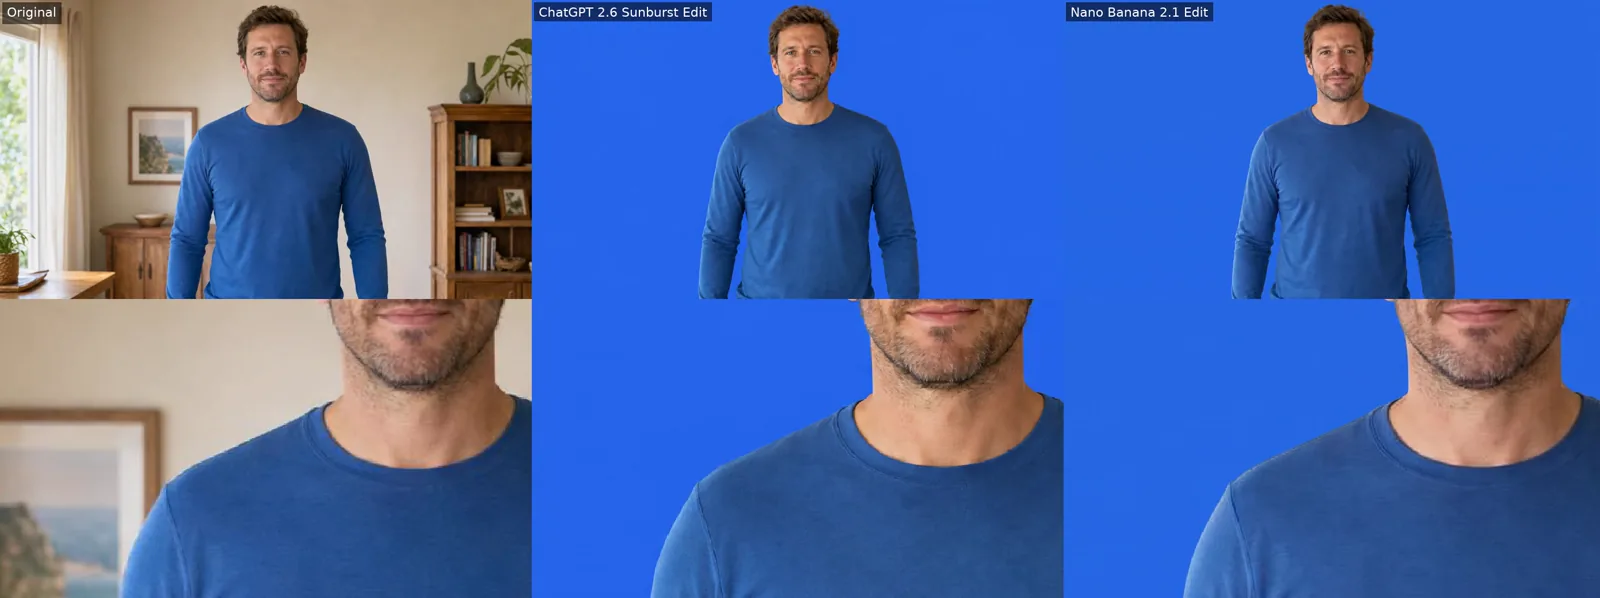
Blue clothing versus blue background: Original · ChatGPT 2.6 Sunburst Edit · Nano Banana 2.1 Edit. AI-generated test image, made for this test, not a real photo. Bottom row: the same close-up of each, zoomed. Our test, Nov 21, 2026.
Pick ChatGPT 2.6 Sunburst Edit when turnaround matters more than that narrow quality preference. It took 16 seconds, compared with 26 seconds for Nano Banana 2.1 Edit.
How do you fix leftover background, halos and blue spill?
Inspect the replacement closely around hair gaps, ears, glasses, shoulders and sleeves. Dark patches can be leftover background; pale outlines suggest a halo; blue on skin or clothing suggests spill. Where your editor supports masking, refine the affected boundary locally. Regenerate if correcting the edge would erase delicate subject detail.
Start between the hair strands, then trace the silhouette down to the sleeves. Use the edge-inspection checklist to include transparent objects, reflective surfaces and contact shadows. Compare suspicious areas with the original, especially inside glasses: a dark strand belongs there; a fragment of the old room does not.
Use a small mask brush to hide retained background or restore an accidentally clipped edge, if that control is available. Keep corrections local. Tightening the whole outline can remove the flyaways you wanted to keep.
For pale halos, try a slight inward adjustment with Shift Edge, if available. Use Feather sparingly: extra softness can spread the pale rim rather than remove it.
For blue contamination, try Decontaminate Colors if your editor includes it, confining the correction to affected edges where possible. Otherwise, use a local color adjustment if available. Preserve genuinely blue clothing and compare skin against the original. Finish by checking both the close-up and the full portrait; a tidy mask still needs to look natural.
What resolution and file format should you export?
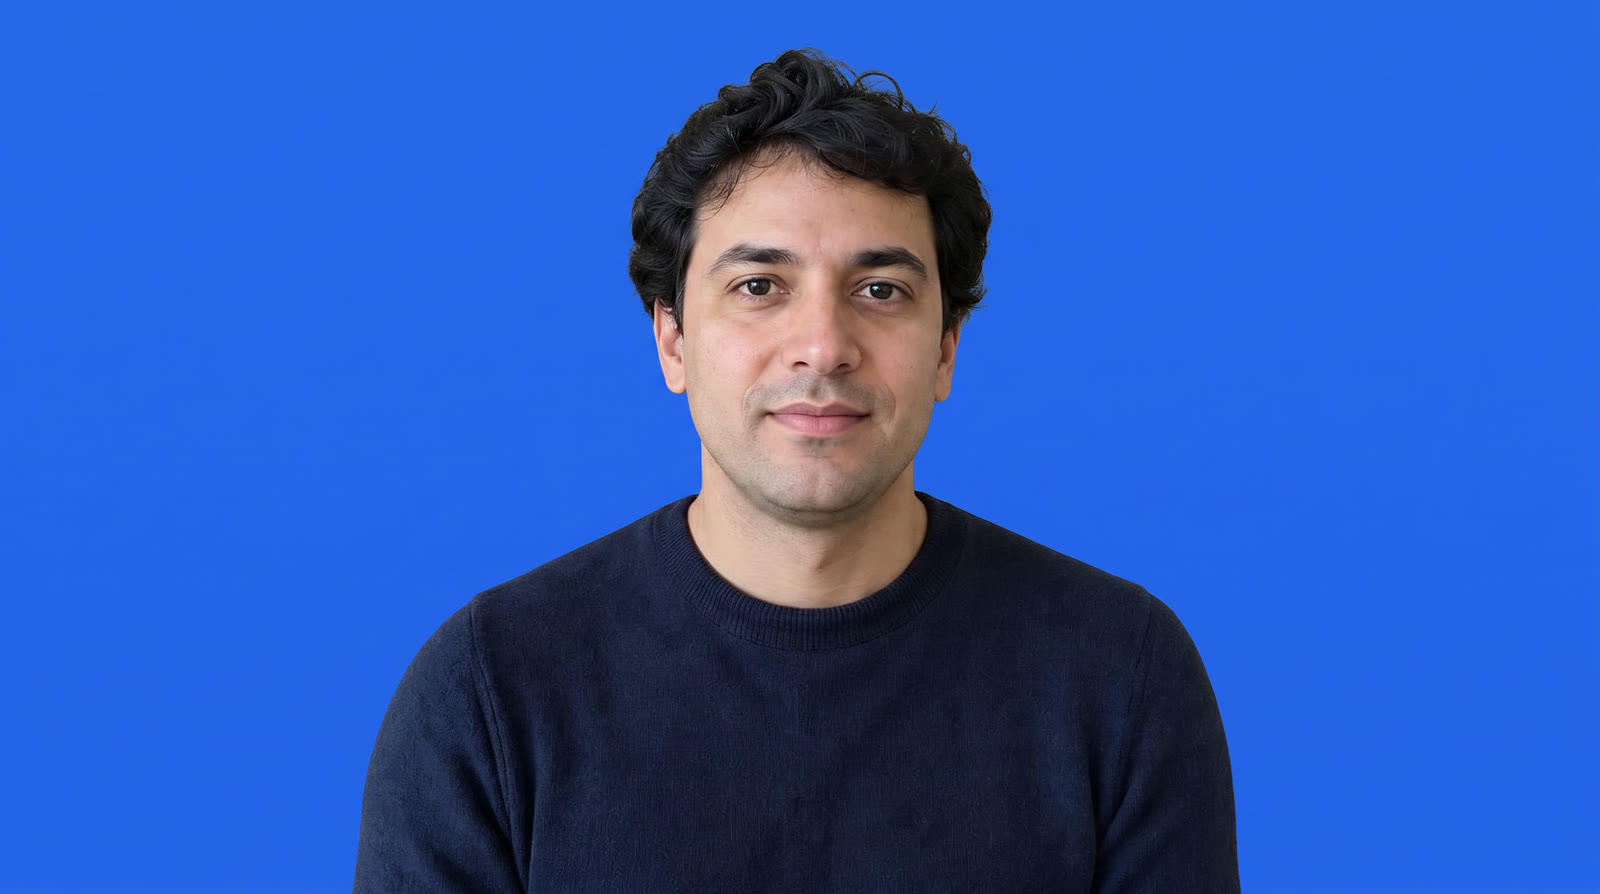
Save the largest useful output and choose PNG when available for a clean editing master; use JPEG when the destination requires it. Our Nano Banana 2.1 Edit result measured 2752 by 1536 pixels, compared with 2560 by 1440 pixels for ChatGPT 2.6 Sunburst Edit.
PNG avoids another lossy compression step, making it the better choice for an image you will keep editing. JPEG is appropriate for delivery when a website, submission form or client requires it. Keep the master separate, then make resized copies to match each destination’s dimensions.
Check the downloaded file at full size before calling it finished. An on-page preview can hide compression artifacts and make soft edges look cleaner than they are. Look closely at fine hair and clothing boundaries, then examine the blue away from the subject for visible blocks or bands. Confirm the file’s actual pixel dimensions, too.
Avoid repeatedly opening and saving the delivery JPEG as you make revisions. Return to the editing master, make the change there, and create a fresh delivery copy. That keeps compression from accumulating across revisions and leaves you a dependable file for the next crop or export.