What causes red-eye, and how do you fix it in Photos?
Red-eye happens when flash light reflects back through the pupil from the back of the eye. In Photos on Mac, open Edit, choose Adjust, then Red-Eye and Auto. For missed pupils, match the Size control to the red area and click each pupil using the Red-Eye controls.
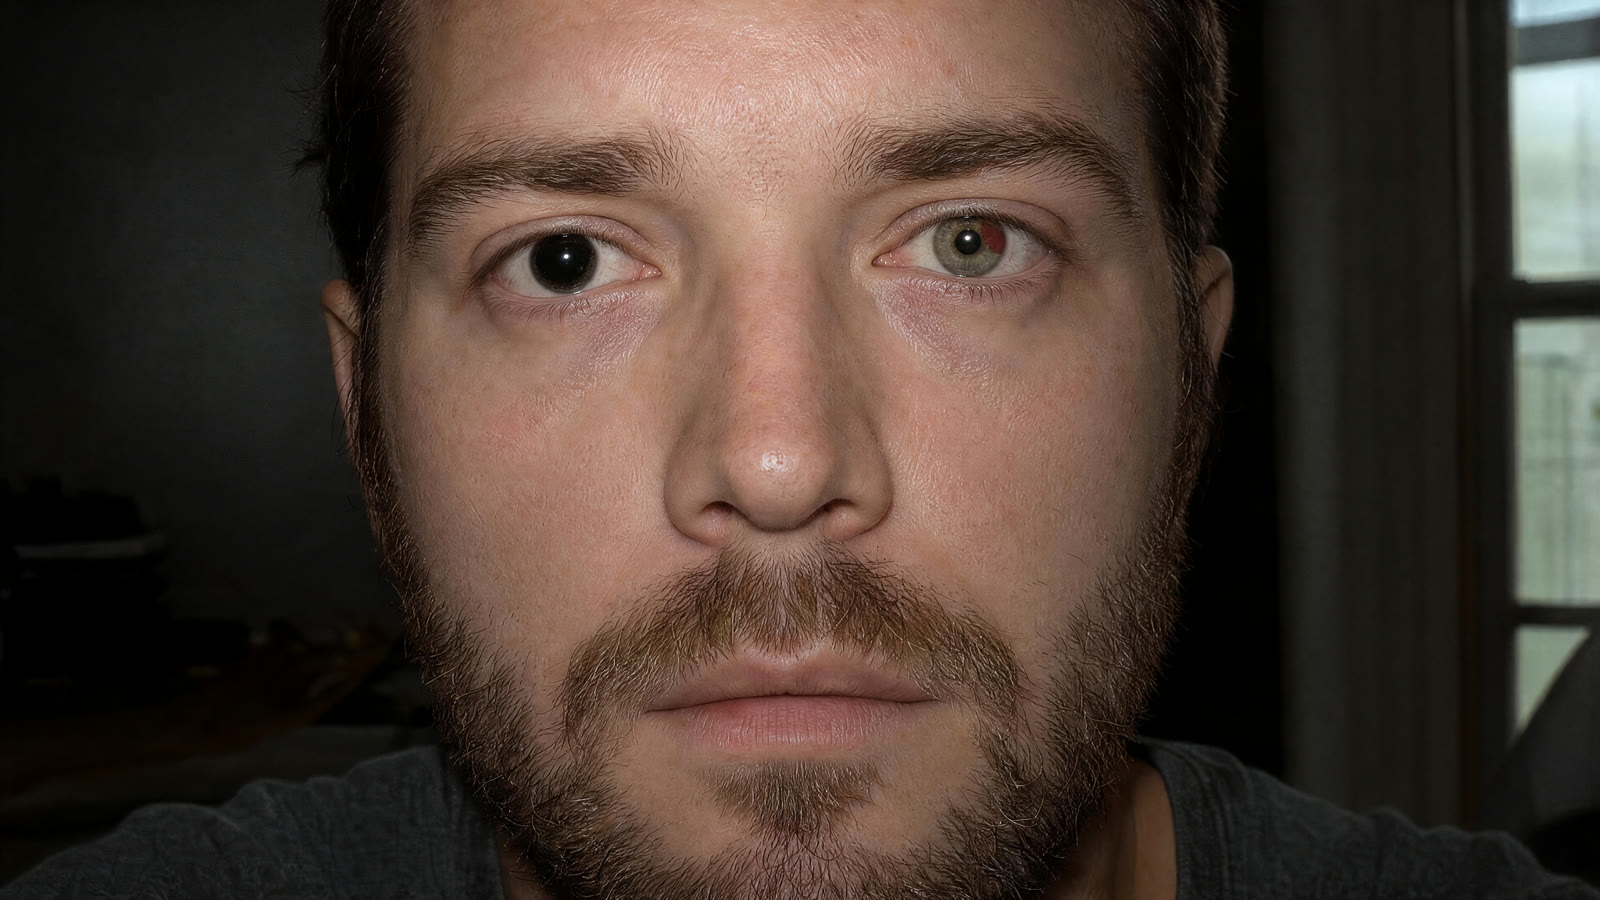
Use this dedicated local correction first for an otherwise good flash portrait. It targets the red pupils, and the pupil-focused workflow has no smile, teeth, or other facial-feature controls. That makes it the sensible starting point when the expression already looks right and all you want to change is the red color.
Keep the correction area tight. If a red pupil remains after Auto, match the Size slider to that remaining red area and click again. Avoid enlarging the circle into the iris just to catch a stubborn edge.
The useful distinction is between unwanted color and unavailable detail. A visible pupil with a red cast gives you something to correct. A pupil hidden behind a glasses reflection or an eyelid does not contain the same usable detail; removing red cannot reveal what was obscured. Likewise, this control is for human red-eye. Animal eyes that flash green or yellow need a different approach.
How do you retouch red pupils manually in GIMP?
In GIMP, select the red pupil areas before opening Filters, Enhance, then Red Eye Removal. Adjust Threshold while watching the pupil boundary. This selection-based approach gives you control over where correction applies. Follow the GIMP red-eye workflow rather than applying the filter across an unselected face.
Zoom in enough to distinguish the red pupil from the surrounding iris. Keep the selection inside the affected pupil, and preserve separate selections for separate eyes. Avoid a broad selection spanning both eyes and the bridge of the nose. The useful control here is the selection boundary: it limits which pixels the filter can change.
The filter replaces red using the selected pixels’ green channel, with a smaller contribution from blue. That makes this a targeted color correction rather than a technique for painting a new pupil. Adjust Threshold gradually while checking how far the correction reaches toward the pupil’s edge.
For a clearly visible red pupil, choose this local workflow when precise control matters more than automatic detection. The extra selection work is worthwhile because you decide exactly where correction applies. If part of the pupil is hidden by a reflection or an eyelid, select only the visible affected area; do not extend the selection into surrounding detail just to make a complete circle.
How do you use the eye fixer without changing the smile?
For the AI route in Eye & Smile Fixer, choose Imagera Dream 5 Pro Edit and request correction of red pupils only, with the smile, mouth, teeth, iris color, catchlights, and other facial features unchanged. We would pick this model over Imagera Image Typeset 3 — Edit based on our comparison, but keep the original available for inspection.
Try Eye & Smile Fixer → Plans start at $19.99; credit packs from 350 credits.
Use the original portrait as the input, select Dream 5 Pro Edit, and give it a tightly scoped edit request:
Correct only the red pupils caused by flash. Preserve the existing pupil boundaries, iris color, catchlights, and eye shape. Leave the smile, mouth, teeth, expression, glasses, skin, hair, and background unchanged. Leave unaffected eyes and people unchanged.
Avoid broad requests such as “improve the face” or “make the eyes look better.” The task is a specific color repair, so spell out both the area to change and the features to preserve. For a group portrait, keep the instruction about unaffected people.
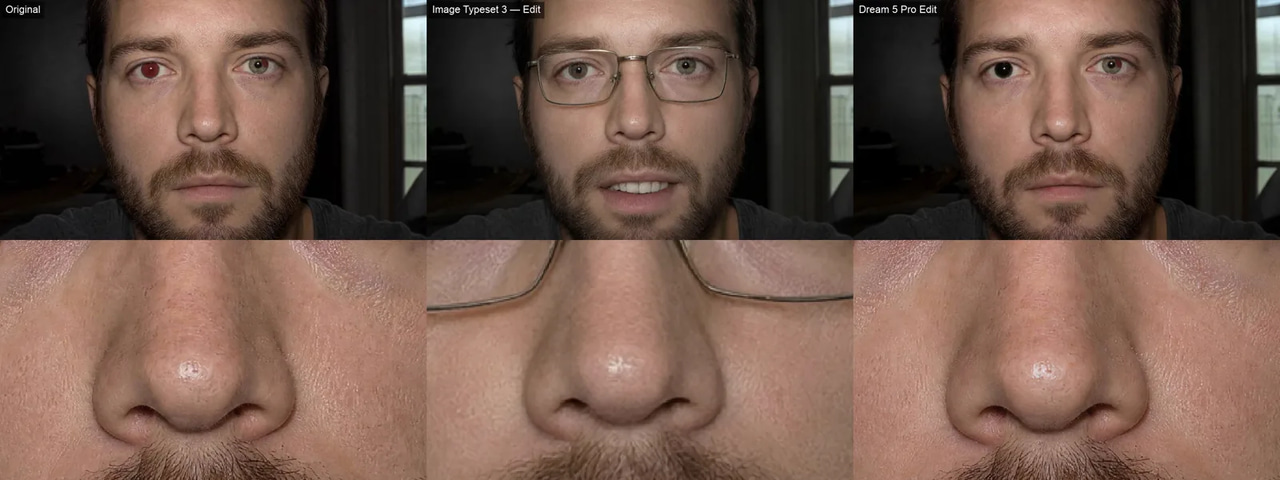
We used Dream 5 Pro Edit for the recommended AI edit in our test and also tested Image Typeset 3 — Edit. The comparison below shows why we prefer the former for this route. Keep its output separate from your working original until you have checked the correction.
How do the AI results compare on groups, glasses, and small eyes?
Dream 5 Pro Edit scored 5.7 out of ten against 4.8 out of ten in our blind AI review, which scored results without knowing the method. Our test used AI-generated images, with no measured conventional-tool or manual-retouching comparison. Conflicting assessments of Dream 5 Pro Edit were flagged and excluded from the findings below.
| Method | Output size | Blind AI review (0-10) | Processing time | Credits |
|---|---|---|---|---|
| Imagera Dream 5 Pro Edit | 2048×1152 | 5.7 | 50 s | 15 |
| Imagera Image Typeset 3 — Edit | 1024×576 | 4.8 | 17 s | 15 |
Between these AI options, we would pick Dream 5 Pro Edit for its higher score and larger output. For a pupil-only repair, the local workflows described earlier remain the better starting point.
Image Typeset 3 — Edit added eyeglasses. Its review also flagged an opened mouth showing teeth, an unacceptable change for an eye-only correction. To repeat the alternate approach, use Image Typeset 3 — Edit with a narrow instruction: “Remove red-eye only. Preserve the smile, mouth, glasses, iris color, catchlights, and all other facial features.” Treat that wording as a request, not a guarantee.
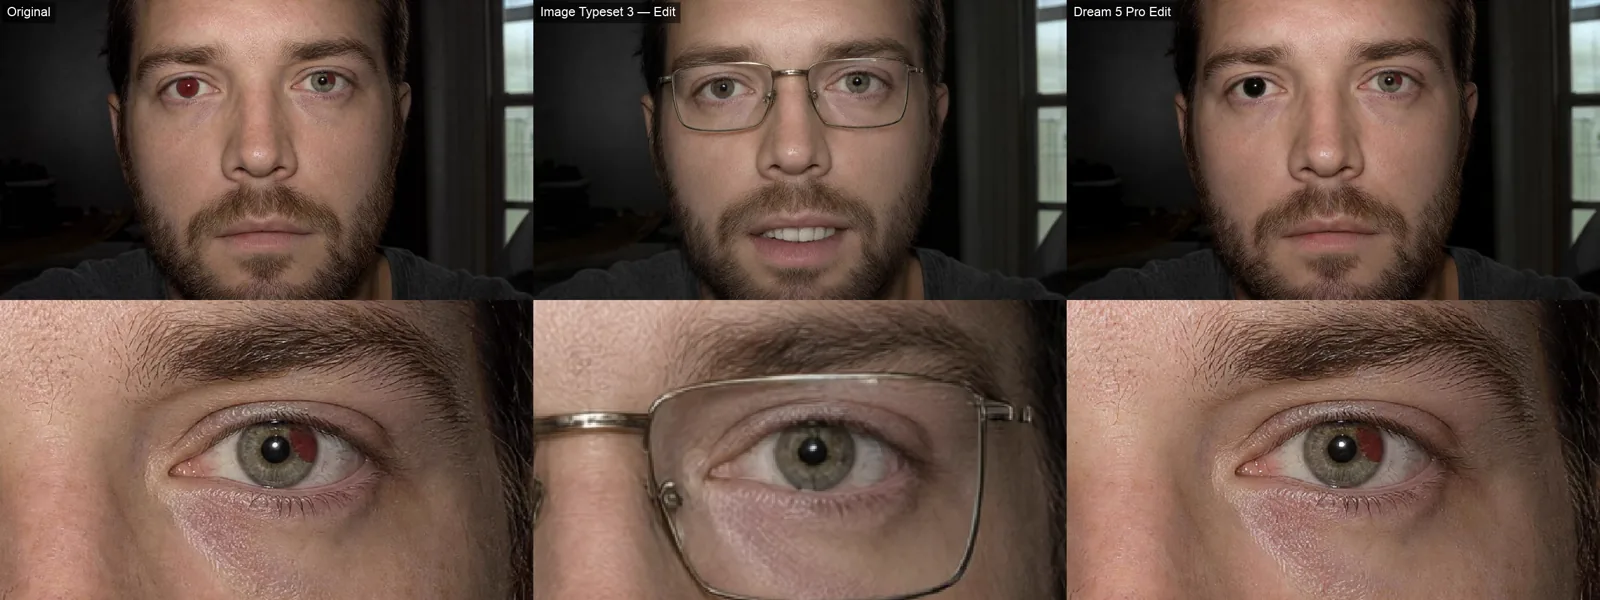
Partial red-eye and natural eye detail: Original · Image Typeset 3 — Edit · Dream 5 Pro Edit. AI-generated test image, made for this test, not a real photo. Bottom row: the same close-up of each, zoomed. Our test, Oct 22, 2026.
Use the partial-red-eye comparison to examine residual red edges, pupil shape, iris color, and visible catchlights. A higher aggregate score cannot excuse a missed pupil or an unnatural dark disk.
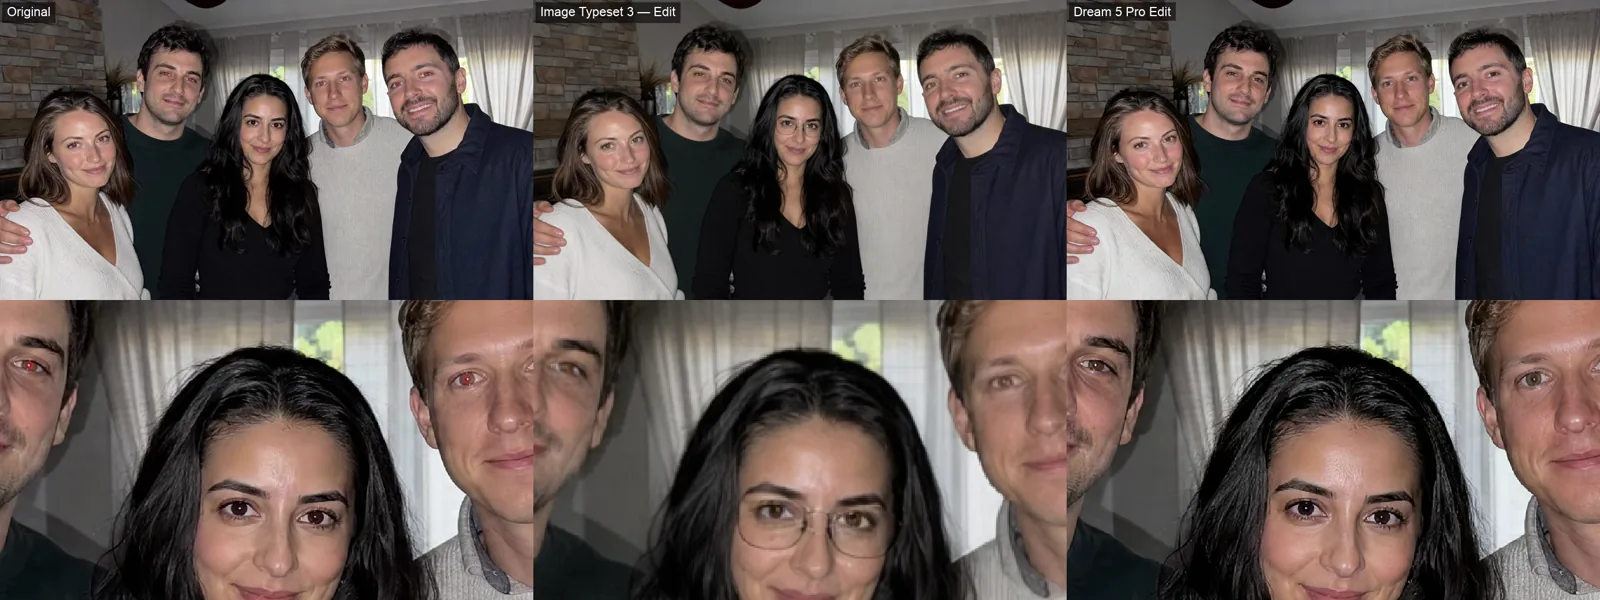
Small eyes and unaffected group members: Original · Image Typeset 3 — Edit · Dream 5 Pro Edit. AI-generated test image, made for this test, not a real photo. Bottom row: the same close-up of each, zoomed. Our test, Oct 22, 2026.
In the group comparison, check the smallest eyes and people who needed no correction. Added glasses show why removing red alone is an insufficient measure of success.
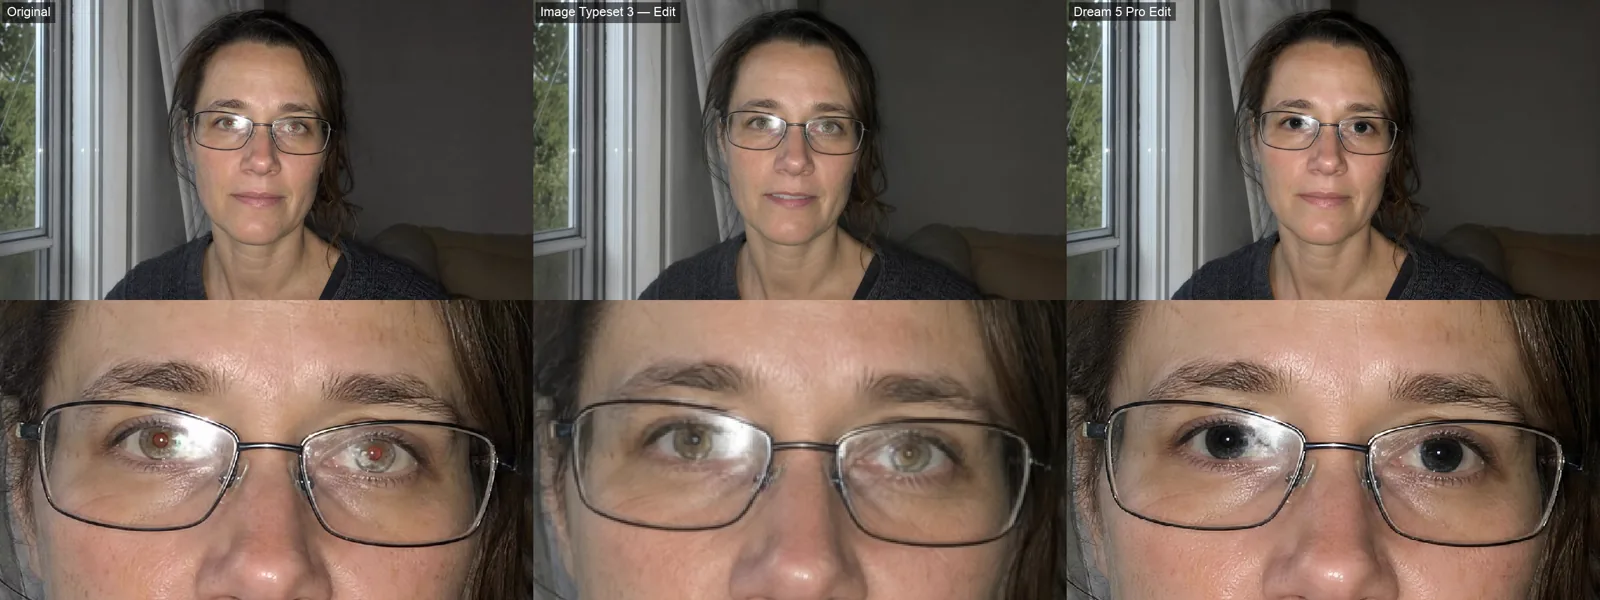
Glasses reflections and obscured pupils: Original · Image Typeset 3 — Edit · Dream 5 Pro Edit. AI-generated test image, made for this test, not a real photo. Bottom row: the same close-up of each, zoomed. Our test, Oct 22, 2026.
For glasses, compare reflections and partly obscured pupils against the original. Dream 5 Pro Edit produced 2048 by 1152 pixels; Image Typeset 3 — Edit produced 1024 by 576 pixels. The smaller output leaves less detail for judging those delicate boundaries at close range.
What if there is a red halo or the eyes look flat?
A remaining red edge calls for a tighter local correction. In Photos, match Size to the remaining red area and click again rather than extending into the iris, following the pupil-size guidance. If the iris darkens or highlights disappear, undo that correction and return to a smaller pupil-only edit.
Treat a red halo and a flattened eye as different problems. The halo still needs a targeted color correction. A darkened iris or missing catchlight means the edit has affected detail you wanted to keep. Making that correction stronger will take you further from a natural result.
For the remaining red, keep the correction area confined to the affected pupil. Resist enlarging it just to catch a thin edge, especially where the pupil meets the iris. Correct each eye separately if the affected areas differ in size.
Avoid painting a uniform dark disk over the pupil. It can hide the red, but it also covers the existing tonal variation and any visible highlight within that area. A pupil should still belong to the eye around it.
For an already overcorrected version, return to the original and start again with a smaller local edit. Trying to rebuild missing highlights or iris detail on top of the damaged version turns a color repair into guesswork. Keep the detail that was there.
How do you inspect and export the corrected photo?
Inspect the original and correction at matching magnification, then check the whole image at its intended viewing size. Export a separate copy at the available corrected dimensions. In Apple Photos, File, Export, then Export Photos offers PNG and TIFF for lossless export, or JPEG with selectable quality for smaller files.
Use the close-up checks above, switching between versions rather than relying on memory. Then scan the rest of the frame for unintended changes, including people who needed no correction. Finally, view the whole portrait at the size you expect readers to see it. Does the correction draw attention to itself?
Keep the original untouched and save a separate corrected master. We would choose PNG or TIFF for that master because lossless export preserves the detail remaining after correction. It cannot recover detail the edit has already removed, and enlarging the export will not restore it.
Make a JPEG delivery copy only when a smaller file is needed. Create each delivery version from the corrected master to avoid repeated resizing and repeated JPEG saves. Before sharing, open the actual exported file and inspect it at its intended viewing size, rather than assuming it matches the editor’s preview.